1974 Coleman Valley Forge - Complete gut job

slepe67

Active member
My dad bought this thing long ago. I figured I'd revive it and use it as a fly fishing setup. I brought out new wheels and tires, installed them, and towed it home.

Then I opened it up for the first time since 2004. Mental note: open camper FIRST, then spend money on rolling stock.

It was a total loss. Mice and water did their damage. Since I knew the frames were halfway decent, and the side walls were aluminum, this thing could be saved, and while Im at it, customized to MY needs.

I love the E1s and Opus. But Im a cheapskate...so here goes...
Its not going to hit "bad" terrain, but the usual Montana gravel roads. Eventually I'll add a bigger axle and tires. Elec brakes, etc.
For now, I'll just get it put back together and go from there.

Day 1. Don military chem mask and rubber gloves and completely gut the interior.
Cabinets are metal, but were a pain to remove without damaging. Just remove the STAPLES that held them to the floor and remove.
The floor was debatable, but since it stunk of mouse urine, it had to go. The good part, Coleman didn't secure the floor to the chassis. it just laid down in 3 chunks.
While still wearing my chem gear, I broke out the bleach bottle mixture and nuked everything in sight. I fired up the pressure washer and cleaned decades of vile filth.

Next step, the Simple Green mixture, followed by another pressure washing.

At this point, Ive got about 4 hrs into this thing, and I realize it's in much better shape than I thought.

Now, what do I do from here?
 

Attachments

  • 20190330_162629.jpg
    20190330_162629.jpg
    1.4 MB · Views: 256
  • 20190331_124658.jpg
    20190331_124658.jpg
    1.8 MB · Views: 250
Last edited:

slepe67

Active member
The smell has improved and I decided to keep it. New canvas is available for about $1,000. My goal is to stay below $1700.
Step 1. Give the inner chassis a quick wire brush, some Krylon primer, and semi-gloss spray paint.

After that, I cleaned and lubed the whiffle-tree, pulleys and cables. The roof raises/lowers flawlessly now.
 

Attachments

  • 20190330_162641.jpg
    20190330_162641.jpg
    1.4 MB · Views: 186
  • 20190402_101155.jpg
    20190402_101155.jpg
    2.9 MB · Views: 196
  • 20190404_115930.jpg
    20190404_115930.jpg
    1.3 MB · Views: 196
  • 20190404_122211.jpg
    20190404_122211.jpg
    1.1 MB · Views: 191
  • 20190404_125208.jpg
    20190404_125208.jpg
    1.3 MB · Views: 185

slepe67

Active member
Day 3. Grabbed 2x sheets of home floor sheathing. I shouldve gone with 3/4" marine-grade ply, but I didn't....
I traced the shapes from the old wood onto the new sheets and cut them out.
I coated the bottom with black basement/foundation sealant, and broke out the cheapo router to make some relief cuts for the plastic wheel wells and the aft cross brace.
These cuts enable the floor to sit flat on the chassis. sorry, forgot to get photos.

I bought some 1-1/4" self-tappers and screwed the floor to the chassis.
The sheathing is the same thickness as the OEM stuff, but I dont like how it flexes.
I was going to lay down linoleum, but since the floor feels spongy, I figured I'd add the cheapo lock-in flooring. [edit: I went with linoleum]

Linoleum laid down nicely via glue and a slightly damp cloth to get the bubble out.

Will screwing the cabinets to the flooring cause any issues?
 

Attachments

  • 20190405_155405.jpg
    20190405_155405.jpg
    1.2 MB · Views: 118
  • 20190411_181118.jpg
    20190411_181118.jpg
    2.5 MB · Views: 122
Last edited:

slepe67

Active member
Day 4. I removed the roof and bought some 1x2s and 3/4" styro insulation.

Page 8 of this thread goes into how to do the ceiling...


I'll build 1x2 cross braces which will keep the roof from sagging AND provide some structure.

Current status: see photo of roof on floor, all cleaned up.

I attached the former carnage for posterity.
 

Attachments

  • 20190411_181214.jpg
    20190411_181214.jpg
    1.3 MB · Views: 106
  • 20190402_101206.jpg
    20190402_101206.jpg
    1.3 MB · Views: 102
  • 20190402_101217.jpg
    20190402_101217.jpg
    1.3 MB · Views: 104
  • 20190402_101301.jpg
    20190402_101301.jpg
    1.2 MB · Views: 99
  • 20190402_101321.jpg
    20190402_101321.jpg
    1.2 MB · Views: 99

slepe67

Active member
After the ceiling is complete, I'll attach it back to the camper and start on the flooring. After that, the luan sidewalls. BEFORE the sidewalls, I need to figure out my electrical needs. I bought an adhesive, dimmable, RGB LED light strip to go on the ceiling, or the ceiling edges. [edit: I might scrap the light strip and install some proper LED Camper lights or pucks]. I will not have Electric heat (Mr Buddy?)

Down the road, I am thinking about adding a couple adapters to charge phones and hook up a 12V refrigerator/freezer. Drinks will go in the Yeti. Should be doable with 2x car batteries, and a 90W or 100W solar suitcase (See page 2)

I have NO clue how Im going to assemble all of this. I do have a 7-pin adapter for our vehicles, so that should help with charging the batteries. [EDIT: this won't work. Will go solar, see bshinn's advice on page 2]

Since I joined a forum, I am definately asking for your help and input. I'd like to keep this bare bones, but user friendly. If YOU were doing my camper, what features would YOU want?
 

Attachments

  • 362_opus_camper_winter_w.png
    362_opus_camper_winter_w.png
    1.1 MB · Views: 146
Last edited:

slepe67

Active member
Ceiling complete. 3/4" styro in ceiling. With 1x2 bracing. 2.7mm luan paneling.

Flipped it over and cleaned/poloshed the aluminum skinned roof. Cut out ceiling hole for vent.

Temporarily placed roof on trailer & laid down linoleum. I need to take to roof back off and paint it while it's upside down (easier).

I plan on cutting the lower side panels next, then wiring/lighting.
 

Attachments

  • 20190411_181214.jpg
    20190411_181214.jpg
    1.3 MB · Views: 80
  • 20190419_135123.jpg
    20190419_135123.jpg
    1 MB · Views: 80
  • 20190419_145815.jpg
    20190419_145815.jpg
    913.7 KB · Views: 89
  • 20190422_171505.jpg
    20190422_171505.jpg
    1.2 MB · Views: 89
  • 20190422_171505.jpg
    20190422_171505.jpg
    1.2 MB · Views: 87
Last edited:

Pacific Northwest yetti

Expedition Medic
great job so far! look forward to seeing this evolve. I agree with flooring down under cabinetry. Sounds like you have a good plan of attack. keeping it Simple and ready for your needs. A buddy heater works fine for heat, make sure you have some windows/vents open as it will put out moisture. But i use them in the winter all the time. The power plug from the tow vehicle can charge the camper battery if all wired to do so. but it is slow, very slow. Just to charge phones, and a small radio you'll probably be alright just upside the battery a little.
 

jays0n

Adventurer
Looks great so far, love seeing these get a new life. As for your power requirements, don't count on the 7-pin from the tow vehicle charging the batteries enough to make much of a difference. It will keep them from losing charge to just sitting but won't charge a half drained battery. If you have 2 deep cycle batteries why not pick up a 100w solar panel and mount it on the roof of the trailer? I got mine from Amazon.com with a basic charge controller, mounting brackets and cables for under $200. I run an ARB 12v refrigerator in my FJ cruiser from a 50w panel mounted on the roof rack and have left it parked with the fridge on for days and the battery was fine. I have the 100w panel from Amazon on my trailer and it has no issue keeping my two batteries charged.

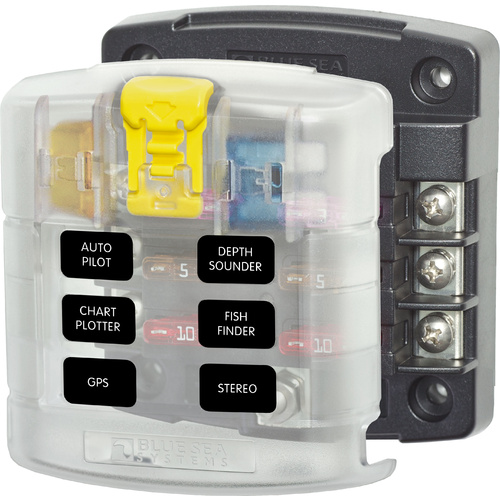
As for hooking up the electric stuff I would use a BlueSea fuse panel like this, you can find them at most marine stores and online and available with 6 or 12 circuits. You can very easily connect your batteries in parallel, run the + to a large fuse or circuit breaker (car audio style are cheap and easy to find) then to a master shutoff switch then both + and - to the fuse panel. At the panel you can wire your USB charge ports, 12v power ports, lighting, water pump, etc all each on their own fuse. Trailers get shaken around a lot and wiring it with fuses for each accessory in an easy to access location will be appreciated in the long run, much easier to troubleshoot when something stops working, which is most likely will at some point. Hopefully this helps a bit, drop me a PM if you have questions, I can probably at least point you in the right direction :)

BSS.5028.jpg
 

jays0n

Adventurer
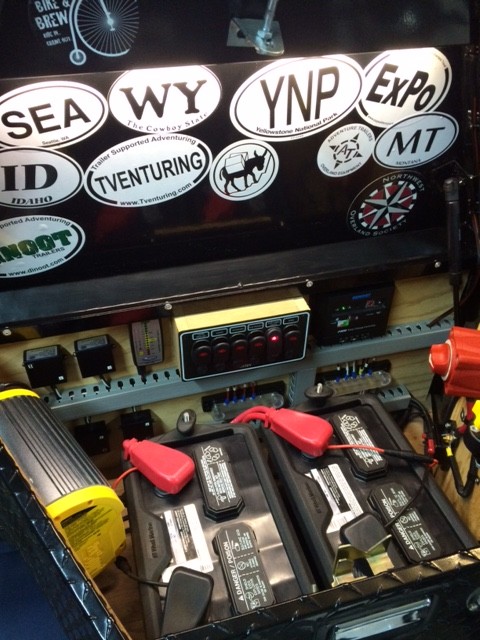
I used something similar that has glass tube fuses instead of circuit breakers and lit switches. You can see it here in the center, what you can't see is the fuse holder under each switch, I adjusted them to be sized appropriately for the accessory it is powering.

nf2Xqb.jpg


The issue I have with breakers is that they come with a specific current rating that can't be changed, usually 15A or 10A from my boating experience. With LED lighting and other things using so little current the light/wiring could be melting before the 15A breaker tripped. If everything is wired correctly you shouldn't need spare fuses :)
 

slepe67

Active member
Thanks everyone for all the info!

The flooring is in, and Im in the process of removing the chinsy factory rivets that are barely holding the cabinets together and replacing them with bolts & nylocks.

I do plan on getting a 100W setup, not sure about dual batteries yet.

I'm in MT and am expecting some crap weather this week, but I hope to get the lower sidewalls cut out and the cabinets spray painted this week. Im comfortable DOING electircal, just not sure how exactly im going to proceed.

Again, thanks for the info. I'll be doing a lot of research in the meantime.
 
Last edited:

Forum statistics

Threads
188,304
Messages
2,905,206
Members
229,959
Latest member
bdpkauai
Top