1996 dodge 3500: Swiss Army knife

ExpoMike

Well-known member
Nice.

That is the one thing I like about the 2000/2001 models. The front axle uses slip on rotors and dual piston calipers with removal mounting brackets. You can bolt on the larger diameter 3rd gen rotors (dual piston calipers are the same) and just change out the mounting brackets. All bolt on for a "big brake kit" using factory parts. You only need to change to 17" wheels to clear the larger setup.
 

DieselDaddy

Member
Nice.

That is the one thing I like about the 2000/2001 models. The front axle uses slip on rotors and dual piston calipers with removal mounting brackets. You can bolt on the larger diameter 3rd gen rotors (dual piston calipers are the same) and just change out the mounting brackets. All bolt on for a "big brake kit" using factory parts. You only need to change to 17" wheels to clear the larger setup.
Yessir. I was more interested in the manual lock out hubs and doing away with the CAD than anything else. This swap is fairly straight forward. I think all in it can be done for 300.00 if you can find the knuckles in a u pull it yard. Everything else I buy new if I can. Just to build back better than stock.
 

DieselDaddy

Member
Today I realized that u spend half my life waiting on parts to arrive. I swear, my doubler kit was excruciating. It took 16 weeks to be delivered, various other parts had two to six weeks lead time. I’m currently waiting on my rear custom leaf springs from Alcan and it’s killing me. They took the funds from my account, which means they are ready to ship but I haven’t received tracking yet. Wait wait wait.
 

DieselDaddy

Member
Just some tweaking and tuning on the front suspension today still waiting on my rear springs I’m gathering the last few parts I need before stripping the truck back down for paint the front fenders and bumper are rattle can desert tan. I was wearing it for a while to see how I liked it I am going to go with a slightly darker custom mixed implement paint and then color match bedliner for the rocker panels and inside of the bed I think, I have a good bit of odds and ends to work on and I need to reorganize the service body but for the most part I am happy with how it’s turned out so far. Took her in this afternoon for an alignment before driving to Kansas for a shakedown run. As soon as my steering stabilizer and rear springs show up I should be ready to go View attachment 832735
 

DieselDaddy

Member
So it was big weekend for UPS. Three packages, two are my custom rear springs, shocks and steering stabilizer. The other is a samlex 1500 power inverter. 73654645726__C7014EF1-3D2E-4DA7-B5A4-C6768C6F9BCD.jpegFunny thing was the wife says, there’s a guy unloading a pallet in the driveway. I said, well that’s my new springs. She sends back a text and says he’s putting it in the storage shed until you get back. So as they say in Wayne’s world. Party on Wayne, party on Garth! I guess I have an afternoon of suspension work again. And hopefully level this pig out. It should also increase comfort as well as the thuren springs did for the front. Which is huge. IMG_1225.jpeg
 

DieselDaddy

Member
Well, today didn’t go as planned. Too much to do at the farm to have enough time to get the new rear springs in. Steering stabilizer is going to take some modification to fit so I went to my little inverter idea.

What I had in my mind was a door on the service bed that would hold a few deep cycle optima batteries, a larger inverter, space for my battery tools and chargers. This would all be linked to the truck to charge, have a few solar panels and be able to use 110 power when I had it to keep everything topped off. Today I got a pretty good start on it. I found this tool organizer at Lowe’s. Seemed like it would just fit. Turned out it was so close that I had to assemble it inside the box. Ha!

I assembled and bolted it in, ran the wiring for my samlex pure sine wave inverter and got it all working. Realized I had only bought 2 blue top optima batteries but it would work for now. I still need to add a charge controller with ac input and a couple solar panels but it’s up and running as is. It should eventually keep all my tool batteries charged, charge my cell phone and of course give a place to plug in any 110v thing that I needed to use for a short period of time. I will eventually add two more optima blue tops to have about 300 amp hours to play with. I know there are better batteries for solar use but the optima is dual purpose. I can pull one and use it to crank my truck. Eventually I want to add a system to jump start my truck from this battery bank. IMG_4605.jpeg
 

DieselDaddy

Member
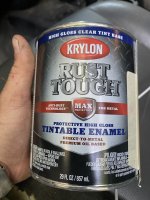
This morning I’m working on some odds and ends that needed finishing. Had to modify the steering stabilizers for the larger crossover steering my truck has. Got that sorted out and finally got the gauges a correct switched 12v instead of the straight 12 they were on. Hooked up the fridge and finally got to install the 8 gang aux beam panel in the cab. That will let me remove a bunch of stupid little switches the previous owner installed to control two light bars. Also for those interested krylon apparently makes a timtwble base enamel at Lowe’s thst you can add any tinted color you like, they can mix it at the paint section. I’m going to try it on my service body and if it comes out well I may shoot the entire truck with it
img_4621-jpeg.834112
IMG_4610.jpeg
 

Attachments

  • IMG_4621.jpeg
    IMG_4621.jpeg
    2.8 MB · Views: 74

DieselDaddy

Member
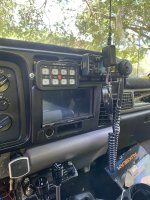
Forgot the picture of the dash. Double din head unit with backup camera, 2m ham radio, 8gng aux head unit. I’m mounting everything but it’s temporary. When I proof out the location for everything I plan to take it all apart and build this side of the dash in fiberglass to recess everything and make it look professional. I’m planning to build a fiberglass and wood add on for my center console as well. I dig the fridge as the console but it has no storage and no cupholder IMG_4622.jpeg
 

DieselDaddy

Member
I have just a few things left to do before she is ready for a good long shakedown run. I’ll add the rear springs and shocks and more bracing for the service body. I’ve been trying to organize the inside of the service body as I go and get things where they need to be. I found a hi loft jack mount I like as well as a mount for the HF off-road jack thst I dearly love. It’s coming together and I’m already starting to squirrel away parts for the upcoming camper build.
 

DieselDaddy

Member
So this sort of followed me home today. I picked up this hard, shell rooftop tent, very inexpensively that was barely used with a slight mold problem on the canvas from where it was not properly aired out after use in the rain. It’s not one of the super high dollar versions and it’s a couple years old, but it does seal up very nicely and it is a hard shell. I mounted it on a couple pieces of unistrut to the service body as a placeholder for now. It needs some attention and mold treatment. It’s very minimal and a spray on treatment should suffice. Eventually it will become the pop up top for my overland trailer that I’m gathering parts for now. For the time being it can ride around with me. Never know, IMG_4634.jpegIMG_4633.jpeg
 

Forum statistics

Threads
188,022
Messages
2,901,260
Members
229,411
Latest member
IvaBru
Top