1998.5 Dodge Ram CTD - Sally

frojoe

Adventurer
Just followed you, already enjoying the posts you have up (even if they are few)!

I'll have some truck updates soon.. it got a bit banged up trying what's realistically a "Jeep trail" section of rocky ravine.. oops!
 

Asha'man

Observer
Thanks, I appreciate it! I looked back through yours and it looks like we both have Fox notches too, so there must be some kind of similarity in taste there!

That doesn't sound fun, hopefully bodywork is minimal. Mine needs paint in an increasingly bad way, but I think I'll wheel it this summer without butt-puckeringly fresh paint and see how that goes before I go crazy with it. I seem to usually paint in the fall anyway, so I'm okay with that.
 

KSM garage

New member
I've been following along for years and i love the build. those engine blankets to keep the noise down are a great idea. ive never heard of them before but now i want them for my 98. I've been working on my 98 for the last year getting it back on the road after sitting for 5 years and every time i drive it i wish it was as quite as my 06 cummins. although its broken again right now the last thing i did was rebuild the axles and regear and it made a huge difference with the 37s. keep up the great work.
 

frojoe

Adventurer
Thanks guys! No shortage of projects and progress on this 'ol rig. Had a nice daytrip at the end of February to a place I've been to a number of times before.. the west side of Harrison Lake here in BC, first hitting the 10 Mile Bay beach and then the very popular Hale Creek beach. There are a few fun side trails around, but it's mostly pretty straightforward with small to medium-sized rocks that can be navigated over or around.

L1oAAvJ.jpg


jDrk6sD.jpg


gkKBVQe.jpg


DVtzWfV.jpg


YBVXH68.jpg


52vw4uW.jpg


OqopF8d.jpg


9fdQCWu.jpg


ZVSy5zE.jpg


iYWjkcr.jpg
 

frojoe

Adventurer
8UodWys.jpg


mFfCyff.jpg


ZVC1Ui3.jpg


The only actual challenging area was a short trail called "Fossil" that decends down to a lesser-used beach, and you have to turn around and head back up it to get out.

It's somewhat steep, but with a few tight points and a number of 12"-36" rocks that either move from under you and you shift sideways, or don't move at all and you dent something. We watched a group of rookie SXS'ers absolutely struggling with speed and 'liquid courage' trying to get back up it.. took them about 10mins to navigate over some of the rocks.

I then watched my buddy's 2nd gen (which I welded the sliders on) slowly crawl around everything without issue, only lightly tapping a big rock.. but he is also re-geared to 5.19:1 and is fully locked front+rear.

This of course made me think I could do it, and without the extra width of the sliders, I thought I could sneak around the biggest immovable rock obstacle mid-climb. Well, I didn't clear it, but managed to bump around it after about 15mins of struggling to hold a line (with my current open-diff front axle)...

KoGC3n0.jpg


A2qn8c1.jpg


3F4zMZi.jpg


5boyUuA.jpg


JY6KyP4.jpg
 

frojoe

Adventurer
Getting back to that second front axle build... I STRUGGLED with these lower ball joints.. my Made in USA OTC ball joint press has always worked for me.. but it was just stalling out and actually flexing trying to push these original lower ball joints out. Heat, penetrating lube, hammer strikes.. nothing helped... so I had to cut the flanges off, and press them out in the other direction (in the 'installation' direction)....

XmW00af.jpg


OsXpSB3.jpg


njJaDfI.jpg


ZaVVIP0.jpg


6bVYsvb.jpg


KitPkQ0.jpg


x26qZee.jpg


4snYcfz.jpg


And then.. the reason I got this axle for so cheap... "the pinion bearing seized".....

wnleDSH.jpg


7467xg2.jpg


I1STZeB.jpg
 

frojoe

Adventurer
And some shiny new parts... I'll post a full build list later, once the Dana 60 assembly is complete and it's a done thing, but here is the Yukon 35-spline Ziplocker and Yukon cast iron front cover I want to use (I plan to redo my track bar frame-side bracket to increase track bar to cover clearance).

lFaYqzv.jpg


ubMsOmd.jpg


gNxwUS0.jpg


I also got matching rear axles, so that the front+rear both have 35-spline 4340 Yukon axles. The awesome thing is that since my truck has a Dana 80 in the rear, these 36.5"-long 35-spline axles just slip right in. That way, I can use the good-condition OEM Dana Spicer axles as spares for either myself or my 2nd gen buddy (also running the same 35-spline 4340 Yukon rear axles).

yaiOldy.jpg


mwkn3Yi.jpg


7zPVL9z.jpg


Mz7m1Rb.jpg


X811WfR.jpg


And the OEM axles cleaned, greased, bagged & tagged, ready to go in a toolbox for a long offroad trip...

PbFFyPC.jpg


And just to round out the updates for today... the 'ol girl as she sits as my daily driver....

j5RORPY.jpg
 

frojoe

Adventurer
Oh boy, lots to update on... so here we go.

First off, longer control arms to get rid of the fender pinch seam tire rub I get at maybe 15-20 degrees of steering angle, with the big outer diameter of new Nitto 37"x12.5" Trail Grapplers. These arms are +1.25" longer over factory, and my current arms on the truck are +3/4" longer than factory.

I opted for rectangular tubing for simplicity, somewhat cost, but also ease of availablilty (versus DOM tubing) and ability to get the clocking of the orientations right when mitering the ends for the pivot housings.

For pivots, I had been wanting to use the you-weld-it Thuren spherical polyurethane joint assemblies (planning ahead a long time ago, I had ordered 8 pivot assemblies back at the beginning of 2020), but after wanting to also use them on the rear 4-link of my Foxbody build, and for simplicity, I decided to only use the Thuren joints on the ariticulating (axle) side, and use standard polyurethane joints on the frame side, which I sourced from TMR Customs up here in Canada.

I went for 2.5" x 1.5" x 3/16" wall on the lowers. I really wanted it to be 1.5" x 2.0" x 1/4", but our local metal place was out of stock at the time. This gave me the opportunity to let the over-height tube hang down a bit below the rear pivot housing, and then I could notch and wrap it around for a bit more weld length. I'm prettymuch building these lower control arms as rock sliders, because they will find rocks.

The upper arms are smaller, since they won't see any impacts, as well as bent for tire clearance. They are 1.5" square, 1/4" wall, and bent 10 degree total to gain about 3/4" of clearance at the 37" tire tread, compared to straight 1.5" tube. I then gusseted them inside and out with 3/16" plate.. just because... I'm here, so why not.

Zd7V5be.jpg


sGzhgW9.jpg


fCfB7LF.jpg


I4f5WKC.jpg


9tF0B6U.jpg


8pHLi2g.jpg


3ngHif6.jpg


Z9X0RnW.jpg


iZNT4LK.jpg


Q0SO0zd.jpg


QCX7JGF.jpg
 

frojoe

Adventurer
And the lower arms...

mGmis0U.jpg


NbSQYBe.jpg


zdTYIpq.jpg


vcbHgOq.jpg


4bfKx58.jpg


HbVZmbd.jpg


MvRdC6d.jpg


XTspQyR.jpg


u6s0shl.jpg


These all were heavily chamfered before welding, then had a root pass and a final pass, to ensure the entire tube wall thickness was fully welded to. I'm confident these will "be good enough" haha...

lCwFZbf.jpg


UISJDP1.jpg


B5Nkcmj.jpg
 

frojoe

Adventurer
And here are the arms with a spraybomb satin black, and some pivot bushing assembly...

6vsjH4H.jpg


gtSu7fN.jpg


gM5o5zz.jpg


These Thuren joints have a machined stainless center section "pivot ball", that is then captured by conical poly bushing halves, then stainless washers, and finally held in place by an internal snap ring on either side.

I found it easiest to load up each housing with "one side" of the pivot.. so snap ring, then stainless washer, then poly bushing cup.. then you only need to compress the other side into it with the vise in order to install the final snap ring...

vPuYvIF.jpg


INmBuFi.jpg


VkG61tb.jpg


o0Navny.jpg


TJj2uim.jpg


PnjqYf5.jpg


8YKyk1e.jpg


m1cmVSh.jpg
 

frojoe

Adventurer
The custom front coils that I had made up a handful of years ago just never really sat correctly in the Dana 60 coil buckets, they are crooked, and would give the coil a bit of a bow along its length. The coil company claimed they only needed the desired spring rate (which they nailed) and the free length (they also nailed), and they'd figure out the rest to make them "drop right in".. well the spring ended up being the same ID on the top and bottom ends, which fits the upper pocket in the fender nicely, but was maybe 3/8" too small on the ID to nestle in the axle-side coil bucket.

Due to this, and wanting to keep these coils since they work really nicely, as well as not knowing "what the future holds" in terms of suspension/travel/droop.. I wanted to fabricate better coil buckets that would actually fit the coils correctly... since this second axle is easy to work on while inside my garage.

N9OcsGF.jpg


ZqCnou7.jpg


I sourced some 5" OD 1/8" wall tube, and had the machinist at our CNC out some plate 'donuts' to work as the new coil bucket bottoms...

CgWJIt0.jpg


hTDKgz4.jpg


naTxXPm.jpg


rNL7Sqt.jpg


GmtwyJb.jpg


CtFecWK.jpg


b9xWNBu.jpg


qnOGjlh.jpg


cIHhwe1.jpg


6Fbihh9.jpg
 

frojoe

Adventurer
Another "while I'm here" thing I wanted to do, was beef up the track bar mounting bracket on the axle. I've seen guys completely cut it off, and weld on 3/8" plate or the like, but that seemed a bit excessive. With the heim-heim 1.5" x 3/8" wall track bar I currently have, I don't really experience any 'flex' or other wander that I can imagine coming from the axle-side track bar bracket flexing.. but what the heck, might as well make it a bit stronger while I'm here.

I opted to keep the factory stamped bracketry in place, since the plate and welds aren't cracked, and just welded a 1/8"-thick 'cap' onto it, to stiffen it up a bit..

I wanted a big-radius on the bent edge, and didn't have plate bend enough in the garage to bend, so I found some 1/8" thick square tubing with a nice radius on it, and harvested a section from that...

yZ7TOiv.jpg


jTfSTkI.jpg


47YNwMH.jpg


mHctNp7.jpg


JItV4xS.jpg


e3Vp4Zw.jpg


bxD0UAG.jpg


Once enough welds were on it to hold it in place, I hammered the bottom tabs around the bottom edges, to really wrap it around the factory bracket...

p8gkegw.jpg


Ja2pPF0.jpg


And here it is (without the hole drilled out yet), in fully-welded form. I'll drill a pilot hole thru it, then hod out the hole to the original factory 14mm hole size using a 1/4" end mill in the Milwaukee M12 die grinder...

CfedMLQ.jpg


koe66Ar.jpg
 

frojoe

Adventurer
And now we can finally get to some of the fun axle build stuff!

The reason for this axle build (and the screwery I knew would almost certainly be involved) was that I wanted to put a locker in it, and while I'm buying a new carrier, might as well upsize things to 35 spline while I'm at it.

The CAD-delete Yukon 35 spline 4340 chromoly axle kit was the one I wanted to use, since I helped install it in a buddy's 1996 2500, and I liked almost everything about it. BUT.. the kit lists as for 1994-1999 applications only... hmm.. I wonder why.

By scrounging Pirate4x4, Rock Auto and Summit Racing part description details, and aftermarket axle company websites.. the only difference I could see between a 1994-1999 Dana 60 and a 2000-2002 Dana 60, was that the rotor moved from behind the WMS to slip-on to the WMS.. and this changed the stub shaft length from 7.05" ('94-'99) to 7.34" ('00-'02). Tape measuring the new 2000 axle housing and the 1998 Dana 60 currently on the truck, the axle end C's appeared to be the same width.. so it seemed that the Yukon axle shafts should physically fit any 2nd gen Dana 60 from 1994 to 2002.

Oh well, I already had the parts.. so might as well start measuring and mocking them up...

32HMDWm.jpg


92ZFWSE.jpg


7QuScbM.jpg


NkLvHQ9.jpg


IX182vI.jpg


On the driver's side, the ground-smooth seal surface on the axle lined up with the factory seal location, with load of room to spare...

IlWfi8V.jpg


J4K33us.jpg


mTW795E.jpg


Uh oh.. what's that.... a smooth axle tube... with no seal seat?

fb3wO3t.jpg


xiAODWv.jpg
 

frojoe

Adventurer
When you delete the CAD on a Dodge Dana 60, you remove the sealing surface on the outer passenger axle shaft (since gear oil is no longer required to travel down the passenger axle tube to get to the CAD actuator and splined collar).

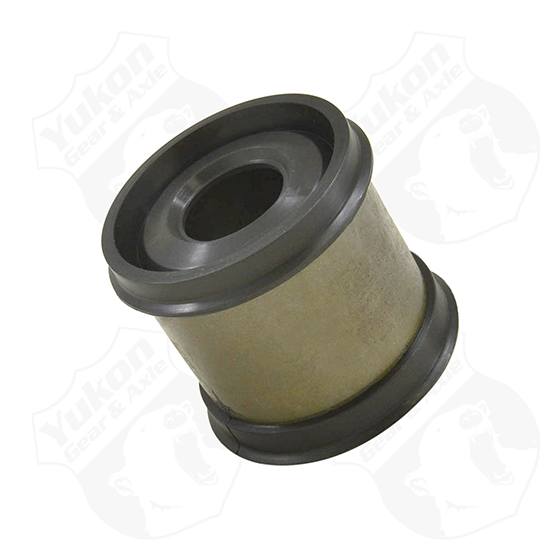
Because of this, Yukon supplies their CAD-delete axle with a nicely ground sealing surface.. right at the splines, next to the carrier bearing. Normally, no problem... Yukon also includes these beefy two-lips seal cartridges, that you're supposed to press+RTV into the axle tubes, right at the inboard ends. We did this on my friend's 1996 Dana 60 with zero issue, the Yukon seals lightly pressed into the axle tubes, and were held in place by loads of RTV.

YMSM1001.jpg


On my 2000 axle, the tube ID is significantly larger... there was a good 1/4"+ gap all around the outside of these Yukon-supplied axle seals.. way too much to just be held in place by RTV. I don't fully remember what the inside of my friend's 1996 axle tubes looked like... it's possible that the axle tube was bored smaller on the early 2nd gens, or some portion of the casting was left unbored at the inboard end of the axle tube.. all I know is that these seals were way too sloppy to fit properly in my 2000.

I imagine the larger tube ID is a result of my 2000 axle coming factory with 32 spline axles, whereas my 1998.5 Dana 60, and my friend's 1996 came with only 30-spline axles from the factory.. maybe this spline count increase from the factory made them bore the tube ID out a bunch more, and the already-produced Yukon seal didn't fit, so Yukon decided to not make a second seal in order to create a 2000-2002 CAD-delete kit.

So.. I had to make a seal fit on the passenger side!

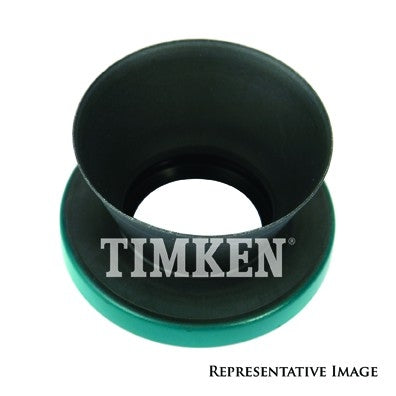
On the driver side, the factory seal (SKF 14694, or Timken 710566) is meant for a shaft OD of 37.34mm and has a free lip ID of ~35.94. So for the factory 32-spline axles, the lips is 'preloaded' about 0.75mm radially. Plus, it has a really sweet stamped steel 'funnel' cone shape, to direct the axle into the middle without the risk of ham-fistedly jabbing the seal and damaging it upon axle installation.

TM_710566_Ang.jpg


My new Yukon axles are 38.12mm OD at the ground sealing section, so that same seal on the Yukon shaft will be preloaded about 1.1mm radially. I put a used and a new seal on a Yukon shaft, it fit happily, had plenty of flex in the seal left to deflect, and overall felt good.. so I decided to make that same seal fit on the passenger side.

First.. I needed to figure out a way to create a seal seat inside the passenger tube. Really the only clean way to do it, was locate some cutting bit to the passenger axle tube ID, since that tube was really nicely machined inside, then start machining the face down to create a counter-bore.

The seal OD is meant for a tight pressfit to a ~74.10mm bore, but I could only source a 3" (76.2mm) cutting bit.. so I would have to machine a 3"-ID bore about 3/8" deep into the end of the axle tube, then make a thin steel sleeve to press into that, to adapt down to an ID that the seal would happily pressfit into. Fun!

I couldn't find any 3" solid bar to machine down to a "guide slug" that would slip-fit into the axle tube, so the next closest thing was two 2.5"-OD steel chunks, with precision-reamed bores, pressed into a thin-wall 3" aluminum tube, that a 1" precision-ground rod would slip through. I'll let the pics speak for themselves...

kspqir8.jpg


Tight fit! Possibly as little as 0.001" clearance in diameter.. the shaft should hopefully not have play and chatter....

Jf6mB9w.jpg


SHlVgjz.jpg


Threads in the end of the rod for two reasons... 1) to use a bolt to clamp everything tight, and 2) to have a hex to then drive, with an impact (or drill) and extensions....

zwrUSef.jpg


The assembly is starting to take shape...

u9KP7c0.jpg


Of course if I'm driving the shaft via a tight hex bolt, then the shaft needs to drive the cutter, or else the cutter is just going to freely spin on the shaft. Guess I need to cut a keyway... it never ends!!....

nDE0EV9.jpg


xqqv9ZN.jpg


mlUBYy8.jpg


Welded a slug onto the shaft, and then squared the opposite mating face up on the lathe, for the cutter to bottom out against on the shaft...

vBNVkLB.jpg


Oc1HHJW.jpg


TRUU5eS.jpg


Y2gXRjQ.jpg


bA1cxjS.jpg


0GKcp6z.jpg
 

Forum statistics

Threads
186,924
Messages
2,889,296
Members
227,524
Latest member
Maynerd Mowat
Top