1998.5 Dodge Ram CTD - Sally

frojoe

Adventurer
Then assembly of the guide-bushing and cutting bit, into the passenger axle tube...

SS2iXuF.jpg


qeOaDRa.jpg


4w7ZekE.jpg


B6xyc7q.jpg


1iqZKaO.jpg


2VMqDPE.jpg


bPzsFKU.jpg


3iX9l82.jpg


CzqdAp0.jpg


First cuts look to be successful, with minimum chatter or jankiness...

HORMQ17.jpg


Took probably 1.5hrs total, with all the breaks to cool the impact down, remove chips, and lube up the cutter.. but I got the seal seat cut just shy of 3/8" deep...

1bXsRbk.jpg


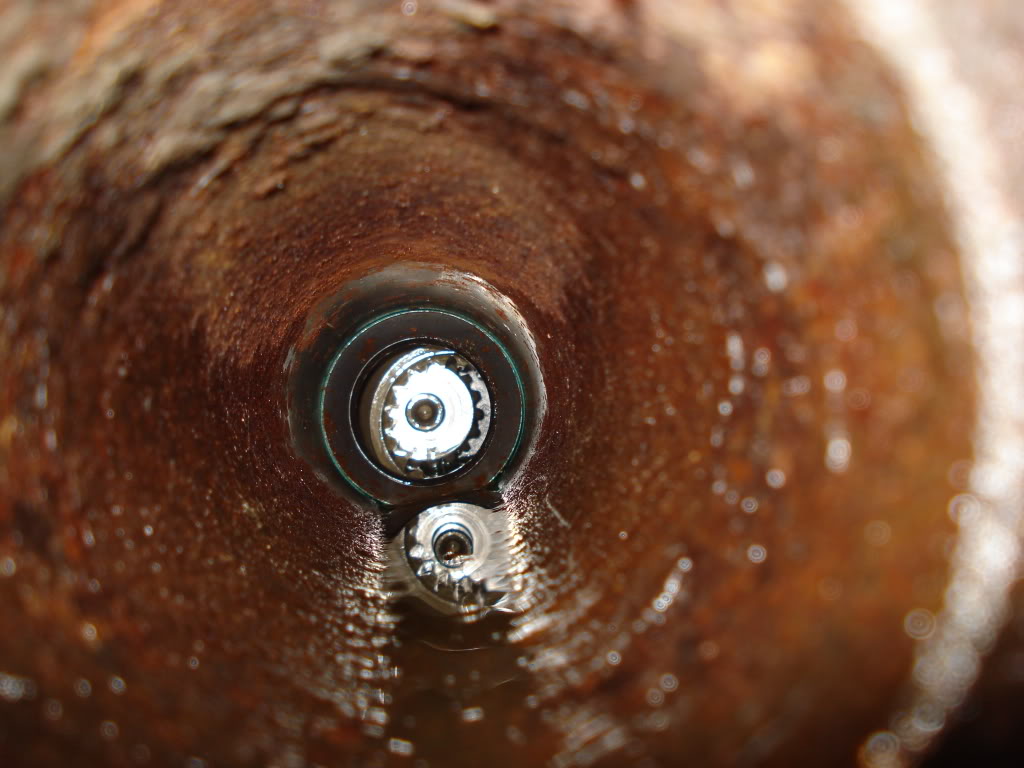
And here is the old driver side seal, to test fit in...

dbwZNlz.jpg


oEPmldc.jpg


Just about flush with the axle tube end, so that's plenty deep enough!

smpsLPB.jpg


And here you can see the gap between the seal and the bore. As cut with this roughing undercut mill, the bore ID ended up at 76.86mm (~3-1/32")...

qLttWOM.jpg
 

frojoe

Adventurer
And this process is case-in-point of the fact that: no matter how much fabrication/machining experience you get, you always overlook something and can learn.

I thought that using an easy-to-source cutter size (in fact this one was free.. it was at work) of 3.0", I'd be ahead since I wouldn't need to source a more obscure size like 2-7/8" or so, and I would still have an adapter sleeve thickness of at least 1mm which would be fine.

Well it slipped my mind that... of course this is a semi-janky home machining operation using a bit that has no flute and no means of properly self-centering.... of course the 3" bit was going to cut oversized. And both at home and work, I had plenty of 3"-OD tube stock to choose to make the adapter sleeve from. But I didn't want to go all the way to the metal store, just to find 3.5" thick-wall tube, or solid bar, just to then have to hog it down again to the thin dimensions I need for this sleeve adapter.

So, you make do with what you have. And that was a 3" wide chunk of 1" plate, and some "rough cutting" holesaws.....

qsnO8sh.jpg


2N4XuUT.jpg


0D0BKsw.jpg


bgeSBox.jpg


IHcWTbx.jpg


4oQgOFE.jpg


And after some unexpected screwery.. we have a thin-wall steel adapter sleeve, pressed into the over-3" bore, ready to receive a factory-application axle shaft seal....

X1CVwnA.jpg


M1bjZM8.jpg


d0WV4oj.jpg


And the same seal, pressed into where it belongs.. on the driver side...

mZxIkZ9.jpg


Aaaaaand copious RTV included, both at the end of the axle tube to the housing, and the seal at the adapter sleeve... just to make sure it's minty going forward...

1TUhTwB.jpg


UYb5oPJ.jpg
 

KARALE

New member
top notch as always!!!

Not sure if you considered, but EMS Offroad has specific 00-02 ram dana60 Cad delete kit

I've got their 94-99 version , fit and finish is great
 

frojoe

Adventurer
top notch as always!!!

Not sure if you considered, but EMS Offroad has specific 00-02 ram dana60 Cad delete kit

I've got their 94-99 version , fit and finish is great

Interesting, and great to know! I hadn't even heard of EMS.. but looks like they turned aluminum housings to adapt down to a smaller available seal. I also like how this turned seal housing allows them to add a bit of a cone funnel to the outer sides, to provide some alignment like the factory driver side seal that I used. From the limited info and picture.. it almost looks like they adapted down to a Yukon double-lip seal!
 

KARALE

New member
Interesting, and great to know! I hadn't even heard of EMS.. but looks like they turned aluminum housings to adapt down to a smaller available seal. I also like how this turned seal housing allows them to add a bit of a cone funnel to the outer sides, to provide some alignment like the factory driver side seal that I used. From the limited info and picture.. it almost looks like they adapted down to a Yukon double-lip seal!
dont quote me but if i remember correctly EMS were one of very first to come up with CAD deletes for rams, that is why they only once who seems to have 00-02 cad delete option
 

frojoe

Adventurer
Alright, let's get back into the updates.

So I assembled the axles into the front diff housing. As a reminder, the axles are beefy 35 spline 4340, however the only stub shafts that I could find for this 2000-2002 axle design which also use the factory 30-spline unit bearings, were these US Gear (Yukon sister company) 1541H stubs. Along with Spicer SPL55-X (aka 1480) u-joints.. this should be sufficient.

9h6wtvh.jpg


RiwuZhC.jpg


kAPR62M.jpg


The driver side seal lands perfectly on the axle shaft seal surface, as expected...

WQlgMzB.jpg


gO7oQ8l.jpg


And the long passenger side...

EubWGMd.jpg


I purposefully left the factory axle seal in the middle of the passenger axle tube (outboard of the CAD shifter assembly), since it was bigger than the raw OD of this Yukon axle. This seal also has that neat steel alignment cone integrated into it, which means that I can use that cone at the halfway point to support the axle shaft, as I'm installing it, so I'm not just forcing the splined end of the shaft all the way through crud etc until it catches the alignment cone at the seal next to the center section.

94272d1501392437-dana-60-seal-dsc00959.jpg


And this is what the axle shaft looks like once the splined end has hit that existing axle shaft alignment cone...

IaviLaK.jpg


Nice and centered, not resting on the inner wall of the dirty axle tube and dragging crud inboard to the inner seal....

2AeqlGq.jpg


E9UBzyk.jpg


And the passenger axle, lining up perfectly with the seal as well!

E9UBzyk.jpg


ORlYmFQ.jpg
 

frojoe

Adventurer
And the final assembly step was to drill holes in the center section casting for the air locker supply line and the relocated vent lone.. yikes!

Found an area in the middle, that looked like it would have enough clearance to the locker body for a generous air line loop...

9ZBsrj6.jpg


xlvsWFZ.jpg


8fNQcdq.jpg


XzqOdb6.jpg


UwhKRDT.jpg


Left lots of extra air line length inside the center section, in case it is needed for future bulkhead fitting repair or whatnot...

ucGtr52.jpg


vLbyfhR.jpg


And my ghetto pressure testing setup. The truck was parked too far away, and my small shop compressor decided it wanted to lock up the regulator and not flow any air.. so had to get crafty with the old truck OBA compressor. But... the LOCKER WORKED!!!!

PvPXnjH.jpg


gBHFr0e.jpg


8iineiA.jpg


RYXhX5E.jpg


LPp9X8V.jpg


G5oLOvW.jpg
 

frojoe

Adventurer
The final assembly step before the axle was ready to go into the truck, was the Yukon diff cover, and steering tie rod fit/function testing, installation, and toe alignment while it's easy in the garage.

yiP4bkM.jpg


OsB4Wcn.jpg


wcelRDM.jpg


7D2FYqB.jpg


DZ7QlRI.jpg


A nice surprise is... unlike my old 1998 Dana 60 knuckles which required me to ream the tie rod end tapers in knuckles bigger to accept the 'updated 3rd gen T-link style' steering... this 2000-2002 axle's knuckles fit the bigger/updated steering tie rod ends already!

j59HGkj.jpg
1fKaMdB.jpg


And checking tie rod clearance to this new, beefier cast iron Yukon front cover...

PbSfnNU.jpg


QlYGx8L.jpg


nXgBwl5.jpg


Close! But if it fits, it ships..... this will just be something to keep an eye on if I have any "front end contact" between a rock and the tie rod.....

jZN6G92.jpg


And a quick but accurate toe adjustment to get it to 0.0* toe, using some straight metal and a tape measure...

411VoE7.jpg
 

frojoe

Adventurer
And install time! It took a buddy and I about 4 hours to swap the front axle.. not too much screwery.. but I did totally mind-fart the fact that I set the new arms/axle up to use 9/16" upper and 5/8" lower grade 8 hardware.. and the frame side was still using factory 12mm/14mm (?) hardware. So that was interesting trying to find and successfully use 9/16" and 5/8" drill bits... didn't even have to open the holes up using an die grinder!

And I also found out that the 3rd gen two-piston calipers use a M10x1.0 banjo bolt thread, whereas my 1998 single-piston calipers use a M10x1.25 thread banjo bolt. That consumed a bit of time combing his shop at 8pm trying to find two banjo bolts in order to [safely] drive it home afterwards...

DlYKOGM.jpg


fbFDJb9.jpg


0xoWPYy.jpg


aFJ5brf.jpg


XLnr6qB.jpg


QYPDnId.jpg


p3SnB6s.jpg


I always forget how much droop and flex I can get out of this truck.. it is pretty satisfying to see considering it's essentially "stock style" suspension and not too crazy with way longer 4-link/3-link, heim joints, and coilovers....

Cr4lUj3.jpg


G0KBySp.jpg


YbrPaXR.jpg


And at ride height, with my design of control arms that push the axle +1.25" forward from factory...

ki8HwcW.jpg


z0uyMh9.jpg
 

frojoe

Adventurer
And here it is on the ground.. man is it rewarding to see ALL of this clearance to a still-fresh 37" tire....

oTWQW2Y.jpg


Knr82fr.jpg


Vkm2S9C.jpg


AXDQSH2.jpg


Z80X4LS.jpg


cD4BuRi.jpg


xhMeOBN.jpg


Interesting thing to learn is that the tires now rub the lower control arms.. was not expecting that. My tires previously rubbed the upper control arms HARD which didn't allow the tire to touch the lower control arm.. so now I get a bit more steering angle.

LOSc26H.jpg


lW00Yqd.jpg


iaCljO6.jpg
 

frojoe

Adventurer
I guess if you make your own problems, then it's all okay? I wasn't sure exactly how smoothly the +1.25" axle move would be, relative to all the other stuff happening on the front end, especially at my lower ~1.5" front lift... but something was bound to hit.

With the axle roughly centered, of course the factory coil bucket on the driver side was now getting really close to, if not hitting, the DOR track bar bracket...

nHy8ZyD.jpg


TZwf5td.jpg


RwpSqOI.jpg


And then I noticed that prettymuch over any bump whatsoever, I got a pretty aggressive BANG, which turns out is the Z-bend track bar that I made, hitting the Yukon diff cover...

TzxObyd.jpg


bC7a42N.jpg


b9T6BXC.jpg


Of course, I suspected that the track bar as mounted using the DOR bracket was not going to play nicely with the new axle location in addition to the chunkier diff cover, so I preemptively ordered Thuren's new 2nd gen track bar mount bracket in hopes that would solve any fitment issues that might inevitably pop up....

byaSaZM.jpg


KfJ1i7H.jpg


YZlCZRk.jpg


WKHLCdK.jpg


I installed the Thuren track bar bracket (holy crap... it's pretty) and then mounted the track bar with the Z-bend oriented vertically, in hopes that the bend would give the diff cover any last additional clearance that it might need.

q8V6Txp.jpg


56oAJQI.jpg


9Aw9HZn.jpg


I also slammed the track bar heim all the way forward in the Thuren bracket, in hopes that it would give the most possible diff cover clearance.. but it ended up rubbing the bracket pretty badly...

So09XqP.jpg
''

And.. still hits! Not nearly as bad as before.. but if you hit a speedbump with some speed, or any type of repeating potholes mid-cornering with body roll... it'd tap-tap-tap away...

MzE4bHc.jpg


BtoC3qn.jpg
 

frojoe

Adventurer
I had a very brief moment of thinking that maybe the heim jam nut was knocking around against the Thuren track bar bracket, so I trimmed that corner and test drove it.. and no improvement...

bPjvIwT.jpg


As a last measure, I tried re-orienting the track bar Z-bend to be horizontal, to then give the diff cover the most forward clearance, and it helped a small amount, but still tap-tap...

4J2ggg0.jpg


So 5 days after receiving this beautiful bracket from Thuren, and only 3 days mounted on the truck....

iYaSjlz.jpg


vWa4uQH.jpg


gtE9Nlv.jpg


ixbKhWR.jpg


***The washers are only TEMPORARY to nail the heim spacing within the bracket mount tabs***... I will make a single, solid cone spacer that better supports the bolt under bending....

EGk7Bqq.jpg


DXMubnh.jpg


ALL of the clearance.. it doesn't hit anymore....

VIbyYJT.jpg


bHM3GZF.jpg


It comes close to the pitman arm (by design/intention), but doesn't hit when the pitman arm is closest...

i2mXw3A.jpg


dQ2eYPz.jpg
 

frojoe

Adventurer
And now an accessory that has been lonnnng overdue.. sliders! If I'm putting a locker in this, it really needs slider to take advantage of that "are you sure you want to go there?" extra front traction...

I purchased universal 78" long TrailGear sliders, and extended them 16" (the same spacing as the short cross-tubes) to make it fit under the truck pretty well. For the extension sections I'm using the same 1.75" x 0.120 wall DOM that the rest of the sliders are made of, so that the extended sections are minimally obvious to the untrained or trained eye.

This is now the 4th time I'm cutting+extending sliders, but finally it's for my own truck and not for a friend haha...

0gAq0Vy.jpg


ZTO0BG9.jpg


YXF4mSl.jpg


YaVJUg2.jpg


97Vhcxw.jpg


cK862m9.jpg


jAMr3bo.jpg


ZTcc8lK.jpg
 

Forum statistics

Threads
186,924
Messages
2,889,296
Members
227,524
Latest member
Maynerd Mowat
Top