2006 Tacoma, tray back, 100K mile re-do

Id love to see more pics as well. Im very close to pulling the trigger and building a flatbed as well. On a side note what tire size and lift are you running, love the look.

Mike
 

zolo

Explorer
Id love to see more pics as well. Im very close to pulling the trigger and building a flatbed as well. On a side note what tire size and lift are you running, love the look.

Mike

Mike, I will take a few more pics. Sounds like there is some building interests in Tray-back style later model mid size trucks. Go figure.

I'm running stock Toyota steel 16" wheel with 255/85-16 KM2s.
I run Sway-A-Way 2.5" shock body coil overs up front with no sway bar and OME rear springs with a Pro Comp gas chock. No bump stops.

It all adds up to something around 3"+. The coil over are adjustable and Ive run them tall and low but now they are around 3"+ of lift. The rear OME seem to be north of 3". I did remove the Toyota plastic Flares so it looks like I have more lift than I do because of the added fender well room.

Has been a good set up for sure.
 
Last edited:

zolo

Explorer
yes sir.

Well here are some more detailed photos of the mount "feet" the bed it self and some new angles. The head board is finished with a plate alum piece thats 1/8 think and pretty sturdy. The rear lights are all LED.

I just finished fabricating a spare tire mount that will bolt to the head board middle bar to secure the spare behind the drivers window. It came out pretty nice and is currently drying from paint right now. I will post more pics of that tmrw when mounted and installed.

Im still figuring a re-design for my rear head bar, my first set up was using up space that I want to use. Im planning on moving the rear head board all the way to the corners and then build drop sides all around. With some type of cover.

I will post more pics once the spare is installed and I get my dog box and pelican cases remounted.

Cheers
 

Attachments

  • tt1.JPG
    tt1.JPG
    1.1 MB · Views: 169
  • tt8.JPG
    tt8.JPG
    1.3 MB · Views: 181
  • tt9.JPG
    tt9.JPG
    342.7 KB · Views: 124
  • tt2.JPG
    tt2.JPG
    1.2 MB · Views: 145
  • tt6.JPG
    tt6.JPG
    1.2 MB · Views: 148
  • tt7.JPG
    tt7.JPG
    986.1 KB · Views: 137
  • tt5.JPG
    tt5.JPG
    1.2 MB · Views: 108
  • tt3.JPG
    tt3.JPG
    1.1 MB · Views: 154
  • tt4.JPG
    tt4.JPG
    1.1 MB · Views: 119

4xdog

Explorer
Really enjoying watching your progress with this one, zolo.

Following up on the earlier discussion of the drop-side, tray ute bodies... Here's a link to the Toyota Land Cruiser 70-series tray body from the Australia accessories site, along with their ideas for head bars.
http://www.toyota.com.au/landcruise...dcruiser_70_accessories-tab-1-tray_body_range

15d1c-lc70-accessories-tray-body-range-620x349.jpg


Don
 

zolo

Explorer
I'm planning on visiting my bro in Durango this xmas and New Years.So I need space for 2 people and my dog.

Since Brox is a working dog
(that means he comes to the shop with me everyday and sleeps and barks at customers he doesn't know.)
He goes every were I do, he has to have a place to hang out. I scored this military dog box off Craig's list. Its all alum and I'm insulating it, and giving him a home for the trip. The rest is my Engel, Pelican and tire mount. So for now and this trip it will remain this way thru the new years.

Cheers, more pics as it evolves..
 

Attachments

  • photo(68).JPG
    photo(68).JPG
    930.3 KB · Views: 52
  • photo(70).JPG
    photo(70).JPG
    1,023.5 KB · Views: 44
  • photo(69).JPG
    photo(69).JPG
    1 MB · Views: 58

pnorvell

Adventurer
Dang it man! I don't think I could dream up a cooler truck Daniel, I swear! Give me a shout when you get a chance. I'd enjoy swinging by the shop and seeing it first hand!
 
So one question I have is with the mounts you have for your bed. Was the reason they are spaced a few inches (the 90 angle in pic 5) due to clearence for the tire? Was there no way to mount the cross bars directly to the factory mounts? Also whats the hight of the top of the bed to the center of your axle?


Thanks
Mike
 

zolo

Explorer
So one question I have is with the mounts you have for your bed. Was the reason they are spaced a few inches (the 90 angle in pic 5) due to clearence for the tire? Was there no way to mount the cross bars directly to the factory mounts? Also whats the hight of the top of the bed to the center of your axle?


Thanks
Mike

Mike,
We had to build the 90 angle mounts because the cross bars would have been way to low to mount them directly and in turn the whole bed would sit to low. The tire would hit if we did that. Even now at completely full stuff it rubs the underside of the wood section of the bed just a bit not much. The rear has a ton of flex. Keep in mind I don't run bump stops. But even with say a Timbren bump stops it might hit.

The 90 angle mount are TIG welded at a 45 cut. They are very strong and those pieces are made from 1/8 2'x2' square. With 6 of them I truly never see one failing. We had other ideas but this was the best. Makes getting to the bolts easy and helps level the bed in relation to the cab. So the front mounts are shorter and the middle mounts are a bit longer and the rear mounts are the longest. This sets the bed level to the cab. Otherwise you would end up looking like the truck is broken in half. If you tried to mount the bed directly to the cross bars this would be a bit harder to achieve.

As for the height from top of axle to top of bed. Well that varies. Depends on what spring you are running and what load is on the bed. Currently it is sitting at 21". That's with an OME spring and a light load.
The main thing to do is start with a box. Say a 6' by 7' like mine then you will need to level it in relation to the bed and build mounts off that. Your lift and tire size all plays into how high the bed needs to be. I run 255/85-16s. So a 33x10. If you ran a 35x12.5 Then the bed needs to be totally different design than what I have to clear the tires at full stuff.

Ive attached 2 pics that show the cut we made to clear the tires at the bed side. It was not needed cause the tire angles in at full stuff but it helps and would be good should there be a wider tire. However I am considering going to a smaller tire rather than larger. Simply for power, load, and ride quality reasons. A 235/85-16.

This cut was hard to make. The heat from the welder arched the bed and we had to do some straightening after to make it right. Large bottle jacks and time but in the end it was the best thing to do. This is one other reason we bent tubing and welded rub rails to strengthen the sides.

I hope this is some good info for you.
 

Attachments

  • photo(73).JPG
    photo(73).JPG
    917.6 KB · Views: 32
  • photo(72).JPG
    photo(72).JPG
    809.5 KB · Views: 35

pnorvell

Adventurer
Looking forward to seeing you and the vehicles bud!! I'll give you a call once I'm off of work! Til then!


STOKED!!

Peter
 

zolo

Explorer
FJC Transfer Case Swap

So Ive had a bearing noise for a while now in my Transmission. I'm to the point now where I want to take it apart and replace the bad bearing or bearings. Also install a new clutch kit. Im excited about the trans getting fixed BUT ......Im more excited about the FJC case swap.

Ive had my Tacoma transfer case modified to be manual (after my electric actuator failed) for a while.
My modified case required me to get out of the truck and switch to low range via a big lever I made.
It worked but was a pain to do and, in the mud, and rain, and cold was just not a long term fix. I priced the actuator and its cheaper and in my case a much better fix to just install a full manual control FJC case.

They are pretty much the same case out side of the control. So with the new FJ case I get 2wd low, and full internal cab manual controls. Something i think should have been done in the first place. This way I get to use all Toyota parts and its a simple and easy solution to an issue I couldn't live with.

I contacted Wyatt from http://www.rocksolidtoys.com/ to confirm that the Auto trans FJC case would in fact bolt to my 5spd and he said yes no problem and I can even use the FJC shifter and it would come up right through the cup holder. So all that being said I was happy and the FJC case is in route to my shop and will arrive next week.

So I will document the trans rebuild for those who want to know about the inside of a Toyota 5spd and the FJC swap.
Something I think is pretty cool and an all Toyota upgrade

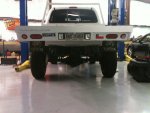
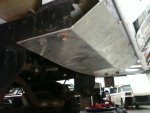
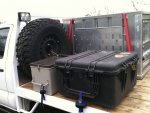
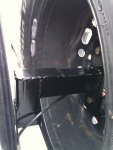
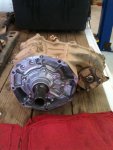
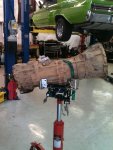
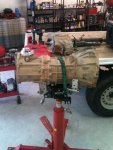
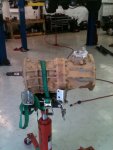
Below are the first pics of the trans out, then the tcase off, then the trans with the bell housing removed. Its actually pretty small all alone.

Cheers Daniel
 

Attachments

  • photo(88).jpg
    photo(88).jpg
    449.1 KB · Views: 22
  • photo(85).jpg
    photo(85).jpg
    456.8 KB · Views: 25
  • photo(86).jpg
    photo(86).jpg
    456.3 KB · Views: 27
  • photo(87).jpg
    photo(87).jpg
    391.6 KB · Views: 22

Forum statistics

Threads
188,479
Messages
2,905,463
Members
230,494
Latest member
Sophia Lopez
Top