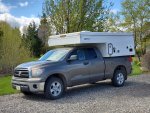
2020 Overland Explorer Vehicles (OEV) CAMP-X pop-up slide-in pickup camper (renamed "Back Country" as of 2023)

Chadx

♫ Off road, again. Just can't wait to get...
If it is over an inch past the tail light it would require moving the Bumper back with an offset plate. This is the same problem with FWC campers...

MuleShoer,
Is that a state law in some states or is the reason a safety concern? I'd not heard of that. This is my CAMPX on my Tundra which shows the overhang same as Seahaul's picture and same as the FWC that I ran for 3 years.
As you mentioned, it's a good of reason as any to get one of the new trucks with a 6' 8" bed! Ha.


20200518_145454.jpg
 
Last edited:

Chadx

♫ Off road, again. Just can't wait to get...
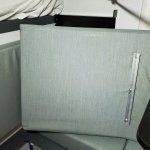
I revised a couple of my cabover interior measurements a couple posts ago and have more insight. I pulled out the bedding to get clear pictures of the room available with my 5" mattress in place and I did remove the chrome handle. A couple things to note on the hinge plate: When in the closed position, it folds down a bit further in the back than I thought, but the plate is at an angle rather than flat so there is some room for the handle. Still, I removed it and that will give more clearance. I think a person could put a 5.5" mattress quite easily. Perhaps a 6" if it compressed just a bit for the very rear area of the hinge plate. See pics.


Strap I added that allows folding the hinge without crawling up onto the bed. I'll be changing color and using a lighter weight strap, but it's what I had handy a couple weeks ago.

20200518_160110.jpg


Folded onto our 5" thick mattress. Chrome handle pressed into mattress about .25". Note that it is NOT supporting the hinge. That is the natural resting place/angle of the hinge and handle.
20200518_160419.jpg


Chrome handle removed.
20200518_160746.jpg


Chrome handle removed. Note distance between 5" mattress and very back of hinge. Clearance for up to a 5.25" mattress. If the mattress used was easily compressible, one could probably get away with up to a 5.5" - 6" mattress.
20200518_160833.jpg


Vast amount of space for pillows and bedding which we now leave in place (removed for photo).
20200518_161300.jpg
 

MuleShoer

Adventurer
MuleShoer,
Is that a state law in some states or is the reason a safety concern? I'd not heard of that. This is my CAMPX on my Tundra which shows the overhand same as Seahaul's picture and same as the FWC that I ran for 3 years.
As you mentioned, it's a good of reason as any to get one of the new trucks with a 6' 8" bed! Ha.

sorry for any confusion Your fine NO laws im aware of. The issue was the clearance between the Expedition one bumper swing outs and the back of the camper On the tundra.
My problem is i tow a trailer and making sure it clears the camper. I will would need to change truck and go to their flatbed model

you have the most state of art camper!!


View attachment 586576
 

Chadx

♫ Off road, again. Just can't wait to get...
We got out for a quick trip Saturday night. Still having a hard time finding anything we don't like about this camper. Seat cushion density and fit and finish of the cushion cases have been the only items needing improvement. Temperature did not get cold. Was about 40 - 45 that night, but with the two of us, absolutely zero condensation and we barely crack the our optional cabover vent/fan. About an hour before we got up, the furnace kicked on once for 3 or 4 minutes and we had it set to 55. We used to set it at 48 - 52 in the FWC, but with this much insulation, might as well keep it balmy! Ha.


Before we left. First image with the camper jacks removed. Much easier to see out the side mirrors, cleaner look, and less risk of catching them on obstacles.
20200516_101651.jpg


No offroading this trip. Just a campground at one of the reservoirs we frequently fish.
20200516_183726.jpg


Done for the day and hitting the road.
20200517_120535.jpg
 
Last edited:

seahaul

Active member
Rig looks great! You have a different font "CAMP-X" logo on the side than we do. I like them both. Just noticed it is all.

Solar looks great. I assume they ran the wires through the roof down into the same wire loom at the rear of softtop?
Those plastic runners look nice. I effectively did the same with mine by doubling up the 3/4" rubber mat. Gave perfect clearance for the Tundra bedrails.
What is the rear step you have attached there? Is that an option you had added or they are now including? Another other fold out steps on the back? If so, can you post a picture taken from behind to show placement?

Can you post a picture of the lid to your water tank/battery compartment? Wondering if the lid is built into your dinette cushion like ours or it's not it's own aluminum lid and the cushion is separate (which I like better and saw in a picture of the CAMP-X with fridge delete). I may source a new lid from Overland if that is the case.

chadx, yes they ran the wires with the existing loom and went through at the back in the extrusion. the runners are nice as they attached them to the bottom of the camper by drilling and tapping. The rear step is just Rubbermaid step, but it’s a little too short so we are looking for something else. I will try to get a picture of the lid on the weekend, it’s attached to the cushion and has a piece of aluminum angle to hold it in place.

We spent two nights in it and it was good. Still figuring out placement of items and how to position the table for comfortable seating.
 

Chadx

♫ Off road, again. Just can't wait to get...
Seahaul,
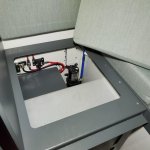
Sounds like your water tank cover is the same setup as mine (pictures below). The lid is within the cushion casing and seems like 3/4" - 1" plywood (not sure if it's wood or something else). The cushion itself is then shorter than the adjacent cushion, to account for the thickness of the lid, and make the cushion tops even. The aluminum L bracket that locates the lid in the correct position (see picture below) is then outside of the fabric and screwed into the lid through the seat cushion case material.

Seems to me there is a better way and that would be what I saw on a setup with fridge delete (pictured further below). It looks to be an aluminum standalone lid. Then, the cushion could/would be the same thickness as the adjacent cushion and be easily removed moved without having to remove the lid to the cubby and risk scratching things up with the L bracket. It makes me nervous every time I remove that cushion and move it around. That L bracket would make a gash if it hit anything while I was moving around the cushion. Better yet, those two cushions could be combined into one which would give a better seating surface.


Bottom of my cushion.
thumbnail_20200520_082735.jpg


Cushion and lid are combined into one unit. Meaning you can not move the cushion with out removing the lid. Would be nice to do so for stepping up into the cabover when working on things if you don't want to take off your shoes and dirty the cushion.
thumbnail_20200520_082759.jpg


Picture of the fridge-delete CAMP-X with what looks to be a standalone aluminum cover. I will be checking with Overland Exporer to see if these lids are available. Then replace the two small cushions with one cushion to get rid of the seam.
thumbnail_20200520.jpg
 
Last edited:

seahaul

Active member
Seahaul,
Sounds like your water tank cover is the same setup as mine (pictures below). The lid is within the cushion casing and seems like 3/4" - 1" plywood or starboard. The cushion itself is then shorter than the adjacent cushion, to account for the thickness of the lid, and make the cushion tops even. The aluminum L is then outside of the fabric and screwed into the plywood/starboard through the seat cushion case material.

Seems to me there is a better way and that would be what I saw on a setup with fridge delete (pictured further below). It looks to be an aluminum standalone cover. Then, the cushion could/would be the same thickness as the adjacent cushion and be easily removed moved without having to remove the cover to the cubby and risk scratching things up with the L bracket. It makes me nervous everytime I remove that cushion and move it around. that L bracket would make a gash if it hit anything while I was moving around the cushion. Or better yet, those two cushions could be combined into one which would give a better seating surface.


Bottom of my cushion.
View attachment 586967


Cushion and lid are combined into one unit. Meaning you can not move the cushion with out removing the lid. Would be nice to do so for stepping up into the cabover when working on things if you don't want to take off your shoes and dirty the cushion.
View attachment 586968


Picture of the fridge-delete CAMP-X with what looks to be a standalone aluminum cover. I will be checking with Overland Exporer to see if these lids are available. Then replace the two small cushions with one cushion to get rid of the seam.
View attachment 586966

chadx, mine is exactly like yours. What you said makes sense. Talking to the guys at overland ex, they are always looking for improvement ideas! I’m sure they would accommodate. When I sit on that cushion I wish the table stand was a little further from my knee but I’m not sure if moving it would wreck the functionality of the table arm?
 

Chadx

♫ Off road, again. Just can't wait to get...
A few more CAMP-X are in the wild. OEV posted a picture of one mounted on a red 2015 F-150 and on it's way to Ontario. Not sure if the owner is a member here. Also, Scott from 4xpedition.com picked his up here in Bozeman and I had a chance to meet and chat during his install. I believe he'll be posting on his website and youtube channel about the camper so more info available there. He did already post on his FB and instagram channels. Will be fun to see more images and ideas/reviews as more CAMP-X get out there.
 

Chadx

♫ Off road, again. Just can't wait to get...
I received some goodies from OEV and will be posting them up in the coming days. Roof rack, water tank/battery box compartment lid, decals, L brackets to build a raised dinette floor cubby, runners (like Seahaul showed to adjust camper height on his Tundra-mounted camper for bedrail clearance), etc.

We got out on an overnight camping trip and MTB ride. Update on battery usage. In a 24 hour period, we used about 22% of the 100 amp AGM capacity (22 amps). On past couple of trips, it's ranged from 25% to 28%. Not wanting to deplete below 50% SOC if possible, that means we have between 2 to 2.5 days worth of power without any recharging input. I'm still collecting data to decide if adding solar or replacing the AFM with a 100amp Battleborn is my next move, though, the more data I collect, the harder either is to justify. With the REDARC changed from 30 amp max charge rate down to 10 amps, we went from 78% SOC back to 96% SOC on the 2 hour drive home.


New compartment lid that is not incorporated into the seat cushion (will require new cushion and I'll post info when I get to that project).
lid.JPG


Start of roof rack assembly. I'll do a details post in the coming days.
reduced 20200531_152623.jpg


New L bracket to make dinette raised floor.
20200531_155924.jpg


New L bracket to make dinette raised floor.
20200531_155902.jpg


Wife and I got out for a weekend of MTB riding and camping.
20200601_065709.jpg


After a bike ride, the camper provided nice shade. The screenhouse was the place to be the night before to keep the mosquitoes at bay.
reduced 20200530_114310.jpg
 
Last edited:

Chadx

♫ Off road, again. Just can't wait to get...
Non camping use? How about being my daily lunchroom. There is a cafeteria in my work building, but lately, I've tried to avoid the group scene. Rather than sitting at my desk and eating lunch, I've been going out to the camper. Nice break and fresh air. As mentioned in previous posts, one of the things I love about the CAMP-X is there is enough room to sit inside without popping the top. I'm 6' tall. If I sit ridgedly upright as tall as I can, I'll hit my head on the ceiling, but if it sit in my normal, relaxed seating position, I have a couple inches of headroom. Definitely not scrunched.

reduced 20200526_112709.jpg
 

seahaul

Active member
I received some goodies from OEV and will be posting them up in the coming days. Roof rack, water tank/battery box compartment lid, decals, L brackets to build a raised dinette floor cubby, runners (like Seahaul showed to adjust camper height on his Tundra-mounted camper for bedrail clearance), etc.

We got out on an overnight camping trip and MTB ride. Update on battery usage. In a 24 hour period, we used about 22% of the 100 amp AGM capacity (22 amps). On past couple of trips, it's ranged from 25% to 28%. Not wanting to deplete below 50% SOC if possible, that means we have between 2 to 2.5 days worth of power without any recharging input. I'm still collecting data to decide if adding solar or replacing the AFM with a 100amp Battleborn is my next move, though, the more data I collect, the harder either is to justify. With the REDARC changed from 30 amp max charge rate down to 10 amps, we went from 78% SOC back to 96% SOC on the 2 hour drive home.


New compartment lid that is not incorporated into the seat cushion (will require new cushion and I'll post info when I get to that project).
View attachment 589820


Start of roof rack assembly. I'll do a details post in the coming days.
View attachment 589824


New L bracket to make dinette raised floor.
View attachment 589823


New L bracket to make dinette raised floor.
View attachment 589822


Wife and I got out for a weekend of MTB riding and camping.
View attachment 589821


After a bike ride, the camper provided nice shade. The screenhouse was the place to be the night before to keep the mosquitoes at bay.
View attachment 589825
chadx I am looking forward to the raised cubby, is that you own idea? We have the racks too, are you adding the foot steps? We opted for the 170 amp hour agm and 180 w solar. We will see this weekend how that goes, but so far on the previous 3 nights with mixed sun all looks good.

Seahaul.
 

Chadx

♫ Off road, again. Just can't wait to get...
chadx I am looking forward to the raised cubby, is that you own idea? We have the racks too, are you adding the foot steps? We opted for the 170 amp hour agm and 180 w solar. We will see this weekend how that goes, but so far on the previous 3 nights with mixed sun all looks good.

Seahaul
I thought of the raised dinette floor on my own but don't know if OEV also been considering it. I reached out to them to source two L brackets (same L brackets the support the table when converting the dinette to a bed) to make the platform and to make the suggestion that the height of the dinette seating was a "leg-dangler" even for me at 6' and wife at 5'10". They noted that they went through and had a varied audience sit and they agreed and future builds would have a 6" raised floor and a cubby underneath. I'm anxious to see the factory version. I believe they will eliminate the 1.5" - 2" step that is there now, which I will not be doing so my cubby won't be as spacious as the factory. I'll grab a few pair of our shoes and see what height clears them and then determine if that height works comfortably for our legs while seated. If I have to sacrifice cubby space for the most comfortable platform height, I will do so; just hoping it will work for shoes as it is the perfect spot to keep them out of the way.

I do not plan to add the rear wall steps at this time. I don't have anything specific to haul on top and don't plan to run the roof racks except as needed; not fulltime. Just extra wind resistance and height when not in use. I'll most more on that when I put up the rundown on putting them together and attaching to roof.

What make/model is that 170 amp AGM? That is huge for a single AGM. I know renogy makes a 170amp lithium. In in either case, that and the solar should serve you with minimal need for the truck to contribute amps. As mentioned, our old setup was dual 75 amps AGM (150 amps with 75 usable to get to 50% SOC) and a 180watt solar and I chose to have the pickup wires disconnected under the hood because they were rarely needed. 180 watt solar would have us charged back up to 100% well before noon on a typical day and that includes the slow charging on an AGM as they become full. By the sunniest part of the day, there was nothing for the solar to do but sit around and wait for us to run something.

As I'm into electric bicycles and electric offroad motorcycles and I have an interest in experimenting with an inverter and induction cooktop. Those could sway my build out. Totally can't justify going with an induction cooktop since propane works so well and is cheap (and I already paid for it and have it in a camper!) but I have the tinker bug. The other option for induction cooktop is to instead get a portable "solar generator" of 1 - 2kw and built in sine wave inverter of at least 1000w (induction cooktops can be handily be controlled by watt draw). The solar generators typically include a built in mppt solar controller as well. One could charge at home, on the road with portable solar, or from the camper. It would allow the induction cooktop to be used in the camper or outside at a table and could charge electric bikes off it, use it at home for emergency backup, or have it with even when the camper is not on the pickup.

Or, I could build out the camper with max lithium, big inverter, and 200 - 400 watts of solar panels and run the induction cooktop and bike battery chargers off the camper. That would be cleaner, but means all of those systems are permanently mounted on the camper and not easily usable/portable for other uses. But still unsure of how often I would want/need portability. Sorry everyone, just thinking outloud. I digress.
 

seahaul

Active member
Seahaul
I thought of the raised dinette floor on my own but don't know if OEV also been considering it. I reached out to them to source two L brackets (same L brackets the support the table when converting the dinette to a bed) to make the platform and to make the suggestion that the height of the dinette seating was a "leg-dangler" even for me at 6' and wife at 5'10". They noted that they went through and had a varied audience sit and they agreed and future builds would have a 6" raised floor and a cubby underneath. I'm anxious to see the factory version. I believe they will eliminate the 1.5" - 2" step that is there now, which I will not be doing so my cubby won't be as spacious as the factory. I'll grab a few pair of our shoes and see what height clears them and then determine if that height works comfortably for our legs while seated. If I have to sacrifice cubby space for the most comfortable platform height, I will do so; just hoping it will work for shoes as it is the perfect spot to keep them out of the way.

I do not plan to add the rear wall steps at this time. I don't have anything specific to haul on top and don't plan to run the roof racks except as needed; not fulltime. Just extra wind resistance and height when not in use. I'll most more on that when I put up the rundown on putting them together and attaching to roof.

What make/model is that 170 amp AGM? That is huge for a single AGM. I know renogy makes a 170amp lithium. In in either case, that and the solar should serve you with minimal need for the truck to contribute amps. As mentioned, our old setup was dual 75 amps AGM (150 amps with 75 usable to get to 50% SOC) and a 180watt solar and I chose to have the pickup wires disconnected under the hood because they were rarely needed. 180 watt solar would have us charged back up to 100% well before noon on a typical day and that includes the slow charging on an AGM as they become full. By the sunniest part of the day, there was nothing for the solar to do but sit around and wait for us to run something.

As I'm into electric bicycles and electric offroad motorcycles and I have an interest in experimenting with an inverter and induction cooktop. Those could sway my build out. Totally can't justify going with an induction cooktop since propane works so well and is cheap (and I already paid for it and have it in a camper!) but I have the tinker bug. The other option for induction cooktop is to instead get a portable "solar generator" of 1 - 2kw and built in sine wave inverter of at least 1000w (induction cooktops can be handily be controlled by watt draw). The solar generators typically include a built in mppt solar controller as well. One could charge at home, on the road with portable solar, or from the camper. It would allow the induction cooktop to be used in the camper or outside at a table and could charge electric bikes off it, use it at home for emergency backup, or have it with even when the camper is not on the pickup.

Or, I could build out the camper with max lithium, big inverter, and 200 - 400 watts of solar panels and run the induction cooktop and bike battery chargers off the camper. That would be cleaner, but means all of those systems are permanently mounted on the camper and not easily usable/portable for other uses. But still unsure of how often I would want/need portability. Sorry everyone, just thinking outloud. I digress.

Chadx, thanks for the info! The 170 Ah is a Victron AGM, I upgraded right with Overland X so it fits the battery box but its 45kg heavy (99lbs). I also have 170 Watts on the roof.

A couple weeks ago I ordered a Victron 1200 watt inverter that hasn't arrived yet. I'm going to play with that a bit to see how it goes. I too would like to mess around with induction as I am also interested on using a similar but larger system on my boat. The inverter I bought has bluetooth (VE.Direct) so it can hopefully install it hidden away and monitor it with my phone without messing with the redarc setup, if it works well I might put the counter top plugs on the inverter and install their filax switch for those plugs. Future upgrades will be more panels and lithium. I can always use the 170 Ah on my boat if it fits, and weight isn't as much a concern. For easy additional panels Renogy sells a 100 watt Monocrystaline panel suitcase that I can plug into the SAE connection on the side of the camper, and that would give me 270 watts total really easily for $195.99 CDN. A suitcase panel would likely fit up the space by the wheel well for storage.
 

Chadx

♫ Off road, again. Just can't wait to get...
That's a brute of an AGM! But still a pound or three lighter than the two 75amp Exide AGM in my previous camper, plus you have 20 more amps. I looked it up and they call it an AGM Super Cycle battery (if this is the correct datasheet https://www.victronenergy.com/upload/documents/Datasheet-AGM-Super-Cycle-battery-EN.pdf ). It didn't specifically say it's max discharge current is supported, but on the datasheet, the fastest rate they use is 0.2. Lithium typically are rated for 1C discharge and AGM I thought were often 0.5C. You may want to check with Victron. If it's 0.2C, that would be a max discharge current of 170amps x 0.2C = 34amps, which would not support much of an inverter, but Victron should be able to tell you max discharge rate as it must be more than the 0.2C examples they give on their datasheet. You'll want to know before pulling more current than 34Amps.

While thinking through inverter locations, the only logical place I could identify was in the same compartment as the battery,REDARC,watertank and mount it on top of the battery box. One wants the 12v supply cables to be thick gauge and a short run to the inverter. And, I'll mention for other readers information, the inverters 12v positive cable would go directly to the battery but the negative would go to the far side of the REDARC shunt, like all other load negative cables, so amp draw goes across the shunt and is known to the REDARC battery manager system.

The outbound 120v will suffer little to no voltage drop compared to 12v plus require much smaller gauge wire for a comparable length run so the 120v run is easy. That location also seems to be the easiest to access to turn the inverter off and on if one didn't mount a remote switch or use bluetooth/app since one doesn't want to leave an inverter powered on when not in use (they draw standby power).

Funny you mention changing the 120v coutertop outlet to inverter rather than shore power. That would also be my design; I would, within the same outlet, make one plug inverter powered and the other plug shore power. I'd then be able to use whichever plug was appropriate.

Curious how you would use a Victron Filax switch for your 120v purposes? Is the intent to have the entire outlet (both plugs) prioritize draw from shorepower when that is available and, if not, attempt to draw from inverter?
 
Last edited:

Forum statistics

Threads
188,026
Messages
2,901,339
Members
229,411
Latest member
IvaBru
Top