You are using an out of date browser. It may not display this or other websites correctly.
You should upgrade or use an alternative browser.
You should upgrade or use an alternative browser.
2020 Overland Explorer Vehicles (OEV) CAMP-X pop-up slide-in pickup camper (renamed "Back Country" as of 2023)
- Thread starter Chadx
- Start date
Sparse Gray Hackle
Morgan Freeman Imposter
Very nice camper, very nice.
one thing in the photos caught my attention, and that is the cable supporting the drop down door for the electrical connections. If there is any way that might cause a short circuit, I’d cover or replace it with a non conducting type.
one thing in the photos caught my attention, and that is the cable supporting the drop down door for the electrical connections. If there is any way that might cause a short circuit, I’d cover or replace it with a non conducting type.
it looked to me like that cable was designed to ground that plate to the frame (total speculation on my part as the other end of the cable isn't in the pic)Very nice camper, very nice.
one thing in the photos caught my attention, and that is the cable supporting the drop down door for the electrical connections. If there is any way that might cause a short circuit, I’d cover or replace it with a non conducting type.
JohninDetroit
Member
the manufacturer should pay you for your time writing/photos of your camper. Nice work.
Very impressive. It seems really well built.
...question for those who use truck campers like this: if you're going to spend a few months wandering about, where do you keep all your stuff? the bed of my pickup is usually full of it, but with a camper like this, that wouldn't be possible, and i dont see enough cabinet space under sink etc. where would you keep clothes, for instance, or food, or recovery gear?
Everyone differs with how much they bring. And some campers have more or less storage. For example, the FWC Flatbed has underbed storage which adds a lot of storage space.
For now, our longer trips are only 7 to 10 days, but I don't foresee needing more supplies for a 30 day trip than what we bring for a 10 day trip assuming one would launder clothing and stop every 5 to 10 days for consumables like food and water. We have the 2/3 length rear seat removed from our Double Cab Tundra. I've liked that so much that, with the new camper, I'm now thinking of removing the 1/3 rear seat as well and maybe doing a small platform to make for easier two-tiered storage. Tons of room in the back seat area even in this double cab. A crew cab would have even more. That is where I store recovery gear, our camper entry ladder, a portable screen house, chairs, leveling blocks, etc. You can put all your clothing and extra camping and recreation gear there as well. That moves the weight further forward, onto the front axles, compared to storing stuff in the camper. You could also put tubs/bags on the floor of the camper for travel and then move then outside (under a tarp or under the truck) or move them to the front seats of the pickup when you get setup. We keep the basics in the camper (immediate food supply, daily use pots and pans, etc.) and other items in the pickup back seat. Really depends on how much you take with you and how often you resupply. And making choices on what not to bring.
We often use our camper when pulling a fishing boat or enclosed trailer with motorcycle/ATV/kayaks, etc. Those trips are not offroading. To get further off the beaten path, its' either no trailer or we carry MTBs on a swingout hitch bike rack. If you need more room than what you can pack inside the camper or back seat, a receiver-mounted cargo box is another option as is a small offroad trailer. Everyone is different when it comes to the amount of stuff they see as mandatory or optional. The type of recreation intended often dictates the amount and type of storage needed.
Great write up. I own one of the prototypes. It appears that all the little issues the prototype had have been taken care of. From experience I can confirm that the softwall insulation actually works. No comparison to the Hawk I owned before. Have fun with your new camper.
Thanks Stefan. Your thread, at https://expeditionportal.com/forum/threads/first-trip-in-an-overland-explorer-camp-x.195608/ , is one I've been following for a while. If you have any new insight, I and others following that thread would appreciate updates. Maybe add some more pictures, to that thread, of your travels?
Chad
I've updated dimensions back on my place holder post (Post #4). Link: https://expeditionportal.com/forum/...rer-camp-x-pop-up-camper.214329/#post-2766742
I've lived off my motorcycle for two months so I'm familiar with light packing. I have no plans to sell this truck and that's why I plan on doing the flatbed plus the megacab has ridiculous space for storage. I bought it used otherwise I would have gotten a longbed crewcab. I've got an older Toyota 2WD if I need to move things around.
...one thing in the photos caught my attention, and that is the cable supporting the drop down door for the electrical connections. If there is any way that might cause a short circuit, I’d cover or replace it with a non conducting type.
it looked to me like that cable was designed to ground that plate to the frame (total speculation on my part as the other end of the cable isn't in the pic)
Good questions and I don't know the answer regarding grounding, but I will note the cable is vinyl wrapped and not bare and the top end is bolted to the aluminum countertop frame. Here is a better image showing both ends and one showing what the cable can touch when door is closed. It mainly can touch the LP feed line for the water heater.

Last edited:
seahaul
Active member
Great photos and write up. I visited their facility and it is very cool to see all the differnt things they do, they take a lot of pride in the product and continous development. Arnold is great to chat to, and is very proud of what they have done especially the various different composite panels. Every wallpanel, roof panel, or floor is a different panel developed for different uses.
DirtWhiskey
Western Dirt Rat
Rad camper and thank you for the extreme detail. As far as materials and construction go, Overland Explorer are making what looks to me as the best pop up campers. I've been in most of the other ones and I'm always underwhelmed. I simply cannot wait until they roll out the flatbed models. I may just have to sharpen my pencil. BTW their Insta page has one pic of a 6.5 foot flat bed under construction. Also mentions an 8 footer with the same layout, just without the tail kick out undercut thing. He also mentions in that thread the drool worthy possibility of shell models!
Attachments
Last edited:
seahaul
Active member
I saw the flat bed model and their new aluminum flat bed box. Both look amazing and roomy and I believe they come in a package. I pulled the trigger and purchased one of the camp-x models they had in stock at the wearhouse. They are pretty amazing, a lot of the decision was helped by this post by chadx and the detailed pictures. These made it a lot easier to get into the detail when looking at the real thing becasue i had already seen it! Having it in a Tundra helped too.
thanks again chadx!!!!
thanks again chadx!!!!
Update:
The CAMP-X bed brackets were installed on my Tundra. Brackets are beefy and tall. There may be some occasions they get in the way when using the bed for other truck duties, but shouldn't be too common. They will come in quite handy, as heavy duty tiedowns, more often than they will be in the way.
Also, nice thick 6 gauge wire (and 50 amp breaker) installed from Truck battery back to bed. Packet was missing Anderson terminals so the install of the Anderson plug has been delayed. Otherwise ready to go. The 6 gauge wire from the truck to the plug and from the plug to the REDARC will no doubt exhibit less voltage drop, and therefor flow more amps, than the 10 gauge wire used in the FWC. How much, I don't know, but I did proactively program the REDARC to only flow 25 amps to the battery rather than the default and maximum of 30 amps. As mentioned previously, the 100amp AGM in the camper has a max charge rate of .25C so for a 100 amp battery, that means 25 amps. I may bump that down to 15 or 20amps to be even nice to the battery and to be a bit easier on my alternator. I don't imagine it will run that full charge rate much anyway as the charge rate will drop off for the upper portion of charging.
The Torklift AnchorGuard Derringer turnbuckles were included in the camper price and retail for around $340 for a set of four. Much more "pro" than standard turnbuckles but then, a person can use these for any brand slide-in pickup camper. On the Derringer (handle) portion of the turnbuckle, one can replace the pins with locks if concerned about someone unlatching and stealing them. On a FWC, no need to use a lock since one can access the turnbuckles only from inside the camper because the rear portion of a FWC is full bed width.
It is very nice to stand on the ground behind the CAMP-X to secure the two rear turnbuckles rather than accessing through portals. For the front passenger side turnbuckle, portal access is from the top and quick and easy. The drivers side front is accessed from the port near the floor and within the storage cabinet under the fridge. With the 2020 cabinet being smaller than the 2019 cabinet, it is a bit of a struggle to squeeze in there and secure the turnbuckle. While the task is made easier with this style turnbuckle, it is still quite a struggle, but then, this was my first time loading and securing and so it will get better with time. And, the struggle is relative. I'd say it took me about the same amount of time to secure the Torklift turnbuckle as it did to position and tighten a standard turnbuckle on the drivers front of our FWC. The struggle likely seemed more dramatic since I'd just completed securing the other three turnbuckles which are very easy to access and secure.
One other side effect I noted for there not being a widened lower rear camper section, like on a FWC, is one doesn't have anything to look at for precise camper loading when backing up or when someone is guiding you. With the FWC's wide section, the camper edges are closer to the bed rails and so you can see at a glance if the camper is centered or not. One has to look a little longer with the CAMP-X. I've found it easiest to look at the floorpack in relation to the inside of the wheel wells. The camper has about 1.5" clearance inside each.
------------------------------
Access to driver's side rear turnbuckle. There is the opportunity to store items alongside the camper in the bed.
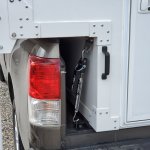
With the camper snug up against the bracket, clearance is just right even with my bumpstop in place (detailed further below).
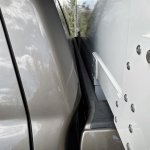
Rear bracket shown with the camper raised. Doubled-up 3/4" livestock mat compresses just enough to put the camper 5/8" above the bed rails (not shown) when fully clamped down.

Passenger side rear bracket with camper raised.

Front bracket without mats and without front bumpstops in place.

Front bracket with mats and front bumpstops in place. The bumpstops are to prevent the white, coated camper extrusion from getting dinged up when loading the camper The same material I used for the bump stops I also placed under the single section of floor mat on top of the bracket. The bracket thickness makes it a bit taller than the bed so that combination came out equal to the doubled-up mat in the bed.
Strips of mat could not be used under the rear extrusion because the back of the camper is longer than the bed. So I ended up using mat material only under 3 sides of the perimeter (the front and both sides of the floorpack extrusion). As mentioned previously, Overland Explorer noted only the floorpack perimeter need be supported; not the entire floorpack. The extrusion touches down before the center of the floorpack anyway so nothing gained by having mat in the center of the floorpack. Also, not having mat material there saves a great deal of weight since a single 4' x 6' floor mat weigh 90 lbs.
Edit: Newer OEV campers now use pucks attached to the extrusion (outer perimeter of the footprint). And various height pucks are available and used depending on the height of the pickup bedrails. The goal is to have the camper barely above the bedrails to keep center of gravity low. Just make sure you have enough clearance between the bottom of the camper cabover and the cab roof since the pickup cab and pickup bed have a surprising amount of different flex.

The CAMP-X bed brackets were installed on my Tundra. Brackets are beefy and tall. There may be some occasions they get in the way when using the bed for other truck duties, but shouldn't be too common. They will come in quite handy, as heavy duty tiedowns, more often than they will be in the way.
Also, nice thick 6 gauge wire (and 50 amp breaker) installed from Truck battery back to bed. Packet was missing Anderson terminals so the install of the Anderson plug has been delayed. Otherwise ready to go. The 6 gauge wire from the truck to the plug and from the plug to the REDARC will no doubt exhibit less voltage drop, and therefor flow more amps, than the 10 gauge wire used in the FWC. How much, I don't know, but I did proactively program the REDARC to only flow 25 amps to the battery rather than the default and maximum of 30 amps. As mentioned previously, the 100amp AGM in the camper has a max charge rate of .25C so for a 100 amp battery, that means 25 amps. I may bump that down to 15 or 20amps to be even nice to the battery and to be a bit easier on my alternator. I don't imagine it will run that full charge rate much anyway as the charge rate will drop off for the upper portion of charging.
The Torklift AnchorGuard Derringer turnbuckles were included in the camper price and retail for around $340 for a set of four. Much more "pro" than standard turnbuckles but then, a person can use these for any brand slide-in pickup camper. On the Derringer (handle) portion of the turnbuckle, one can replace the pins with locks if concerned about someone unlatching and stealing them. On a FWC, no need to use a lock since one can access the turnbuckles only from inside the camper because the rear portion of a FWC is full bed width.
It is very nice to stand on the ground behind the CAMP-X to secure the two rear turnbuckles rather than accessing through portals. For the front passenger side turnbuckle, portal access is from the top and quick and easy. The drivers side front is accessed from the port near the floor and within the storage cabinet under the fridge. With the 2020 cabinet being smaller than the 2019 cabinet, it is a bit of a struggle to squeeze in there and secure the turnbuckle. While the task is made easier with this style turnbuckle, it is still quite a struggle, but then, this was my first time loading and securing and so it will get better with time. And, the struggle is relative. I'd say it took me about the same amount of time to secure the Torklift turnbuckle as it did to position and tighten a standard turnbuckle on the drivers front of our FWC. The struggle likely seemed more dramatic since I'd just completed securing the other three turnbuckles which are very easy to access and secure.
One other side effect I noted for there not being a widened lower rear camper section, like on a FWC, is one doesn't have anything to look at for precise camper loading when backing up or when someone is guiding you. With the FWC's wide section, the camper edges are closer to the bed rails and so you can see at a glance if the camper is centered or not. One has to look a little longer with the CAMP-X. I've found it easiest to look at the floorpack in relation to the inside of the wheel wells. The camper has about 1.5" clearance inside each.
------------------------------
Access to driver's side rear turnbuckle. There is the opportunity to store items alongside the camper in the bed.

With the camper snug up against the bracket, clearance is just right even with my bumpstop in place (detailed further below).

Rear bracket shown with the camper raised. Doubled-up 3/4" livestock mat compresses just enough to put the camper 5/8" above the bed rails (not shown) when fully clamped down.

Passenger side rear bracket with camper raised.

Front bracket without mats and without front bumpstops in place.

Front bracket with mats and front bumpstops in place. The bumpstops are to prevent the white, coated camper extrusion from getting dinged up when loading the camper The same material I used for the bump stops I also placed under the single section of floor mat on top of the bracket. The bracket thickness makes it a bit taller than the bed so that combination came out equal to the doubled-up mat in the bed.
Strips of mat could not be used under the rear extrusion because the back of the camper is longer than the bed. So I ended up using mat material only under 3 sides of the perimeter (the front and both sides of the floorpack extrusion). As mentioned previously, Overland Explorer noted only the floorpack perimeter need be supported; not the entire floorpack. The extrusion touches down before the center of the floorpack anyway so nothing gained by having mat in the center of the floorpack. Also, not having mat material there saves a great deal of weight since a single 4' x 6' floor mat weigh 90 lbs.
Edit: Newer OEV campers now use pucks attached to the extrusion (outer perimeter of the footprint). And various height pucks are available and used depending on the height of the pickup bedrails. The goal is to have the camper barely above the bedrails to keep center of gravity low. Just make sure you have enough clearance between the bottom of the camper cabover and the cab roof since the pickup cab and pickup bed have a surprising amount of different flex.

Last edited:
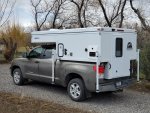
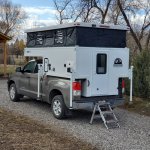
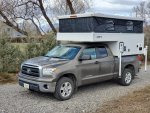
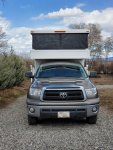
Loaded in it's final loaded height. The clearance between top of bedrails and camper is 5/8".
The clearance between the ribs on the pickup roof and the bottom of the camper cabover is 3". That is plenty close for me. I don't recall the exact distance on our FWC but from the eye, it seems about the same. This 3" gap looks natural.
My pickup suspension is stock with Firestone Ride-Rite airbags and the usual 10-ply E-rated tires. For FWC shell (with side dinette, furnace, stove, and the propane tanks and two AGM batteries positioned at the far rear of the camper), I typically ran around 30 - 35lbs in the drivers side airbag and 20 - 25 in the passenger side to make the rig sit level front to back. That had the truck riding level front to back with all our typical overnight food, food prep, camping chairs, etc.
For these images of the CAMP-X with no water in the tank, no camping gear, single 100-amp AGM (positioned at the front of the camper) and one full 10lb propane tank (also positioned at the front of the camper), it took only 15lbs of air on the drives side and 13 lbs in the passenger side to make the rig sit level front to back. Once I load up with camping gear, I expect to be closer to the 32lb/25lb of my FWC settings. Of note is that though the CAMP-X overall weight will be higher than the FWC, the truck seems to carry the weight better because two of the three heaviest items are at the very front of the camper rather than at the very rear (and behind the rear axle) and that is the propane and the camper battery. The CAMP-X water tank is also at the front of the camper which is nice. In our shell, we carried our water in the back seat of the truck when driving, so in both cases, our water weight was ahead of the rear axle and so sharing weight with the front axle/tires.


Last edited:
Similar threads
- Replies
- 7
- Views
- 2K
- Replies
- 2
- Views
- 966
- Replies
- 2
- Views
- 1K
- Replies
- 4
- Views
- 3K

