You are using an out of date browser. It may not display this or other websites correctly.
You should upgrade or use an alternative browser.
You should upgrade or use an alternative browser.
2020 Overland Explorer Vehicles (OEV) CAMP-X pop-up slide-in pickup camper (renamed "Back Country" as of 2023)
- Thread starter Chadx
- Start date
Ableguy,
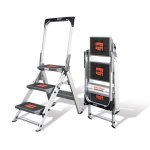
The step stool is Little Giant brand. They come with a flip up handrail that I removed (drilled out the rivets) as that rail precludes one from stepping forward into the camper. Removal of that rail also removed a bit of weight. Though a bit pricey (shop around for a deal), they are very sturdy and a nice wide step. We don't hesitate when stepping out of the camper down onto the stool. It's much better than the small plastic steps we used only one time and then replaced. We've used this Little Giant steps for 3 years. Some like the hitch steps, but we, more often than not, have either a bike rack in the hitch or a trailer of some type (enclosed trailer or fishing boat). Plus, I like having the steps around camp and in the shop to use.
We store it in the back seat area of the truck. It's the first thing we take out when we stop and the last to go in so plenty handy. We keep a handbroom handy to brush off pine needles, dirt etc. before we pack it away. Also put a mat under it to wipe feet before heading up into the camper. They make them in 2, 3, and 4 step versions. Manufacturer image attached (of one that has the handrail still in place).
This is the version we have: https://www.littlegiantladder.com/products/safety-step-ladder
(They also make a more economical, and slightly lighter weight, version: https://www.littlegiantladder.com/collections/ladders/products/jumbo-step )

Last edited:
seahaul
Active member
Hey chadx, have you got any pictures with stuff in there yet? I’m interested to see how you organize. I bought serial number 15 (3 after yours) but haven’t picked it up yet in Red Deer. I’m doing lots of planning in my head until I get her. We are very excited, they are amazing campers.
Seahaul,
We'll be loading it up Saturday for the first time and plan to do a quick, local shake-out trip this weekend. This will give us a better idea of where we want to organize what. Then we can start shopping for appropriately sized containers. Will be a work in progress for a while, but will share as we go and will we are open to any and all suggestions/ideas along the way. I'm looking forward to you adding pictures and ideas, from your rig, to this thread, too!
More general updates:
The Anderson plug is not yet attached to the truck so this quick trip will give us our first benchmark for amp usage. Camper is plugged into AC currently so we'll start with 100% SOC. We are used to 150amp AGM (so 75 amps usable) and that was with a much more efficient Engel top-load fridge. Now we have 100amp AGM (50amps usable) and the Dometic 65 front load fridge which will draw more. Not sure if the Truma heater is more efficient, or the same, as the Atwood unit from the FWC. The camper is still winterized so we are not filling the water tank nor using water pump or water heater this trip. I never pre-cool the fridge while still plugged into AC power; I just load it up before we go as that is what I'm used to with solar on previous camper. I always like to get a few baseline trips in order to calculate typical 24 hour draw. Then decide how to care for power needs. Not yet having the truck hooked up to the camper will make it easier to calculate.
Once the truck wiring is complete, I'll have that power source (REDARC max DC charge is 30 amps per hour, but as mentioned, I currently have that adjusted down to 25amps because that is the max charge rater for this particular 100 amp AGM battery). We usually don't stay in the same camp spot for more than a day or two (weekend trips). We do several long trips a year an then only stay one night with 3 to 5 hours of driving in between camping spots. Reality is that the pickup input and the factory 100amp AGM will likely be plenty for us as I expect to get nearly two days before at 50% SOC on this battery.
But, I do really enjoy setting up and monitoring a solar setup. But I also want to try a lithium battery. I won't need both. Solar would add weight overall but be slightly more economical. Changing to lithium battery would reduce weight overall and be a bit more costly. I'm in a unique situation from other new owners because I do need a new 100amp AGM for our fishing boat so re purposing the camper's AGM effectively pays back that $300 that I'd have to spend anyway. Adding solar panel and mounting hardware would be another $300 (depending on if I used rigid or flexible solar panel). So that means my effective price difference, between the two solutions, is $300 (based on a 100amp lithium costing about $900). More data needed before I even consider my next move there, though. I'm not going to add either of those just because I am interested in them. I'll only add if we need the power. Also have to keep in mind that, in a pinch, I can run the AGM to a lower SOC that 50%. Would prefer to not do that very often, but it's an option and dipping to 40% SOC once or twice a year is not going to make a significant useful life reduction.
Last edited:
Martyn,
Good point and something to consider for those that would be greatly concerned with loss of plumbing while traveling. We've happily used a FWC without plumbing for 3 years, so if a leak occurred and we weren't in a position to fix it, I'd simply drain the problematic joint/section and not use it for the remainder of the trip. Even if that meant no plumbed water supply at all, we'd simply revert to how we've used a camper for the last 3 years and fill a portable cooler/container for water supply and finish a trip. For others, that might be a major inconvenience, but would not bother us. It's no different than how we'll use the camper when the weather is cold enough that the plumbing is winterized. Also, I think the risk of a pex leak occurring is very low.
At this point in our lives, our trip durations are typically weekend trips plus a few 5 to 10 day trips each year. Those that are doing multi-month trips or are in the camper full-time may weigh the risk differently, but then, those type of folks typically prep differently and would typically carry appropriate tools for plumbing fixes and know how to use them if they are not going to be around "civilization" where it could be fixed by a shop.
Appreciate the input and it's something for each owner to take into consideration for how and how long they travel, their repair aptitude and appetite, etc.
Last edited:
LincolnSixAlpha
New member
Another view of the table support as well as the cutouts that allow one to monitor water level in watertank.
View attachment 578177
New for 2020, the rear cabinet face is starboard material rather than aluminum.
View attachment 578178
View attachment 578179
View attachment 578180
Tray slides out to allow access to portable toilet or other storage. Drawer is rated to support 300lbs I believe. It is narrow enough that I submit anyone approaching that weight won't comfortably fit there anyway. For users that want more room to use the toilet (or want that space for non-toilet storage), it may be preferred to remove the drawer, store the toilet or other items in the space and pull it out as needed.
View attachment 578182
Shows how narrow the seating space is when used on the drawer. It will work well for both my wife and myself. We typically avoid using it, but nice to have it there is we need it.
View attachment 578183
Do you happen to know the size of that "potty" drawer? Just curious the dimensions.
We have one very short overnight trip on the camper so far. That was without the pickup wiring being complete. Will hold off on reporting amp usage until we get another another trip in. RV dealer finally got in Anderson terminals so the wiring could be installed in the pickup. The 6 gauge wire has no voltage drop all the way back to the Anderson plug. Very nice. The 10gauge wire that it replaced suffered greatly from voltage drop. It was only able to push about 7 or 8 amps and only if the house battery voltage was very low. Tundra's having very low voltage alternators doesn't help (typically runs 13.9 to 14 volts). We won't have the voltage drop or amp limit with the 6 gauge wire. But I don't want to stress our pickup alternator if not absolutely necessary, so I've set the REDarc down to 10 amps max. It can go up to 30 amps, but I don't feel the need to charge that fast and stress the alternator unless it is an emergency and/or rarely and even then, the 100amp AGM has a .25C charging max, so I'll always limit max charge to 25 amps. One interesting note is the REDARC max charge amp applies to all settings, so doesn't matter if charging from truck, solar, 120v or a combination of them, it will push a max of your max charge setting into the battery. But it is also smart enough to know what how many amps are being consumed by other items so will draw enough amps from the various sources to fulfill that amp draw plus (if available) push your max charge setting to the house battery.
The running light wiring is not working correctly, so I'll troubleshoot their connections this weekend and see if it's an easy fix or if I take it back to the RV dealership yet again.
Quick comments from first trip. No condensation! Love the following: REDARC battery management system. Vents/fans - 10 speed, very quiet. Truma heater - great heat, quiet. Fridge worked great but is an amp hog compared to our previous Engel 45qt top load. Love having enough room in the cabover to leave all bedding and pillows in place when the top is down. Dometic stove was only used to heat some soup and make a grilled cheese sandwich, but stovetops are stovetops so not expecting anything surprising there. Camper is still winterized so no running water, sink, pump or water heater reviews yet. We plan to get out this coming weekend so another opportunity to evaluate (though still winterized).
For containers, last trip we experimented with the common 11" x 11" fabric cubes that are available (see picture). They also make them in 12x12 and 13x13. The 12x12 would work even better than the 11x11 we used and fit in the available cubbies.

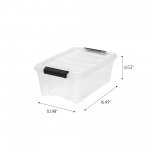
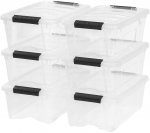
We are also going to try some clear tubs with lids that I use in my shop. One of the box stores sells them in 6 packs and I grabbed them and three of them can stack one on top of the other in the under-fridge compartment with lots of room left in front of and beside it. Brand is Iris Buckle Up 12.9 quart. Per the label, dimensions of each tub is: 16-7/16"L x 10-15/16"W x 6-1/2"H.
The running light wiring is not working correctly, so I'll troubleshoot their connections this weekend and see if it's an easy fix or if I take it back to the RV dealership yet again.
Quick comments from first trip. No condensation! Love the following: REDARC battery management system. Vents/fans - 10 speed, very quiet. Truma heater - great heat, quiet. Fridge worked great but is an amp hog compared to our previous Engel 45qt top load. Love having enough room in the cabover to leave all bedding and pillows in place when the top is down. Dometic stove was only used to heat some soup and make a grilled cheese sandwich, but stovetops are stovetops so not expecting anything surprising there. Camper is still winterized so no running water, sink, pump or water heater reviews yet. We plan to get out this coming weekend so another opportunity to evaluate (though still winterized).
For containers, last trip we experimented with the common 11" x 11" fabric cubes that are available (see picture). They also make them in 12x12 and 13x13. The 12x12 would work even better than the 11x11 we used and fit in the available cubbies.

We are also going to try some clear tubs with lids that I use in my shop. One of the box stores sells them in 6 packs and I grabbed them and three of them can stack one on top of the other in the under-fridge compartment with lots of room left in front of and beside it. Brand is Iris Buckle Up 12.9 quart. Per the label, dimensions of each tub is: 16-7/16"L x 10-15/16"W x 6-1/2"H.


Last edited:
seahaul
Active member
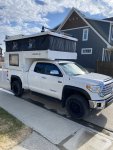
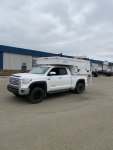
Got my Camp-x yesterday! Turned out amazing, the solar install was top notch, they used full length powder coated brackets, really pleased. Also got the roof rack. Because the Tundra has tall box sides, they installed heavy duty plastic runners under the camper which turns out to be an extra added bonus. Top quality tie downs, super pleased!! Chadx covered everything else. I have the same interior options except no extra fan and no king sized bed.
Attachments
seahaul
Active member
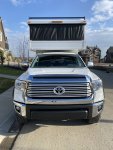
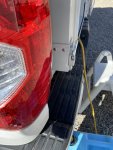
@MuleShoer Hi, some pics of the overhang. Probably too much for the rear bumper?
Attachments
Last edited:
Got my Camp-x yesterday! Turned out amazing, the solar install was top notch, they used full length powder coated brackets, really pleased. Also got the roof rack. Because the Tundra has tall box sides, they installed heavy duty plastic runners under the camper which turns out to be an extra added bonus. Top quality tie downs, super pleased!! Chadx covered everything else. I have the same interior options except no extra fan and no king sized bed.
Rig looks great! You have a different font "CAMP-X" logo on the side than we do. I like them both. Just noticed it is all.
Solar looks great. I assume they ran the wires through the roof down into the same wire loom at the rear of softtop?
Those plastic runners look nice. I effectively did the same with mine by doubling up the 3/4" rubber mat. Gave perfect clearance for the Tundra bedrails.
What is the rear step you have attached there? Is that an option you had added or they are now including? Another other fold out steps on the back? If so, can you post a picture taken from behind to show placement?
Can you post a picture of the lid to your water tank/battery compartment? Wondering if the lid is built into your dinette cushion like ours or it's not it's own aluminum lid and the cushion is separate (which I like better and saw in a picture of the CAMP-X with fridge delete). I may source a new lid from Overland if that is the case.
Last edited:
We removed our our King Bed extension and have not been taking it with. Turns out, the CAMPX is wider than the FWC and insulated better so no issues sleeping East West. With heads on Drivers side, the rear person (me!) can easily climb over the legs of other person and step down to, or up from, the dinette seat. And no messing around with the pullout before and after bed.
Answered a couple other bedding and interior cabover space questions in private messages and thought I'd post some info here as well:
Stock mattress: 3" thick
With stock mattress removed and top down, distance from cabover floor to ceiling: 13.5"
Cabover floor measured up to where the soft top folds in: 10"
Cabover floor measured to chrome metal handle that protrudes down when top is folded: 4.75"
Cabover floor to white metal hinge panel: 5.5"
Our memory foam and soft foam mattress is 5" tall. The chrome handle pushes down into it a bit, but top closes fine. I may unbolt that handle and remove it. I use a strap tied to that handle to close the top so I don't have to crawl up into the cabover to collapse the front. If I remove that handle, I will loop that strap through the metal hinge plate to server the same purpose (I'll post images when/if I do that). There is a lot of room for our pillows and top quilts to stay up there with the top down; about 8.5" between the top of our mattress and the ceiling. We just keep the area clear where the hinged support lays.
Last edited:
MuleShoer
Adventurer
If it is over an inch past the tail light it would require moving the Bumper back with an offset plate. This is the same problem with FWC campers...ugh@MuleShoer Hi, some pics of the overhang. Probably too much for the rear bumper?
i really want a Camp X but will have to change truck to accommodate Which is a 2021 Deal...it will take that long for my wife to get tired of me complaining the truck bed is too short....

