2020 Overland Explorer Vehicles (OEV) CAMP-X pop-up slide-in pickup camper (renamed "Back Country" as of 2023)

PaulPritchard

ArizonaPaul
I went back an re-read my post and it didn't make much sense. Ha. I went back and edited it for clarity.
You are correct that the threaded rod, that feeds down in the silver tube, will be the limiting factor if/when it bottoms out. (The threaded rod in the folding handle can't really be adjusted due to handle clearance when shut). If you screw your current turnbuckle all the way into the silver tube so the threaded rod bottoms out, what is the measurement from the inside hook to inside hook (with the handle clamped shut like it was on and holding down the camper)? You mentioned only an inch or so of threaded rod showing when bottomed out so guessing you are around 17.25" inside-hook to inside-hook, so you might be fine. If you need to shorten the threaded rod, it will be a very small amount. Curious how much rod was left inside the silver tube when you had it adjusted out for your short bed? Or, the measurement from inside-hook to inside-hook when clamped down.

MisterSmith's is about 17" as shown above. Mine is about 16.25" which has next-to-no thread adjustment left and is the tightest you can make these turnbuckles. Mine used to be another 3/4" longer (around 17"), but adjusted my under-camper support to be the shortest possible while still clearing my bed rails. I used to have two 3/4" mats but now only have one 3/4" mat with a shim, so mine is likely the shortest turnbuckle setting you'll encounter. This is on a 2013 Toyota Tundra with 6.5' bed. Some pickups have taller bed rails and so require taller under-camper mats or pucks which means a longer turnbuckle adjustment.
Thanks chadx. I appreciate your clarification. When the dealer (not Big Sky RV) installed my new brackets on my new truck they said if I needed to shorten the rear Torklifts just cut down the threaded rod. Since then I couldn't figure out how doing that would shorten the Torklifts enough, so I do appreciate your and MisterSmith's response.

The measurement from inside hook to inside hook for my former 5.5' bed configuration is 21.25".

As an aside, for my new truck I asked whether I needed a longer bed mat for my longer bed. They said they don't recommend mats any longer, unless the taller truck bed rails dictate the need. I believe my new truck bed rails are shorter than my former truck's, so I likely won't need to supplement the bottom-attached pucks on my Camp-X.

As a further aside, the dealer also told me that if necessary the Camp-X attached rear brackets could be swapped (the left rear could be swapped with the right rear) so that the bracket angle is oriented properly to the bed bracket. He said that attaching the Torklift on a camper bracket angled toward the front of truck to a bed bracket positioned more toward the rear of the truck could cause the camper bracket to bend. So, if the camper brackets are swapped the proper bracket-to-bracket angle could be preserved. Something I didn't know.
 

Chadx

♫ Off road, again. Just can't wait to get...
OEV implemented the pucks after our CAMP-X was manufactured so dense rubber livestock mats were still the norm then. Rather than running the entire mat (100+ lbs), I simply cut 4" - 5" strips since only the footprint perimeter needs to be supported (the extrusion). Since camper is longer than the bed, my strips support under the front and both sides. Original post here: https://expeditionportal.com/forum/...e-in-pickup-camper.214329/page-2#post-2773760 but later, I went down to one 3/4" bed mat and a thin shim rather than two 3/4" thick strips.

Different puck heights are available. I believe OEV installs the appropriate puck height for the customer's pickup brand and bedrail height if it's a customer-ordered unit. For dealer stock campers, I imagine dealerships have a variety of puck heights in stock and install the appropriate ones upon purchase.

CAMP-X height, from base straight up to shelf (read: needed bedrail clearance) is 21.5" on our CAMP-X (not including any pucks or mat). Easy enough to measure new pickup bed rail height to determine if you'll need puck/mat changes.

The rear brackets have changed for the better since our camper was manufactured. The orientation was changed to allow room to open and close the turnbuckle handle without hitting the pickup bedrail.
Here is pic of ours which you an compare to yours (and to the one MisterSmith posted above).

20210102_131330.jpg
 

PaulPritchard

ArizonaPaul
OEV implemented the pucks after our CAMP-X was manufactured so dense rubber livestock mats were still the norm then. Rather than running the entire mat (100+ lbs), I simply cut 4" - 5" strips since only the footprint perimeter needs to be supported (the extrusion). Since camper is longer than the bed, my strips support under the front and both sides. Original post here: https://expeditionportal.com/forum/...e-in-pickup-camper.214329/page-2#post-2773760 but later, I went down to one 3/4" bed mat and a thin shim rather than two 3/4" thick strips.

Different puck heights are available. I believe OEV installs the appropriate puck height for the customer's pickup brand and bedrail height if it's a customer-ordered unit. For dealer stock campers, I imagine dealerships have a variety of puck heights in stock and install the appropriate ones upon purchase.

CAMP-X height, from base straight up to shelf (read: needed bedrail clearance) is 21.5" on our CAMP-X (not including any pucks or mat). Easy enough to measure new pickup bed rail height to determine if you'll need puck/mat changes.

The rear brackets have changed for the better since our camper was manufactured. The orientation was changed to allow room to open and close the turnbuckle handle without hitting the pickup bedrail.
Here is pic of ours which you an compare to yours (and to the one MisterSmith posted above).

View attachment 707329
Thanks chadx. As usual, useful and interesting responses.

At least with your brackets you can lock your Torklifts.
 

MisterSmith

Member
I've not wired an inverter into our CAMP-X but have thought about it quite a bit. While you can do it either way, I would personally value running it through the shunt otherwise the SOC will constantly be off (you will never know what you have drawn and REDARC won't know what to put back into the battery bank). You don't mention the size of the inverter and it's max draw, but I know you are thorough enough to have confirmed the shunt is rated for enough amps to handle the inverter and if so, then you are good to go with running it through the shunt as long as you replace that factory battery-to-shunt negative cable with the larger like you have speced in diagram B.
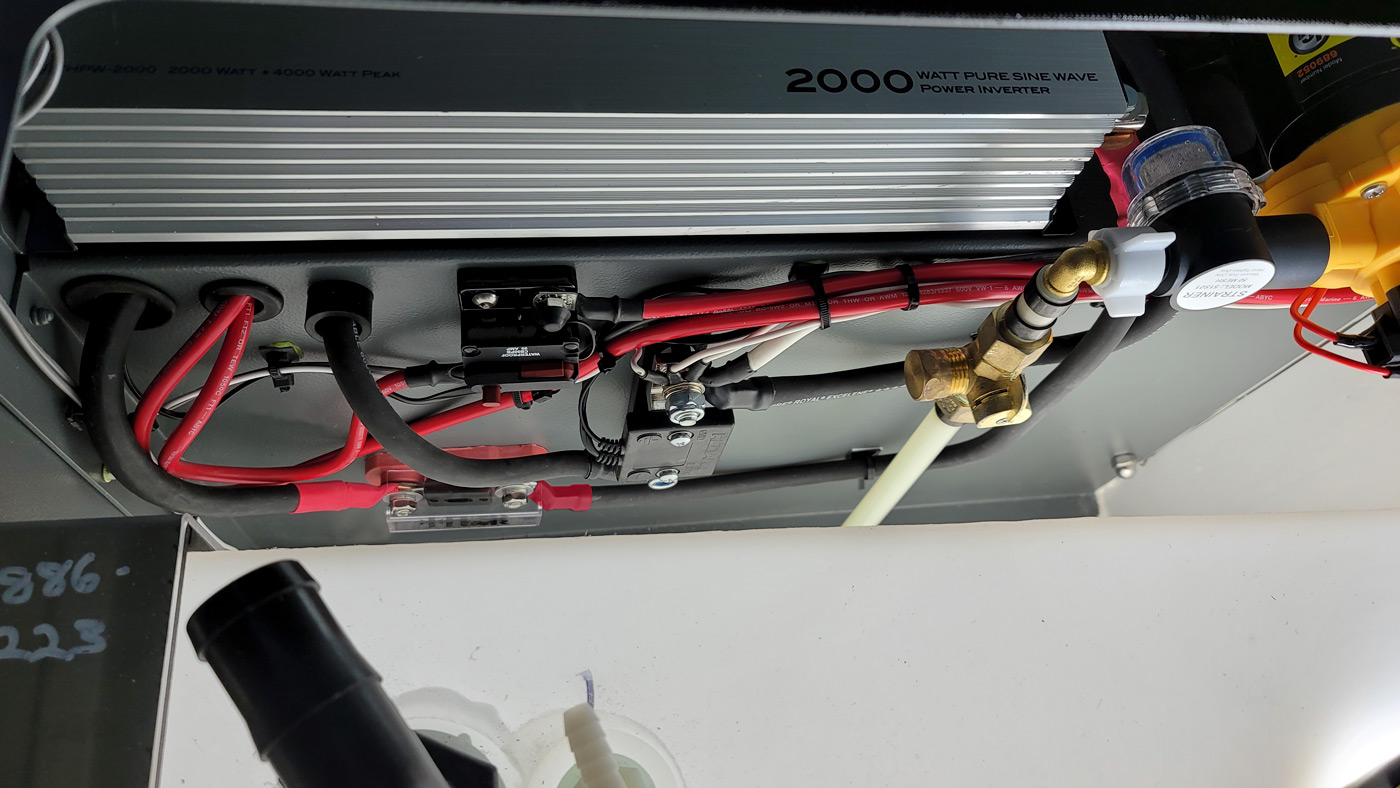
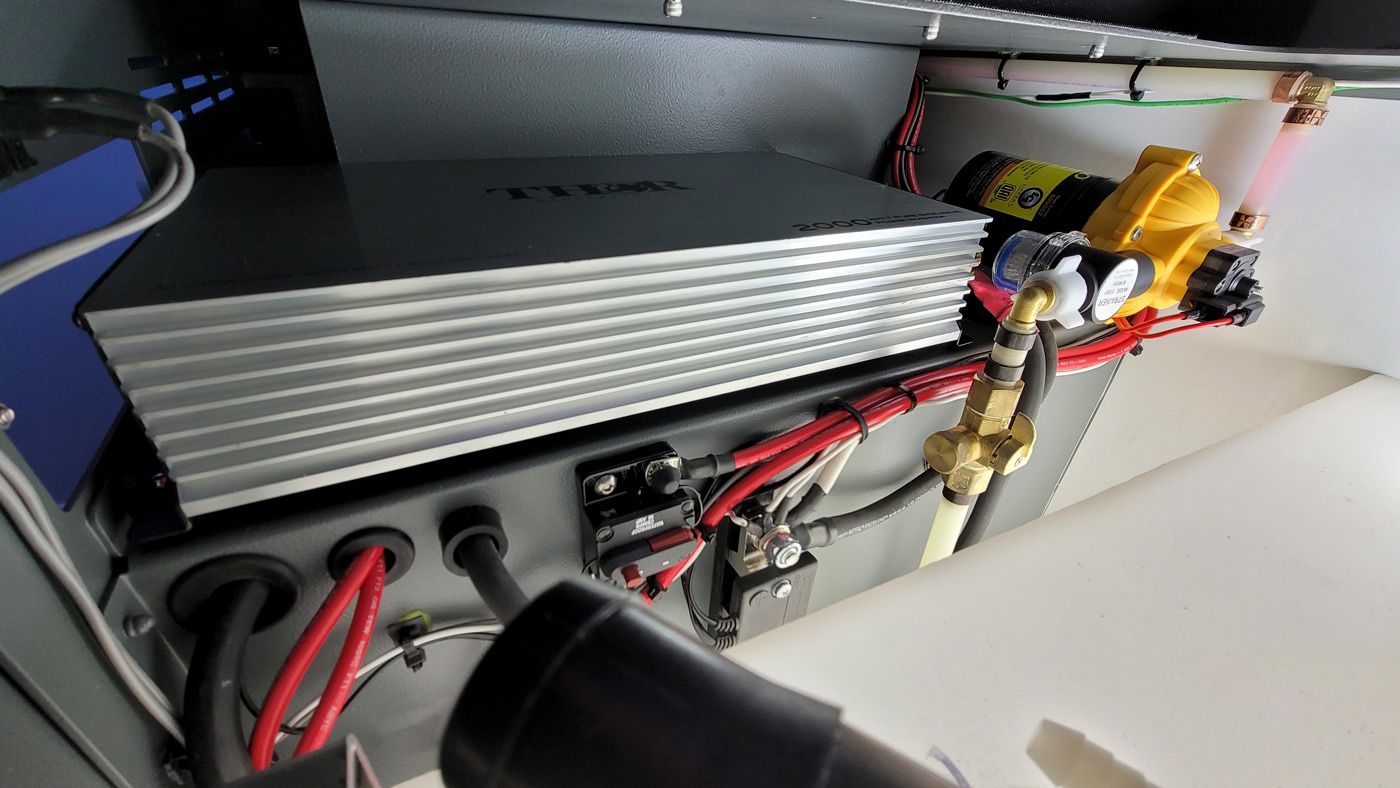
I completed the inverter install via the REDARC Sensor/Shunt (rated @ 300 amps). I chose the Thor 2000-Watt DC Inverter Kit-2 (THPW2000-KIT2) which comes with 1/0 cables, a fuse, and an On/Off remote switch. The dimension of the unit are 16.92L x 8.5W x 3.34H, which is a tight squeeze, but fits perfectly into the space above the battery.

20220216_084849.jpg


20220216_085259.jpg


20220216_085333.jpg


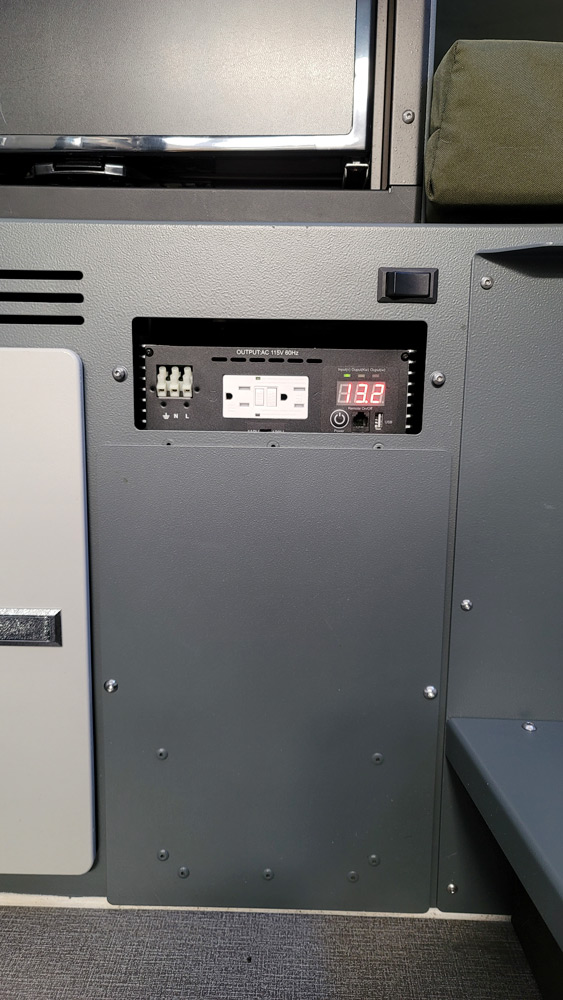
There's still enough room to put the water tank fill and vent hoses back on above the inverter. I haven't selected a spot yet for the outlet and the remote switch. I'll probable put it in the rear where the access door is for the REDARC display and light switches.
 

Chadx

♫ Off road, again. Just can't wait to get...
I completed the inverter install via the REDARC Sensor/Shunt (rated @ 300 amps). I chose the Thor 2000-Watt DC Inverter Kit-2 (THPW2000-KIT2) which comes with 1/0 cables, a fuse, and an On/Off remote switch. The dimension of the unit are 16.92L x 8.5W x 3.34H, which is a tight squeeze, but fits perfectly into the space above the battery.

There's still enough room to put the water tank fill and vent hoses back on above the inverter. I haven't selected a spot yet for the outlet and the remote switch. I'll probable put it in the rear where the access door is for the REDARC display and light switches.

Very slick! Will you also leave the inverter panel off allow for access to that 120v outlet and the face of the inverter? Do you predict cooling will be adequate with cover plate on? Looks like the fridge lower vent is nearby so imagine the inverter heat will be drawn up and out the top fridge vent along with the fridge heat.

Regarding wiring the 120v circuit to an rear service panel, I assume that will be strand wire not only because it handles vibration better compared to solid copper/romex but to accommodate opening/closing the service panel? Or were you thinking the outlet and remote switch would not be on the face of the swing-down service panel but off to the side on the aluminum cabinet itself? Countertop outlet might be another option.

In our year CAMP-X, one 120v outlet was under the sink and one at the rear of the camper up on the countertop. These are only live when connected to shore power and the under-sink outlet is what the REDARD 120v circuit plugs into. Those shore power outlets were discontinued later which seems reasonable. We never use ours so the switch to have the outside shore power plug feed only the REDARC seems like a good move. And that outside plug was changed to a typical 120v plug rathe than the large 30amp camper plug which was way over kill and required carrying an adapter or at least having one handy at home rather than being able to plug the camper into any extension cord directly. Simple is better. But just mentioning this because a countertop outlet might be another outlet location to consider. I've also seen those slick outlets that retract down into the countertop when not in use and pop up when you need them.

Image of our factory countertop outlet and undersink outlet for reference...

20200405_120519.jpg

20200405_120615.jpg

20200405_120624.jpg
 
What burner cooktops are the latest versions coming with?

The Dometic PI8022US 2 burner unit in our 2019 Camp-X is faulty - it won't stay lit on either burner. I've spent $140 on new thermocouple parts which didn't fix it. I spent $150 on an RV Tech who rang Dometic and they couldn't do anything to help.

Messaging with the OverlandEx folks they got a suggestion from Dometic of new burner/valve assembly (no longer in production) and/or pressure regulator (can't find it in stock or even listed anywhere).

Given I'm close to $300 and nowhere on fixing the current cooktop, I'm thinking of just replacing it completely. But I would need something very close in size to match the current countertop cut-out.
 

MisterSmith

Member
What burner cooktops are the latest versions coming with?

The Dometic PI8022US 2 burner unit in our 2019 Camp-X is faulty - it won't stay lit on either burner. I've spent $140 on new thermocouple parts which didn't fix it. I spent $150 on an RV Tech who rang Dometic and they couldn't do anything to help.

Messaging with the OverlandEx folks they got a suggestion from Dometic of new burner/valve assembly (no longer in production) and/or pressure regulator (can't find it in stock or even listed anywhere).

Given I'm close to $300 and nowhere on fixing the current cooktop, I'm thinking of just replacing it completely. But I would need something very close in size to match the current countertop cut-out.

My 2022 has a Suburban model SDS2.
 

RAM_ID_190

New member
From the info given to me so far, the CAMP-FX is the same length and floorplan as CAMP-X (rear entry with the same counter, dinette and galley locations) simply expanded on the bottom (exterior footprint) to be a flatbed model. Flatbed form factor will allow for much more built in storage options (some accessed from inside and some from outside) since the footprint is full width, like the HBE, rather than indented to fit between wheel wells of a pickup bed. There are a couple more features, but I'll hold off until the final designs are complete and OEV starts revealing hopefully in the next few weeks. Then I'll start a CAMP-FX thread. No sense in starting the other thread now and have the first 3 pages be speculation. I'll start is when the first post can have some solid content.

Chad, not sure I am envisioning this description...confirm your impression is that the CAMP-FX will be designed to be installed on a tray still, not in bed of truck? Basically a rear entry HBE? I just sold my FWC Grandby and was trying to muster up the poor money-management to order an HBE. But now, I may have to hold off to see what this CAMP-FX is all about.
 

Chadx

♫ Off road, again. Just can't wait to get...
Chad, not sure I am envisioning this description...confirm your impression is that the CAMP-FX will be designed to be installed on a tray still, not in bed of truck? Basically a rear entry HBE? I just sold my FWC Grandby and was trying to muster up the poor money-management to order an HBE. But now, I may have to hold off to see what this CAMP-FX is all about.

Yes, CAMP-FX will is basically a "flatbed X" model. Same layout as a CAMP-X (rear door, drivers-side galley, passenger side dinette) but since a flatbed format, there will be much more room for storage since the lower sides of the camper are not notched inward to fit in a pickup bed. There are a couple other nice surprises in the package as well they are still finalizing. Arnold said they will have the specs and pics up on their website in mid-April, well ahead of EXPO West which is where they will be featuring a CAMP-FX. And he said, as the build progresses, they will share info on IG. I'm anxious for the design to mature and the first specs/pics to be released and then I will start a new thread on it. Should be a fun one to see.
 

MisterSmith

Member
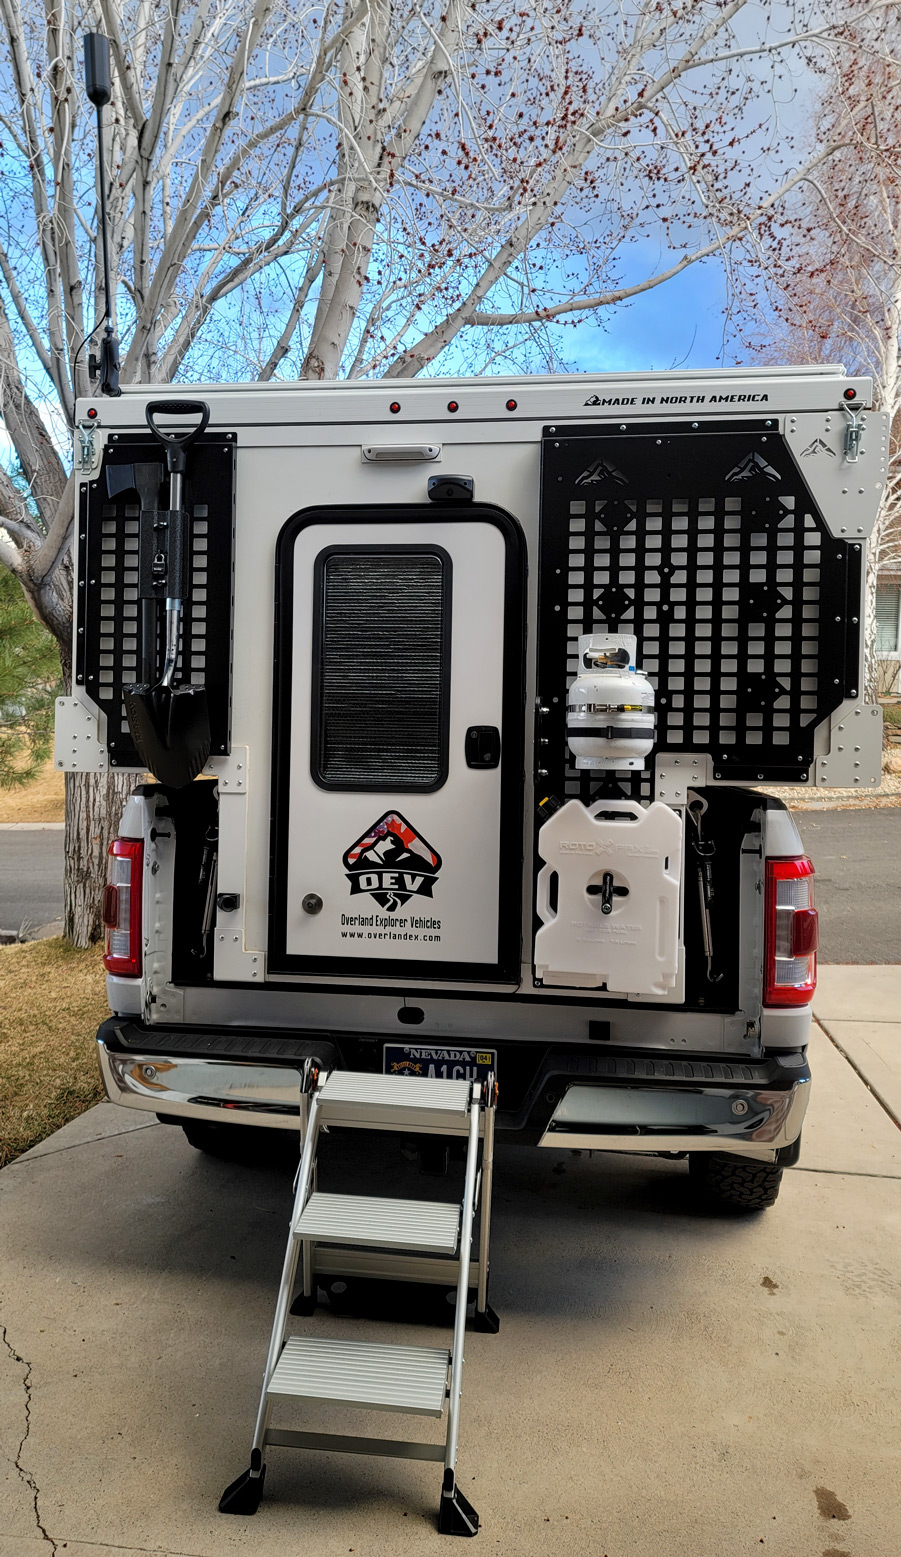
It's been kind of quiet here so I though I would share some recent additions. My 2022 CAMP-X didn't have the left side molle panel, so I had it installed last week.

20220304_171441.jpg


I added the two fresh water Rotopax containers (2 Gallons Each) which required 1 RotopaX RX-EXT Pack Mount Extension and 1 RotopaX RX-LOX-PM Pack Mount Lock Very easy installation, as the holes in the molle panel match the Rotopax mount.

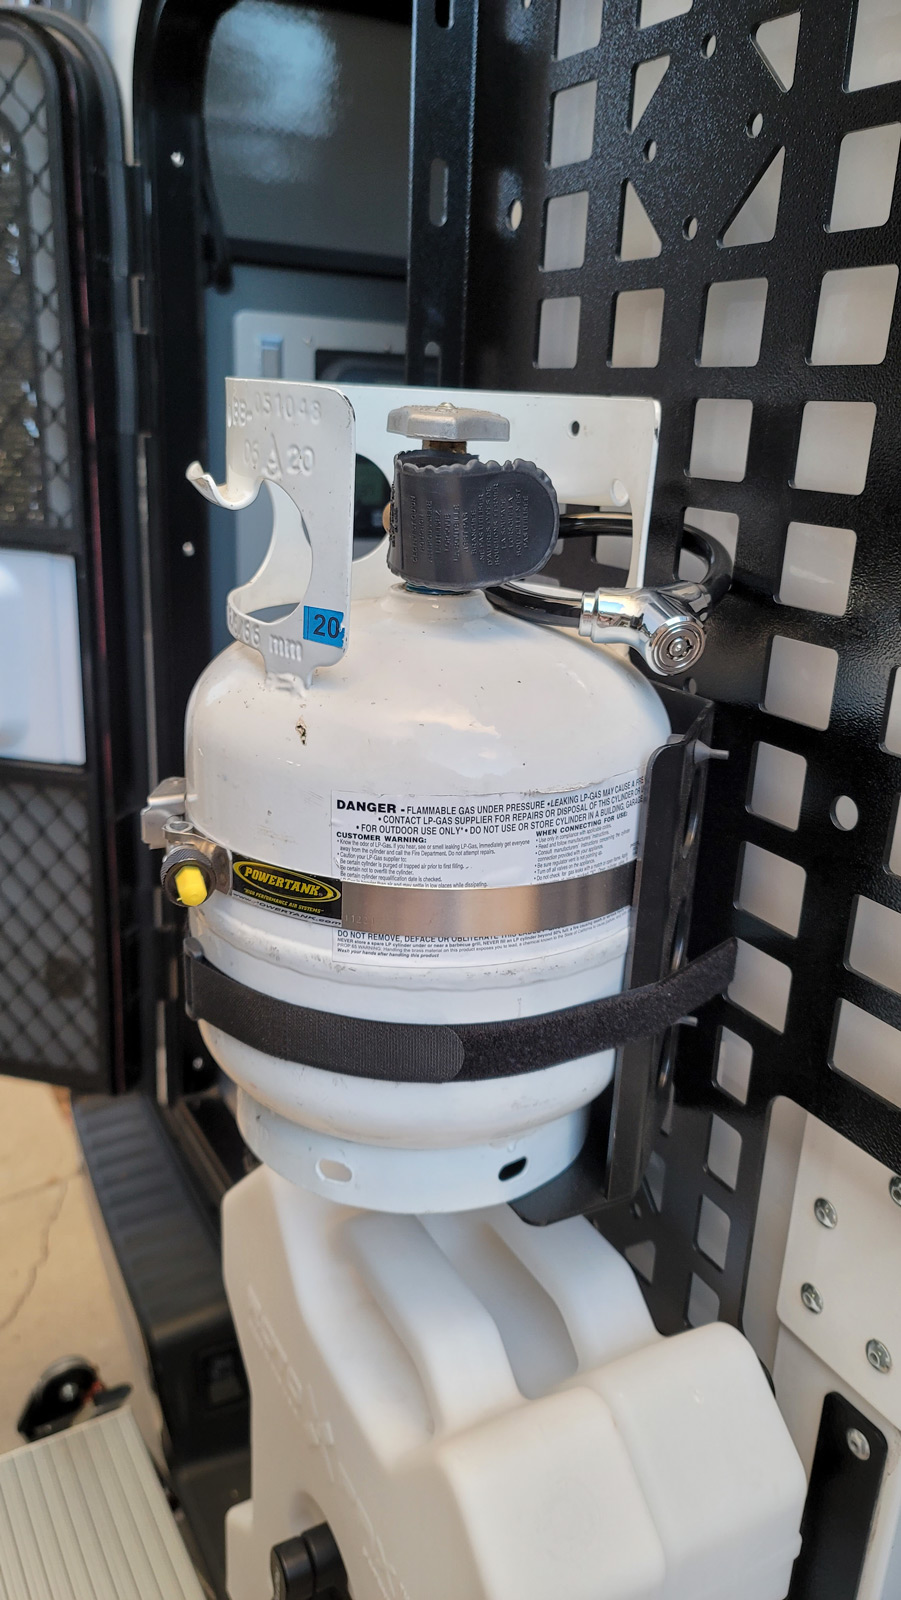
Next up, the Power Tank Propane Tank Bracket. This is a nice unit, I did have to cut some aluminum bar stock to mount it.

20220304_173710.jpg


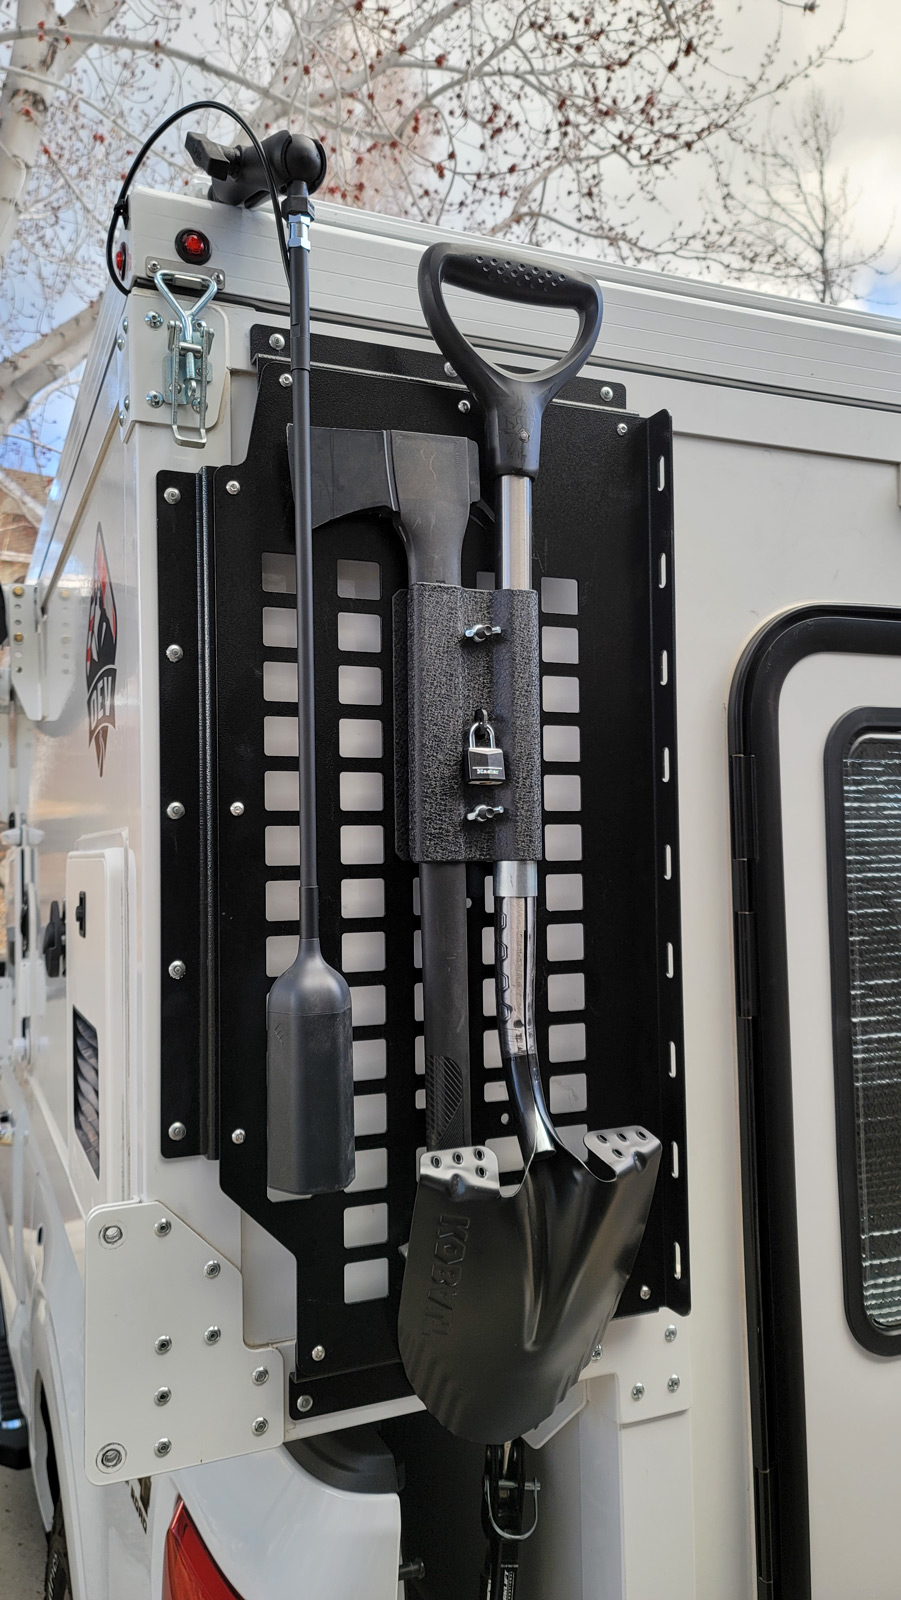
Followed by the Smittybilt Axe And Shovel Mount It looks nice and works, but the whole reason I bough it was because of the lock feature. It's really difficult to find a lock that will fit it as the lock tab is too short. As with the Power Tank, I had to cut some aluminum stock to mount it. You can decide which tool is better to drop on your head when you're trying to use it, the design is pretty bad.
20220304_171613.jpg


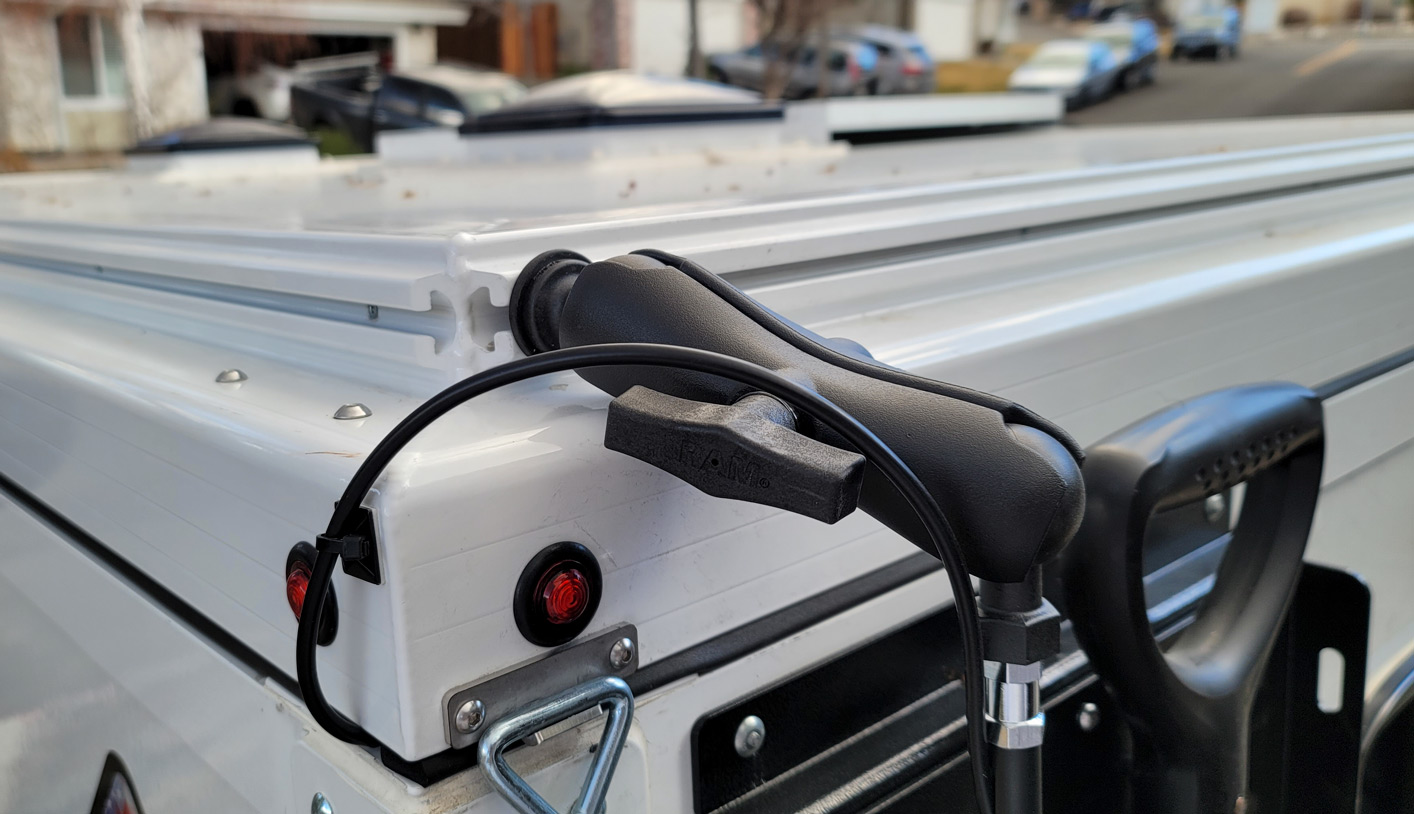
Last up is the RAM Track Ball Heavy Duty Mount for the weBoost. This makes the mounting of the weBoost antenna really easy, very happy with it. That said, the weBoost is pretty much as lame as it's always been. The Cel-Fi Go is far superior to the weBoost. I purchased both last year for our Surveyor trailer and ended up never using the weBoost. Only installed it because I already had it and it's going to be a few more months before Starlink enables roaming. Very much looking forward to the end of cellular boosters and phone company based internet.
20220304_171233.jpg


Waiting on a few more goodies to come next week and then we're off to Baja for our first big trip starting March 17th.
 
Last edited:

PaulPritchard

ArizonaPaul
It's been kind of quiet here so I though I would share some recent additions. My 2022 CAMP-X didn't have the left side molle panel, so I had it installed last week.

20220304_171441.jpg


I added the two fresh water Rotopax containers (2 Gallons Each) which required 1 RotopaX RX-EXT Pack Mount Extension and 1 RotopaX RX-LOX-PM Pack Mount Lock Very easy installation, as the holes in the molle panel match the Rotopax mount.

Next up, the Power Tank Propane Tank Bracket. This is a nice unit, I did have to cut some aluminum bar stock to mount it.

20220304_173710.jpg


Followed by the Smittybilt Axe And Shovel Mount It looks nice and works, but the whole reason I bough it was because of the lock feature. It's really difficult to find a lock that will fit it as the lock tab is too short. As with the Power Tank, I had to cut some aluminum stock to mount it. You can decide which tool is better to drop on your head when you're trying to use it, the design is pretty bad.

20220304_171613.jpg


Last up is the RAM Track Ball Heavy Duty Mount for the weBoost. This makes the mounting of the weBoost antenna really easy, very happy with it. That said, the weBoost is pretty much as lame as it's always been. The Cel-Fi Go is far superior to the weBoost. I purchased both last year for our Surveyor trailer and ended up never using the weBoost. Only installed it because I already had it and it's going to be a few more months before Starlink enables roaming. Very much looking forward to the end of cellular boosters and phone company based internet.

20220304_171233.jpg


Waiting on a few more goodies to come next week and then we're off to Baja for our first big trip starting March 17th.

That's a great looking rig, MisterSmith. Is your propane bottle to supplement your Camp-X propane, or do you use it for something else? I'm still not sure how you mounted it cutting aluminum bar stock. I have the molle panels, too, and I'm always looking for good ways to mount tools and things. I just got a portable fire pit that runs off of propane so I'm looking to buy a 10lb bottle and bracket to put on my Camp-X.
 

MisterSmith

Member
That's a great looking rig, MisterSmith. Is your propane bottle to supplement your Camp-X propane, or do you use it for something else? I'm still not sure how you mounted it cutting aluminum bar stock. I have the molle panels, too, and I'm always looking for good ways to mount tools and things. I just got a portable fire pit that runs off of propane so I'm looking to buy a 10lb bottle and bracket to put on my Camp-X.

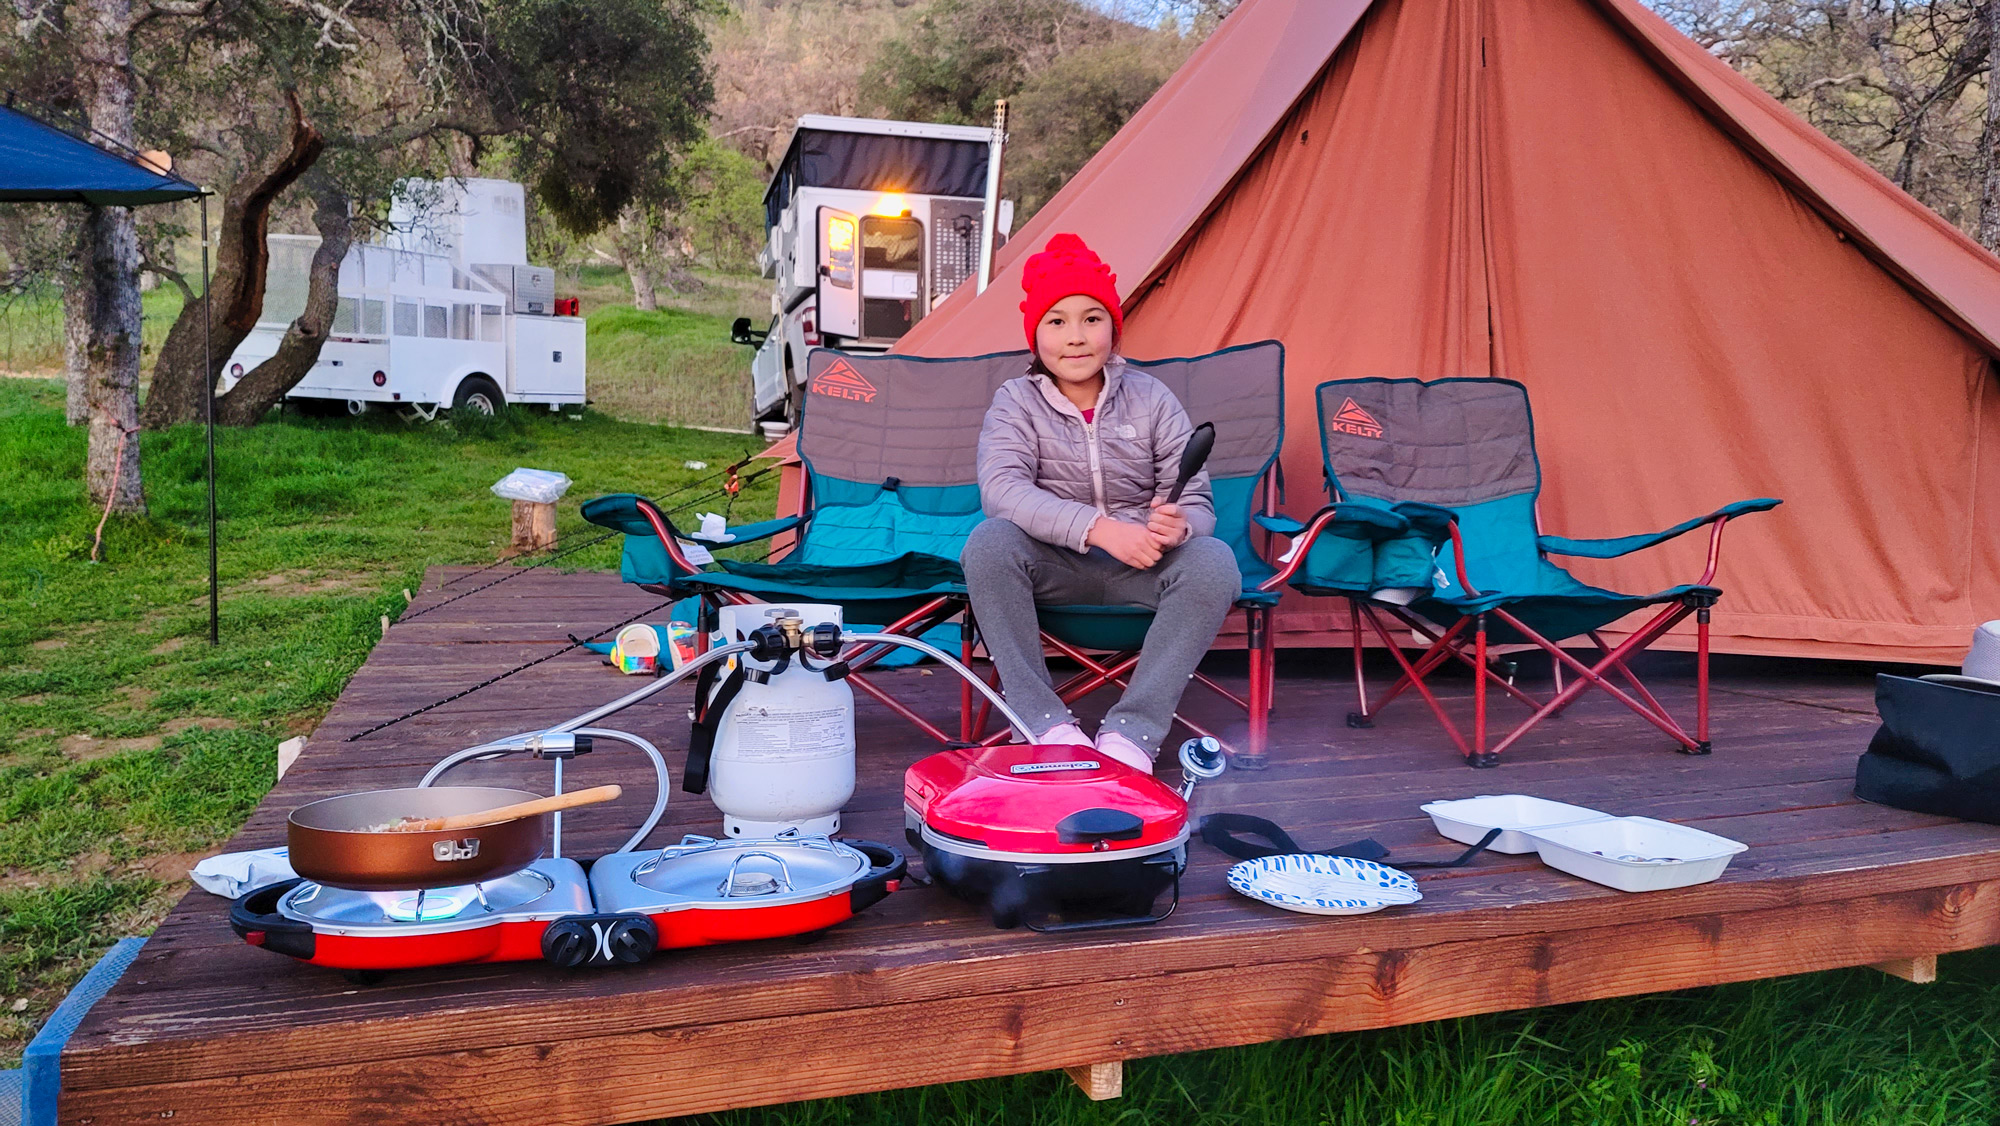
The 10lb bottle is for our outdoor kitchen stuff, we also have a LavaBox portable campfire.

20220219_180304.jpg


For the mounting of the PowerTank, I was able to get 2 holes to line up with the molle panel holes and on the bottom I used a piece of aluminum from behind...maybe I should have called it flat stock.
 

PaulPritchard

ArizonaPaul
The 10lb bottle is for our outdoor kitchen stuff, we also have a LavaBox portable campfire.

20220219_180304.jpg


For the mounting of the PowerTank, I was able to get 2 holes to line up with the molle panel holes and on the bottom I used a piece of aluminum from behind...maybe I should have called it flat stock.
Thank you for the information. I hope you will share pictures of your Baja adventure.
 

Forum statistics

Threads
188,235
Messages
2,904,265
Members
229,805
Latest member
Chonker LMTV
Top