98 Jeep ZJ "SHTFV"

SP Jon M3

Observer
Good call on the Scepter cans. You will want to make one small change on the cans in the near future. The diesel cans have rubber gaskets, and they don't hold up well at all to gasoline. What you'll want to look for are some viton gaskets, these are made for the gasoline fuel cans.

I've ordered from this guy, and he's always been great to deal with. Plus he seems to have all the parts needed to fix a scepter can, like the viton gaskets, and the cap flanges which can crack over time.

http://www.jagmte.com/index.php?route=product/product&product_id=74
 

rb70383

Observer
Nice jeep. Been following this so far. Just had to redo the heater core on my wife's 98 GC twice. :( New one leaked at the swivel joints. Anyways, decided to run the wires for the brake controller while the dash was out. Also after some ideas with her, made the hole a little oversize for future lighting. I really like the sPods. How big of a hole is needed in the firewall? Also where did you run it? My rig is a 89 Ramcharger and a wiring mess I am trying to clean up. Dont want the basically unmolseted GC to turn into the RC. So I am trying to thoughtfully run any additional wiring on the GC.

Factory did a decent job on the wiring. Oh and on your trailer lights and lamp outages. The factory tow package uses relays to supply power to the trailer plug. All that is under the trim on the left rear wheelwell house. (according to the FSM) Just an fyi. :sombrero:

Oh and where are the night shots!? :)
 
Last edited:

k1w1 Jeeper

New member
Over the last month or so I have followed your thread all the way from the start. I read up to the beginning of August in one long read. I had been tempted to join the site for a while, but tonight I just had to sign up to tell you how awesome your build is. It is completely insane!! :wings: I found your thread simply because I wanted some ideas for setting my wagon up for camping. I love your sPod, the awning and the lights. We are just coming into spring down here and I can't wait to get out there camping. Keep up the great work!
 

Recce01

Adventurer
We would both be lost without our wives. Mine too is my navigator and co pilot. Shes a trooper too and she puts up w all my shop/build time and me always throwing around ideas for the zj. We r lucky. Ive got to say awesome job on the fuel can mount. I have a milspec fuel can w carrier mount and 2 gi water cans I acquired prior to getting out of the army. I use them quite a bit. Im looking to pick up 2 more carrier mounts for my trailer.

Oh ya, the wife is an integral part of the operation. Gotta love "home cooked" meals on the road too!

Again sir i have to say this amazing and inspirational. I have begun to replan/rework my XJ using some of the ideas from your build. Thank you very much for posting this

Thank you very much for the compliments! I am looking forward to checking out your XJ.

Good call on the Scepter cans. You will want to make one small change on the cans in the near future. The diesel cans have rubber gaskets, and they don't hold up well at all to gasoline. What you'll want to look for are some viton gaskets, these are made for the gasoline fuel cans.

I've ordered from this guy, and he's always been great to deal with. Plus he seems to have all the parts needed to fix a scepter can, like the viton gaskets, and the cap flanges which can crack over time.

http://www.jagmte.com/index.php?route=product/product&product_id=74

Thanks for the link Jon! I will be purchasing the right materials as soon as my Jeep budget gets replenished :)

Nice jeep. Been following this so far. Just had to redo the heater core on my wife's 98 GC twice. :( New one leaked at the swivel joints. Anyways, decided to run the wires for the brake controller while the dash was out. Also after some ideas with her, made the hole a little oversize for future lighting. I really like the sPods. How big of a hole is needed in the firewall? Also where did you run it? My rig is a 89 Ramcharger and a wiring mess I am trying to clean up. Dont want the basically unmolseted GC to turn into the RC. So I am trying to thoughtfully run any additional wiring on the GC.

Factory did a decent job on the wiring. Oh and on your trailer lights and lamp outages. The factory tow package uses relays to supply power to the trailer plug. All that is under the trim on the left rear wheelwell house. (according to the FSM) Just an fyi. :sombrero:

Oh and where are the night shots!? :)

I actually run the wires under the dash, then out the passenger door and into the right front fender. I debated quite a lot as to where to run them and decided that would be the best for us "for now" I intend to remove the interior, replace the factory headliner (sagging) and drill a hole in the roof to route the wiring. I figured I would do it the right way through the firewall at that point. A little lazy I guess, but seems to work fine for now.

Thanks for the intel on the hitch wiring, good to know!

Pics of the lights at night, coming soon! Thanks man :)

Over the last month or so I have followed your thread all the way from the start. I read up to the beginning of August in one long read. I had been tempted to join the site for a while, but tonight I just had to sign up to tell you how awesome your build is. It is completely insane!! :wings: I found your thread simply because I wanted some ideas for setting my wagon up for camping. I love your sPod, the awning and the lights. We are just coming into spring down here and I can't wait to get out there camping. Keep up the great work!


Wow! I am very honored that you joined the site just to comment on the thread. I am glad to hear you like the build, and I appreciate your compliment! Be sure to start your own thread on here and enjoy all the info exchanged by like minded campers.
I will be making more posts soon, been way too busy lately!!

Thanks again to all who drop in and participate in this thread!
 

Recce01

Adventurer
On the road repair

I find that I am working on 3 to 4 different projects on this vehicle all the time. I rarely start and finish a project completely. Part of this is due to the desire to get out and use it! As much as I enjoy the building process, I really appreciate getting out and enjoying the great outdoors. My family recently spent 5 days on the road exploring the eastern slope of the sierra Nevada mountains. Not all excursions are trouble free, this trip was extremely fun for our family but presented a few challenges I didn't see coming. On our way up the 395 we pulled off to fuel the rig and pick up some ice cream. Upon stopping, we wanted to restock the fridge with water so I went to the back of the Jeep and the rear gate would not open :( I had noticed it opening "with resistance" in the past but thought nothing of it. Usually a couple of pulls on the handle and it would pop right open, not this time.

This had me fairly concerned, as we had lots of supplies in our pelican cases that we would be needing, such as our dry food storage. In case you are not completely familiar with this build, I have a complete storage system that fills the entire area from the back of the rear seats to the rear gate. This made our dilemna even more challenging. I quickly consulted google and found that many people had experienced the same fate. While researching a solution for our issue, I discovered that my problem was going to be significantly worse and harder to overcome than the average ZJ owners issue. The suggested methods to rectify the issue were all the same, "Simply climb in the back and remove the carpeted/platsic panel covering the gate and open the latch manually. This is where it all goes sideways, I did not have the option of doing so, due to the storage system.

This is one of those moments where I need to keep my cool and spend some minutes pondereing the best course of action without alarming the family. I decided that we would just carry on as if all was well and hit our first camping spot at Leavitt Lake. The road to Leavitt Lake was fairly easy to negotiate, with only one real spot that required 4x4. There were a few shallow stream crossings which excite me because most of our travels are in the desert and are free of water of any kind :)

7820323718_cc6eaa5d78_c.jpg


The road approaching the lake opened up and revealed the crystal clear waters of Leavitt Lake, what a beautiful place!

7820344946_50f3255e8b_c.jpg


We made our way around the lake looking for a nice private camp spot that was somewhat level. There were a few campers up here, but nothing like the zoo that is the $21/night "reservations required" camp spots at standard camp locations.

7820384928_b48b2f0f1b_c.jpg


We finally located a spot that would be perfect for us and began to set up the camp site when the family said time to eat. Of course I still hadn't sorted the gate issue and was hoping it had decided to fix itself as we bounced our way down the road. Murphy wouldn't let us down unfortunetly. We tried everything we could think of to no avail. I opened the glass and reached down behind the box trying to free the latch with a screwdriver, still nothing.

I finally made a decision to get in this damn thing if it was the last thing I did, to include breaking out the pry bar and yanking it open and travelling the rest of our trip with bungee cords holding it closed :) Thankfully it didn't come to that. I had my wife and son start pulling tools for me, and I decided I may have a chance of getting it open if I removed the rear bumper. Obviously I wasn't in much the mood to shoot pictures through this stage of our trip so the images are limited. It was funny to see other campers roll by with an astonished look on their face when they saw my Jeep laying on the earth in pieces.

7820392504_23bdf99ffb_c.jpg


Once the bumper was off I thought I would have access to the latch. Not so lucky. I did however have access to the 2 nuts that hold the striker on. I removed the 2 nuts and started yanking on the gate. I was hoping it may rip open for us. It did not open entirely, but it did open enough to have a look through some small slots and holes into the latch mechanism. I found a screwdriver and slid it through one of the holes and manually opened the latch. At last the gate was open. From this point I removed the plastic trim from the gate and found the culprit. It was the same problem everyone with these rigs experience. The "all thread" type part had slipped out of its location. Admittedly it may have been my doing from when I repaired the glass popping mechanism recently. Either way, I have figured out how to break into my rig, and shared it with you all too... LOL

7820395348_d359dbff81_c.jpg


We set up camp, and I tried to reassure the family that this was a freak deal and would not be a regular part of our family outings

7820431916_1e7d1a6854_c.jpg


View from camp

7820442814_19eb93a4e6_c.jpg


I guess this is the price you pay when you modify your vehicle like this, and unexpected drama is part of the adventure. Not every outing will be perfect, and I can roll with the punches, I just hope I will never have to wake up from a great night's sleep and see this pile lying behind our rig again

7820448790_f7671f7840_c.jpg
 
Last edited:

rb70383

Observer
Those little things that thias add to the stories later. :) Glad it worked out. I might open mine and have a looky see before it happens.
 

Firehawkclone

Adventurer
I went through the samething. I also went to the web for the fix, and the way in. It happen again just days afterward. After that I used a piece of safety wire to hold the poor design in place, and ran a piece of the wire up, leaving a small piece to pull up on if it ever happen again. Which it has.

Love the build
 

Mekcanix

Camper
Heh On my Bronco II i built a few years ago i had this fancy latch set up on my tire rack and it locked its self up tight. I couldnt get into the back area to get my tools to un bolt every thing. after 4 hrs in the woods with no tools and no help i got alittle upset and frustrated and peeled the carrier off using a strap a BIG tree and a lot of skinny pedal. I like your way much better LOL
 

Recce01

Adventurer
Those little things that thias add to the stories later. :) Glad it worked out. I might open mine and have a looky see before it happens.

Ya, it wasnt the most pleasant of experiences, I was just glad to sort it out. It would be a good idea to prevent the issue if possible, and doesn't take that long to access it!

I went through the samething. I also went to the web for the fix, and the way in. It happen again just days afterward. After that I used a piece of safety wire to hold the poor design in place, and ran a piece of the wire up, leaving a small piece to pull up on if it ever happen again. Which it has.

Love the build

Good call on the sneaky wire to open it, I may take your advice there. The all thread was not fully secure in the bracket for it, so it was probably my fault. It is fully secure now! Thanks for the compliment!

I love this build. Especially the wiring setup you have!

Thank you! I too am a huge fan of the sPOD, worth every penny!!!

Heh On my Bronco II i built a few years ago i had this fancy latch set up on my tire rack and it locked its self up tight. I couldnt get into the back area to get my tools to un bolt every thing. after 4 hrs in the woods with no tools and no help i got alittle upset and frustrated and peeled the carrier off using a strap a BIG tree and a lot of skinny pedal. I like your way much better LOL


OMG, I just pictured this, wow. I am glad it didn't come to that, though admittedly I would have considered it had my disection not produced results :) I like your style for the record :)
 

Recce01

Adventurer
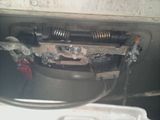
I just took the back about to check and grease it. If you dont mind here is pic:

OH YA, I am all to familiar with that little mechanism LOL. Looks like your is in it's proper place. Mine was only held in by the first tooth, not both :( Looking back on it, it had to be my fault :( Very cool you checked yours! Now you can go forth with confidence :)
 

88Xj

Banned
Man your doing some amazing work on that jeep..I'm very curious about those new Rigid's you installed..the small ones. Do you have pictures of just them on yet?


And do you do any side fab by chance?
 

Recce01

Adventurer
Man your doing some amazing work on that jeep..I'm very curious about those new Rigid's you installed..the small ones. Do you have pictures of just them on yet?


And do you do any side fab by chance?

Thank you for the kind words! I am actually very impressed with the SRM Rigid lights, they are the perfect amount of light to see everything around the vehicle for about 50'. Any more than that and they would be obnoxious. I will admit, I will likely have to move them a little, as I have to look right where they are to set up the awning and tent at night. When you look into these things, you become blind for about 10 mins. LOL. I am unable to take any pictures at night with my camera at the moment due to the chip on my camera lense, it screws up the light bad. I tried to do it though...

7820301528_fccec178bc_c.jpg


while I am at it, I will post some others. I will do this again in the future when my camera is fixed and with manual settings, as you can see the difference in the color of the sky of pictures taken within 1 minute of one another. This is due to the massive amount of light put out by the rigid stuff I guess...

Here is with stock headlamps

7820272890_bc8152b8d9_c.jpg


With the 20" light bar on the bumper switched on

7820275852_948ab385fe_c.jpg


Adding the 40" roof light bar as well

7820286554_682ca6766e_c.jpg


For lack of better words, this mod made a night and day difference for us when we travel into the wee hours of the morning :)

I do a little fab work on the side when I have time, PM me for my number and we can chat if you like.
 
Last edited:

Recce01

Adventurer
Storage Solution Cont.

As expressed earlier, I tend to have 3-4 project going all the time on this vehicle. One of those projects was to finish the storage system in the back of the Jeep. It still isn't 100% (is anything ever 100%?), but I thought I would share. I was bothered by the look of the storage solution. It appeared as though I just found a box that fit, and threw it in the back. I wanted to make it really fit the vehicle by adding some components to it to finish off the look and serve a few purposes. The problem is with both sides of the box. I use that area for storage, but it tends to overflow with stuff, and look like my closet when I was a teenager. That stuff would then start to protrude from the front and back of the box as well, hanging out by the fridge in the front, and out the back as well. My solution for this was to build some components to cover all of those areas.

I stopped back in to visit the guys at Artistic Wood and procured some "scrap" pieces of Baltic burch to do the job. This is where I find myself very far out of my element. Wood is not my friend, I do not know how to negotiate with it, as I do with most things metal. The tools are different, the methods are foreign, and the idiosyncrasies are completely unknown to me. This fact forced me to do some testing before I made any parts.

First, I'll share my Jigsaw, this little beauty was left to me by my grandfather, who was quite the wood worker in his day. I am guessing that technology has come significantly farther and this is a little out of date, but it is what I have and what I will use.

7926687084_ed8e0e3488_c.jpg


I decided it was time to cover the top of the openings on either side of the box. This had been my plan from the beginning when I designed the box, I just hadn't made the time to complete it. In order to access the areas, I decided to hinge the pieces that would cover the space. On the advice I secured from Gabe at So Cal Teardrops, I went with plastic hinges. These are meant to offer a little resistance and be quiet!

7926612244_ec64b10d6b_c.jpg


I haven't messed with these hinges before, and was not sure how these were meant to be installed, so I decided to do some testing and learn how they work. I started with a few small wood squares and tried to make them hinge successfully. I wanted to make the cut outs for the hinges on the doors only, as to not have to cut into the main box.

7926617162_523a0d65ba_c.jpg


I noticed when I cut this material with my saw, it really did a number on the edges of the finished surface. This meant I would have to make all future cuts 1/8 to 1/4 from finish line and used the old belt sander to bring it to final spec.

7926610218_dc41191edb_c.jpg


Once I mounted the 2 pieces it the hinge, it appeared as though only cutting the hinge into the door side would work just fine

7926614946_b602b37fc8_c.jpg


7926626364_22aebbae9d_c.jpg


Through this test process, I think I learned enough to make this work :) Next on the list was to develop some patterns for the parts to be cut

7926491008_baeca30028_c.jpg


This is one of those jobs that just takes time to complete. It is important to sneak up on it, little trimming at a time

7926486080_78458b3454_c.jpg


Like every pattern, it is a rough estimate of what needs to happen. This is why I always used foam core for patterns, as paper or poster board is too flexible and will cause more more in later steps.

7926481772_22489c3902_c.jpg


Oddly enough, the basic dimensions of the rear of the pattern was perfect for the opposite side of the vehicle, that means I managed to mount the box fairly centered and square :) I laid the pattern on the material and started cutting. A buddy asked me after the fact if I had set the grain to match the other surfaces, and I said "grain?" ya, I really dont do well with wood!

7926495614_155de7421a_c.jpg


Once I had the pieces cut I just had to take the time to fit them. I also had to make sure they would hinge, which required more trimming than I was expecting. The hinges make the material swing out due to the height of th hinging point.

7926500560_1ea60d03de_c.jpg


7926493106_c4bcb80152_c.jpg


I decided to make the other front and rear filler pieces while I was in cutting and trimming mode. My next piece was the front of the box on thr driver's side nearest the fridge. I made a base pattern first

7926643188_4c1b7c486b_c.jpg

\
During the layout stage, I add lines to add material where I mess up the pattern

7926645766_b12bdeee4a_c.jpg


This piece took a little while to fit, because of all the curves in the interior plastic. It is not perfect, but it is good enough for who it's for :)

7926640388_1e8a65d0b9_c.jpg


At this point I decided to pull the box out of the back and mount the "side flaps" on the box before doing the final filler pieces at the rear. This would allow me to make sure I had the box completely mounted and secure with the new parts in place, and th=insured there wouldnt be a gap if it went in differently than it came out. I quickly cut the hinge slots, and test fitted them

7926629144_88c308d8c1_c.jpg


7926631994_a348c10b81_c.jpg


7926637390_961c1de800_c.jpg
 

Forum statistics

Threads
188,470
Messages
2,905,513
Members
230,428
Latest member
jacob_lashell
Top