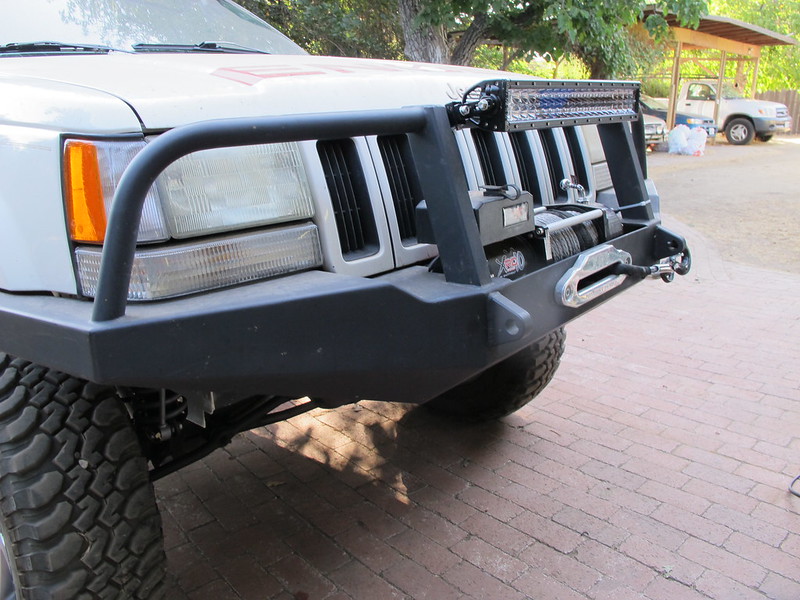
98 Jeep ZJ "SHTFV"

Recce01

Adventurer
Thanks for the s pod write up. Far from my area of expertise but now can see why to use this if adding electrical. Did not grasp it before.

John

That setup looks very nice indeed. I built my own setup very much like that, minus the circut board but similar. That looks very well made indeed.


As you guys can tell, I am very excited about this addition to the ZJ. If I was a wiring wiz, I may have tried to do my own but my expertise most certainly isn't wiring :) I am floored at the quality of this piece. Makes me feel confident installing my electronic goods. I only hope my portion of the job does it justice. Thanks for checking out my thread!
 

Recce01

Adventurer
Hi guys! I am just back from 5 days in the Eastern Sierras, I'll pop in here tomorrow and bring you up to date as well as answer a few questions I see here. Been a long ride home today, now I need rest :) thanks as always for checking out my thread!!
 

Recce01

Adventurer
I'm loving your zj! Glad to see it coming together. Its awesome of the guys at spod to be willing to work w us zj owners to make something that works for us. You have me convinced to get the same set up for mine. Let me know what the initial cost is. Thanks.

They do not have a specific mount for the ZJ, but he spent some time with me debating mounting options as well as supplying me with a 7 switch panel that I get to make a bezel for :) So far, I spent about $450 on the system, and I am of the opinion that it is worth every penny :)

Where are you mounting each component? Very interested in doing something similar.

I will start working on that post now, stay tuned!

Great work, really enjoy reading this. Looking forward to hearing about the latest work.

Thank you very much, I really appreciate you reading and taking the time to comment. :D
 

Recce01

Adventurer
S-POD mounting

In my last post I tried to show you some decent shots of the sPOD unit. I spent a lot of time debating on where to mount the components and finally decided on the spot. I have been having problems with my cruise control, and frankly never used it anyway so I decided to yank it out and mount the sPOD source there.

I mocked it up and it appeared as though it would fit there nicely

7708376700_3f031b8307_c.jpg


The first thing I did was do some research as to what issues if any would arise by removing the cruise control servo. The only issue I found was if I did not plug the vaccum line off, so I began tearing it out

7708383458_26f48a527a_c.jpg


Once I had the unit out on the ground

7708396878_2b449bc08d_c.jpg


I had to deal with the vaccum line

7708388604_c839ace5bd_c.jpg


This is kind of cheesy, but it is what I had laying around and it seemed to get the job done. I screwed in a 3mm bolt to plug off the line

7708385976_27d869e22e_c.jpg


Now that this was handled I could then start figuring out how to mount the sPOD source

7708392484_eaf709a85b_c.jpg


The first thing I did was remove the source from its mounting bracket. I wanted to re-use most of the bracket, but would likely have to trim it to fit the way I wanted it to.

7708403404_e739ec27d8_c.jpg


I decided to keep most of the bracket, and just trim off the ears

7708405172_9d86b0e35f_c.jpg


The result was a basic 90 degree bracket in which to mount my own ZJ specific bracket to

7708410844_f6401461e4_c.jpg


I slid the bracket in place and began planning how to solid mount it under the hood

7708412372_5112149b1f_c.jpg


I decided to use the OG mounting location for the servo as well as the threaded hole that the overflow bottle bolts into, I bent some .125 cold roll X 1.5" and bent it 90 degrees to get started

7708422080_efd7ab68ab_c.jpg


The next step was to add a second mounting hole on a different angle

7708423716_702fdb57dc_c.jpg


For ease I made them individual pieces and decided to weld them together, this keeps down on the math and up on the speedy fabrication

7708425638_9aca2b5096_c.jpg


The result should be more than strong enough to support the sPOD source

7708437968_4cd25a0ba9_c.jpg


I simply mounted the new bracket in place and slid the OG sPOD bracket up next to it and marked the holes to mount them together

7708436080_74fe46c416_c.jpg


A little bit of paint, and we are in business!

7708434664_aac58a6547_c.jpg


The mount seemed to fit perfectly!

7708441034_9990421fc3_c.jpg


7708442902_0758a5c9d8_c.jpg


With the Source mounted, I could finally start thinking about the goodies this system would power!

7708444866_3143317c5d_c.jpg


7708450886_75ee62651c_c.jpg


Truth be told, I screwed this up just a little when I did not take into consideration the latching mechanism that holds the lid in place. I am able to latch it, and un-latch it, but it takes a little paying attention to. Not the end of the world, but it still bugs me that I let one slip by me :)
 

Recce01

Adventurer
sPOD custom dash bezel

I was in a bit of a hurry to get the next steps done, as the wife was hounding me to go on a little vacation with the family. I tried to take as many photos as I could, but I was primarily focused on just getting the job done. I decided to make the bezel out of .090 5052 aluminum. This was a risk for me because I have not been the best at welding aluminum in the past. I have done a lot of it, but that was a lot of years ago, so this was going to be interesting. I started by making a surround for the sPOD supplied switch panel

7783585786_efd09c4838_c.jpg


I came up with a way to make the panel so I could access it if it all went wrong, and I needed to access the back side. Not the cleanest looking piece, but it should work

7783673784_c289ca1681_c.jpg


Then I had to design and make the outer bezel to cover the switches. I busted out the plazma cutter and cut the basic shape

7783582276_e75fd25d3b_c.jpg


Next I had to use the sheet metal brake to bend up the panel

7782907010_a33e5c7299_c.jpg


After I had it all bent up, which ended up taking some serious creativity due to brake limitations, I had to weld up the seems

7782887468_b8423856c0_c.jpg


You probably noticed the little corners that are all beat up, I had to bend them 90 degrees out of the way to bend the back surface down, it wasn't pretty. The nice thing is that it is aluminum, and assuming I don't screw it up, it can be modified and tuned to the point where you would never know I had a problem

7782928892_8bed6759cc_c.jpg


I welded up the seems and ground them to make it look like a single molded piece

7782944408_df6c66674c_c.jpg


The next step was to semi assemble the parts

7782934216_026152bf88_c.jpg


Then enter the 3 hours of making it contour the section of the dash where it was meant to be mounted. This took forever!!

7782924284_f1c73bb962_c.jpg


7782920332_593fafbaa8_c.jpg


7782912918_7e0f3fbdcf_c.jpg


Gotta love how hammered and dirty the Jeep gets when I am in fabrication mode, I feel so bad for it!

After the fitment was done, It was time for some paint

7782955286_2778102be8_c.jpg


7782961080_7fe7b77873_c.jpg


7782984114_ff0c4a6e16_c.jpg


I have come to realize I do not have a single photo of it mounted on the Jeep dash LOL. You will have to wait on that one :)
 

Recce01

Adventurer
The switches are allocated as follows:
Orange= Ham Radio
Red1= Bumper LED light
Red2= Roof LED light
Blue1= Front Locker (future)
Blue2= Rear Locker (future)
Green1= Engel Fridge
Green2= Roof rack Aux lights
 

Recce01

Adventurer
Dash Bezel

I finally went out to take a few pics of the bezel installed. While doing so I realized my camera is in the midst of epic fail mode, and has a large chip out of the lense :( This means my pics will likely suck until I get it sorted out :( Sorry for the poor quality images, but here it is!

7792485916_a94b01b085_c.jpg


7792483474_c4595acd34_c.jpg


7792469080_86c8d33c3c_c.jpg


As always thanks for looking!
 

Rangerman28

New member
I just read your entire thread and fell in love with your Grand! I've had a Cherokee for awhile that I was building to take on hard trails and bang up but I've lately found myself wanting to venture. I was thinking about getting a Grand Cherokee to replace my Cherokee and you've about sold me on the idea. I'm looking forward to seeing what else you've got planned!
 

Recce01

Adventurer
I just read your entire thread and fell in love with your Grand! I've had a Cherokee for awhile that I was building to take on hard trails and bang up but I've lately found myself wanting to venture. I was thinking about getting a Grand Cherokee to replace my Cherokee and you've about sold me on the idea. I'm looking forward to seeing what else you've got planned!

Wow, thank you very much!! It was awesome to come in this afternoon and read your compliment. RE: banging up a vehicle on hard trails: This used to be fun for me, when I was in to conquering obsticles. Truth be told, it was a lot of fun, when everything was working correctly. The problem lies in the conversation with your wheeling buddies where you exclaim, I would love to go this weekend, but I have that "X" problem with the Jeep from last trip that I can't afford to fix yet :( Not that overland/expedition style of travel is free of breakages nor problems, but they certainly are less likely. I found myself in the mood to wander in a moments notice, and it is much easier to keep an overland style of rig in tip top condition without breaking the bank. The money I used to spend on repairs is now put in the rig for desired accessories, or straight in the gas tank for more exploration. Welcome to Portal my friend, this is quite a forum with great resources. Feel free to PM should you have any questions I can help you with.
 
Last edited:

xjman88

Adventurer
Wow, thank you very much!! It was awesome to come in this afternoon and read your compliment. RE: banging up a vehicle on hard trails: This used to be fun for me, when I was in to conquering obsticles. Truth be told, it was a lot of fun, when everything was working correctly. The problem lies in the conversation with your wheeling buddies where you exclaim, I would love to go this weekend, but I have that "X" problem with the Jeep from last trip that I can't afford to fix yet :( Not that overland/expedition style of travel is free of breakages nor problems, but they certainly are less likely. I found myself in the mood to wander in a moments notice, and it is much easier to keep an overland style of rig in tip top condition without breaking the bank. The money I used to spend on repairs is now put in the rig for desired accessories, or straight in the gas tank for more exploration. Welcome to Portal my friend, this is quite a forum with great resources. Feel free to PM should you have any questions I can help you with.
Welcome as Recce said. I too am a convert from the hardcore wheeling crowd. I had a 94 xj w 35s and all the goodies. Overlanding/expo wheeling is where its at. Ive enjoyed my build up on my zj thus far and where it takes me and my family. Like Recce said any questions feel free to ask. Ive been wheeling for 25 yrs plus so I kinda know I'm doing. Feel free to check out my build thread and borrow my ideas.
 

Recce01

Adventurer
Auxiliary Lighting! (Front Bumper)

With the sPOD installed, it was now time to distribute some juice! I have been looking forward to this moment for a long time, and had been collecting goodies that run off of 12V just for the moment when I had the sPOD up and ready for duty. I did a substantial amount of research on auxiliary lights, as I knew they would be fairly high on the priority list down the road. I have experienced proper 7-8" HIDs on rally cars and off-road trucks in the past, and frankly they are hard to beat. When I say hard to beat, I mean out-run. This is where a shift in priority for me has opened the door for some other "New School" options. You see, at 85-120 mph it is very important to make sure your lamps can light up the next county, because at those speeds, you will be there before you know it. With my Overland/Expedition rig, I never intend to see those speeds especially at night. After looking into patterns and light distribution, I elected to go with the latest and greatest LED bars from Rigid Industries.

In the end, the painstaking research became moot as I discovered these low profile LED light bars could give me the reach any decent 35W-55W HID lamps could, and do it in a more compact package. I began to scower the Rigid Industries catalog looking for the exact lamps that would suit the SHTFV the best. I had my decision on these lamps sorted long before I had done any fabrication, therefor my work would be in preparation of what would come, versus wrestling with any afterthoughts.

I decided that the E-Series light bars would be great for the roof and the front bumper. I thought long and hard about the roof rack lamps, as I wanted the most light possible for the area surrounding the rig at night. I was almost set on the Dually lamps for the roof rack when I discovered the new SRM lights with a diffused lenses, which became the object of my desire. I was reminded buy the wife that we may show up to a camping area at night, and if there are other campers around, we may need to be somewhat respectful, and not light the next county and their tent while they are sawing logs. Good point.

Front Bumper:
I built the front bumper with cooling in mind, as this Jeep tends to get a little toasty now and then, so If we are going to place something up front for aux. lighting, it had to be low profile-ish. I had roughly 24" in between uprights, and decided the 20" E-Series P/N 12031, which was a spot/flood combo would do the job perfectly. With the 1.5" tube mount(avail separately), I could rotate it any way I like on the main tube of the bumper's brush guard and make it work. I managed to sneak a few shots of the light bar in my ghetto photo studio (IE, my office table top) before I installed the bar. Check it out!

7651713046_10975589ef_c.jpg


The light bar was the combo version featuring 8" of flood refelectors double stacked, and 12" of spot reflectors double stacked. The tube clamp connectors would allow me to position the light in several different configurations until I found the desired position. If I decided to solid mount it, I would be forced to stay with that position. I like options!

7651719624_386a25fc78_c.jpg


I removed the grill from the front of the grand and began stringing the wires to the sPOD. This was a very simple install between the tube clamps and the sPOD. It took me 20 minutes to have the lamp in place and ready to rock!

7708378492_210c2c694e_c.jpg


I love this sPOD, have I mentioned that yet today? I simply cut off the Rigid supplied wiring harness and added bolt in connectors

7783001208_21638bba28_c.jpg


7783017912_b7682d7725_c.jpg


and finally 2 screws brings the lamp to life!

7783035618_02bc33629c_c.jpg


The mounting position of the bumper light bar is wide open with possibilities. For the time being, I simply mounted it above the top cross bar on the bumper a little forward of the bar. Final positioning of the light will happen late at night when I aim them properly :)

7783164060_93208c7551_c.jpg
 

Recce01

Adventurer
Auxiliary Lighting! (Roof Rack Lights)

The roof rack was the location for my next adventure in lamp wiring. I wanted to be able to pull up to a very remote camp spot at night and light the area all around the vehicle. As previously stated, the only concern I had was having too much light. Normally there is no such thing, but we didn't want to polute the beautiful night sky with our lights should there be other campers near by. After a conversation with the guys at Rigid Industries, we decided to go with the SRM series lights for the four corners of the roof rack. This would allow us a significant amount of scattered light out to about 30 feet from the vehicle in every direction. This was exactly what we wanted. The dually's that we were looking at first, were pretty much too bright and would likely be over the top for our needs.

Like the 20" E-Series, I plopped these down in the ghetto studio to bring you a few shots

7651723686_c4cc970751_c.jpg


7651727148_cf3e94c39a_c.jpg


7651733648_28824f19bc_c.jpg


Not unlike the 20" light bar, I decided to employ some of the ready made 1" tube clamp mounts for these lamps as well. The main reason behind this is the adjustability and the option to change my mind on where I have these positioned over time for our needs. The mount itself is the same style as the ones I used for the front bumper, all billet aluminum and anodized black for protection

7651732120_875333c7e3_c.jpg


I had envisioned mounting them under the racks lower tube, and close to the body, so this is how I mocked them up.....

7651739304_30e6b1bca9_c.jpg


7651737856_62ecb497ed_c.jpg


I test fit one of the lamps on the rack and determined the mounting configuration would work great, so I made them all the same and ready to mount!

7783083714_25db68ae23_c.jpg


On to the wiring.... This is where I fall in love with sPOD all over again, as I really wanted to run all of these off of one switch. I am no wiring wiz, so I have no idea whether or not I could or should be trying to do this. Thankfully all the resources are right there for me to make this decision and act on it. sPOD offers a wiring cheat sheet in their kits to determing the wire required to safely produce the amperage at a specific distance. IE, what gauge to run for what power at what distance from the source. Here is a shot of the sheet!

7783157038_fde699daa5_c.jpg


I determined (by reading) that 4 of the SRM lights would draw roughly 4 amps and that called for 18 gauge wiring. The supplied harnesses came with 16 gauge wiring, so I began cutting and splicing to make a 1 piece harness to install.

I soldered all the joints hoping they will hold up over time

7783167170_0fd84d3e45_c.jpg


Then added some heat shrink for protection

7783177466_6e534d9276_c.jpg


The resulting harness was ready for install

7783200476_c59e287b8d_c.jpg


7783197364_141e68596c_c.jpg


The connecters supplied by Rigid are top notch, I was very happy to see this

7783193574_f42561779c_c.jpg


I then installed the lamps on the rack, and zip tied the wire harness in place

7783212206_91193af31a_c.jpg


7783209962_653a82a9c1_c.jpg


I tried to do a clean harness install, but that is harder than I thought it would be. Using loom helped a little, but I wish the wires were ran through the tube

7783202878_fe62c0a7cc_c.jpg
 
Last edited:

Skeptic

Adventurer
Great build, and thanks for posting - the attention to detail is inspiring. There isn't a lot out there on the Grand Cherokee along the lines of what you are doing, and you've demonstrated that it can be made into a great overlanding vehicle.
 

Forum statistics

Threads
188,461
Messages
2,905,298
Members
230,428
Latest member
jacob_lashell
Top