FDM2012
Adventurer
So, my neighbor heard me making some noise this morning, and came over to investigate. After seeing holes in my hood,
he said "Man, things are starting to get serious!". Of course, the "SERIOUS" began in West Virginia when it almost gave up
on me, only 75 miles into my trip home to Tampa.....
Anyways, hood vents complete.
Several of you have already done vents, and the rest are genius enough (like me) to see how I did it,
so I will spare my keyboard the frustration of spelling it all out.
View attachment 357466
Getting motivated....

Cutting down to size

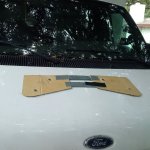
I actually taped the template to the underside first for fitment, and then drilled some alignment holes.
then I laid laid it on top, stuck some bolts through, and traced it with a Sharpie.

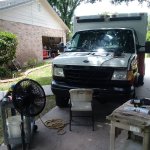
Put some tape down, so as not to scratch the paint. And naturally, a fan is always the most important
tool this time of year in SW Florida...

My little jigsaw cut the fiberglass like butter.

Voila!

Button head cap screws and serrated flange nuts to hold them down. (I also applied 1'' border of
single side adhesive insulation strip to the vents before mounting) And, since the lower panel
of the hood has contours and whatnot, I used a hole saw with a long guide bit to cut it out of the way,
so that all bolts have nuts on them. My neighbor said to don't worry about the 14 nuts and just put some
goo on them. And yes, he was sober......Still a good dude, though.


View attachment 357465


I went for a good drive afterwards, and the air coming out is minimal, but Again, my theory is that
all the little things add up, and sooner or later, my compartment temp will hopefully come down a few degrees......
And on top of that, I like the look.
he said "Man, things are starting to get serious!". Of course, the "SERIOUS" began in West Virginia when it almost gave up
on me, only 75 miles into my trip home to Tampa.....
Anyways, hood vents complete.
Several of you have already done vents, and the rest are genius enough (like me) to see how I did it,
so I will spare my keyboard the frustration of spelling it all out.
View attachment 357466
Getting motivated....

Cutting down to size

I actually taped the template to the underside first for fitment, and then drilled some alignment holes.
then I laid laid it on top, stuck some bolts through, and traced it with a Sharpie.

Put some tape down, so as not to scratch the paint. And naturally, a fan is always the most important
tool this time of year in SW Florida...

My little jigsaw cut the fiberglass like butter.

Voila!

Button head cap screws and serrated flange nuts to hold them down. (I also applied 1'' border of
single side adhesive insulation strip to the vents before mounting) And, since the lower panel
of the hood has contours and whatnot, I used a hole saw with a long guide bit to cut it out of the way,
so that all bolts have nuts on them. My neighbor said to don't worry about the 14 nuts and just put some
goo on them. And yes, he was sober......Still a good dude, though.


View attachment 357465


I went for a good drive afterwards, and the air coming out is minimal, but Again, my theory is that
all the little things add up, and sooner or later, my compartment temp will hopefully come down a few degrees......
And on top of that, I like the look.
Last edited:


