And it begins. Stump XJ's trailer build.

Hilldweller

SE Expedition Society
Yeah white... original right?

I decided to paint the top half of the Jeep white to match it, so white it is. I was gonna do desert tan, but figured white would be better in the long run.
WWSBD --- what would Scott Brady do? :sombrero:

I told him that was our catch phrase around the campfire when we were drinking at the Country Fried Weekend. We really need to get him to one of our trips....

Speaking of trips, we're watching the weather again for this weekend to go camping. I want to get in another before it gets too dang hot out.
Anybody in? Stumpmeister?
 

flashooter

Observer
First off great looking build!!..

and I may have missed it but what gauge sheet are you using for the can holders/propane holder and fenders and skins.
 

StumpXJ

SE Expedition Society
Hey StumpXJ,

If you're willing to field yet another couple suspension questions :sombrero:, I have a couple for you. As I already mentioned, I like the simplicity of the design - I'm a big K.I.S.S. person, as well, but really like the idea of the air bags for tunability. It sounds like you're very pleased with the handling of the suspension set-up.

  1. When one of your wheels hits a bump, where does the lateral flex likely occur, given that you don't have joints at the frame end? Is it happening in the bushings, along with the axle tube? I'm trying to wrap my mind around the mechanics. I understand that it's not a long-travel type of suspension set-up, either, so crazy articulation isn't needed.

    Its a multitude of things. The tires absorb a large amount of 'bump', more than we probably realize. The bushings certainly have a decent amount of flex in them, as well as the arm/axle combo itself. Even though its all bolted together, there is quite a bit of movement allowed within the whole set-up. Similar to a well flexing leaf spring suspension. It too is also all bolted together, and the bushing, axle, spring, shackles etc etc, all allow ample twisting or lateral flex in most cases. Ultimately, I still say the coupler takes 95% of any twisting movement, even at speed.
  2. Did you just weld a solid round "pin" through the trailing arms to act as a "centering pin" to locate the axle?

    Not quite, although that would work as well. I was going to make the pins on my lathe, but my axle came with the traditional short stiff leaf springs that were bolted together with a round headed bolt. It happened to be the perfect length for my trailing arms so I used it instead. its just a bolt, with a round head on one side, and a locknut on the other side. One goes into the axle spring pad, the other goes into the u-bolt plate when its all sandwiched together.
  3. Does the angle on your panhard bar seem to be working out fine? I have seen many people mention to have it as parallel to the axle as possible, but didn't know how subtle (or extreme) the differences would be between having a mild angle like yours.

    Work great for this set-up. If I had or needed lots of articulation, I would want it more parallel. Because its not though, I just made it as long as I possibly could between the frame rails, and mounted it where it was easiest. I made my own brackets out of 1.4 plate, and have everything (even the shocks) mounted in double shear.

    I can tell you this. From the bags completely empty, to the bags VERY full, there is about 6.5 inches of height difference. The tires move about 3/8 of an inch left to right from full low position to the full high position. Its very minimal. Obviously the shorter the panhard, the more movement you get, and the more static/ride height/initial angle, the more movement you get.

  4. What size greasable bushings did you use? 1.5" I.D.? I already own a couple that size.

    I got them here, in the 2.5" width variety:

    http://www.ballisticfabrication.com/Single-poly-bushing-with-DOM-sleeve_p_1197.html

  5. Why did you choose the solid bushings vs. joints at the frame end? Other than cost, would there be any pros/cons to using joints (e.g. - Johnny Joints) at the frame end with this suspension design?

I have huge Johnny Joints on the long arms of my Jeep on the frame end. I have rubber bushings on the axle end. The Johnny joint ends 'jar' very hard over certain terrain. They subsequently wear out faster because of it. Even a little slop in a johnny joint is a bad thing, not the case with a bushing necessarily. The bushings provide a very nice amount of dampening, and I would be surprised if I ever wear them out on this trailer. The grease-able feature (zirk fitting) is nice also, for obvious reasons.

Johnny joints, by far, offer the most amount of movement. But again, thats unnecessary on a trailer due to the coupler action, and the fact that its simply being dragged behind the vehicle, instead of the wheels/axle being powered.

Even though you say 'other than the cost', that was/is also a factor for me. 4 large, rebuildable johnny joints, and tubing inserts get VERY expensive quickly.


As always, thanks! :victory:
Craig


No problem, I dont mind answering anything I can. All of the above is simply my opinion, and personal experience. There are many ways to skin a cat, and this one works well, was failry simple/easy, and was inexpensive for me.. :victory:

~ Stump
 
Last edited:

1x1_Speed_Craig

Active member
No problem, I dont mind answering anything I can. All of the above is simply my opinion, and personal experience. There are many ways to skin a cat, and this one works well, was failry simple/easy, and was inexpensive for me.. :victory:

~ Stump


This information is an infinite help to me. Thanks Stump!

Craig

P.S. - I have been browsing ballisticfabrication.com...good stuff there.
 

StumpXJ

SE Expedition Society
Just wanted to update my build thread, got the trailer 98% wired up over the past 3 days. Took longer than I anticipated, but everything turned out nice and neat, and I am happy with it.

Ultimately, I had to wire in my 12volt DC aux circuits, 110 volt AC circuits, finish the trailer lights, and everything involved with doing that.

I have (5) 110volts duplex outlets, two on the front tongue box, two on the rear of the trailer, and one inside the RTT, all powered by an 800 watt inverter located in the tongue box.

I have (3) 12 volt cigarette lighter type outlets, one on the tongue box (full time hot, 15 amp) one in the rear of the trailer, and one in the RTT.

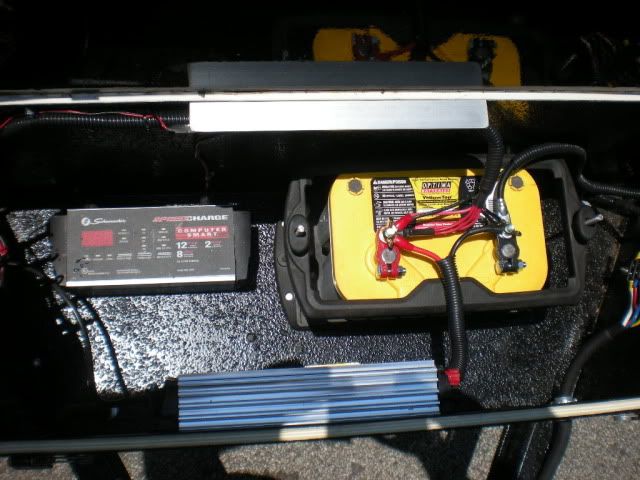
I am using a Schumacher Smart Charger for the shore power duties.

On to the pics:

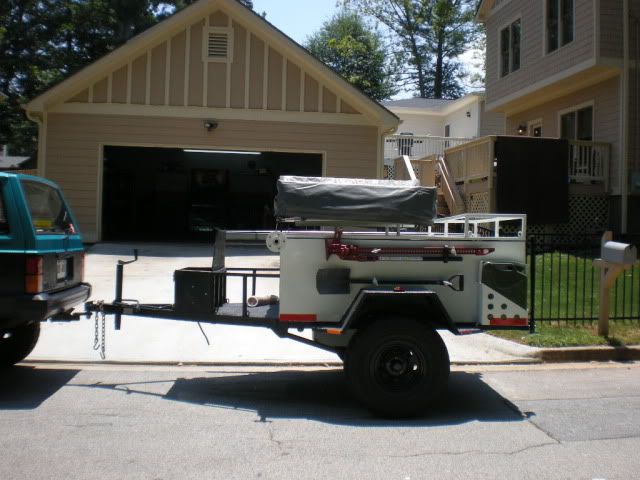
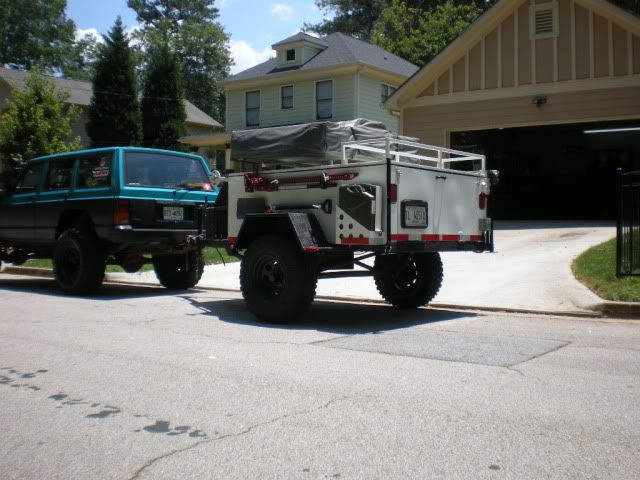
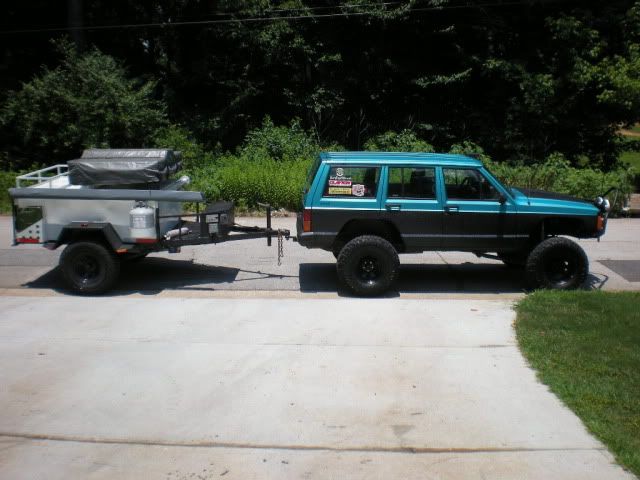
These are just a few poser shots in the driveway, figured I would take a few since the jeep was clean. :)

DSCN1824.jpg


DSCN1823.jpg


DSCN1817.jpg


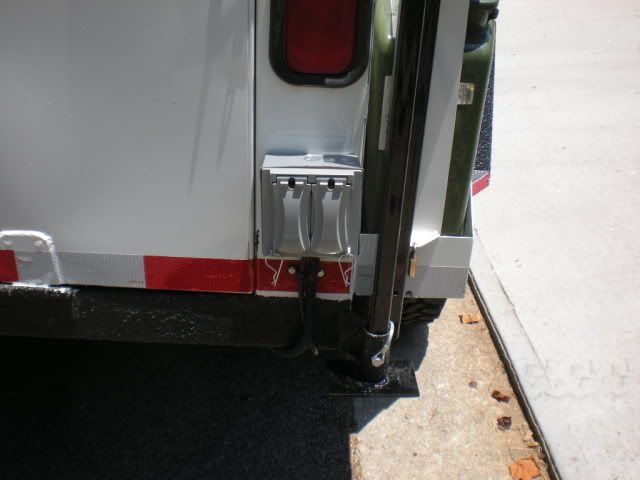
The weather proof box on the rear of the trailer, housing two duplex outlets, and a 12 volt socket (you cant see the 12v socket, but its below the box.

DSCN1816.jpg


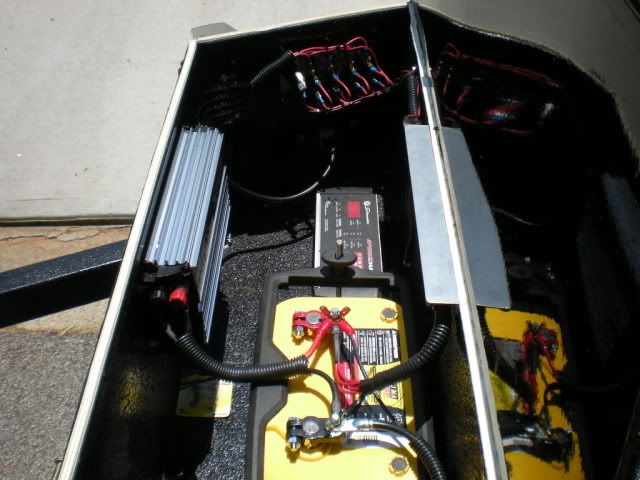
This is the business side of the tongue box.

Upper left: Just fabbed up a little toggle switch/fuse holder/12 volt socket plate, and screwed it to the box using stainless self tapping screws. I also put a bead of silicone around the plate to ensure no water can get in behind it. I am in the process of making labels for the switches. From left to right the switches are for, tongue box lights (LED's), RTT power (LED lights, and 12 volt socket), 12 volt aux plug/kitchen lights, and finally, main power to the shurflo pump.

Bottom left: Another weather proof box that houses two duplex outlets for 110volt power.

Right: Shore power power-cord housing, weather proof box.
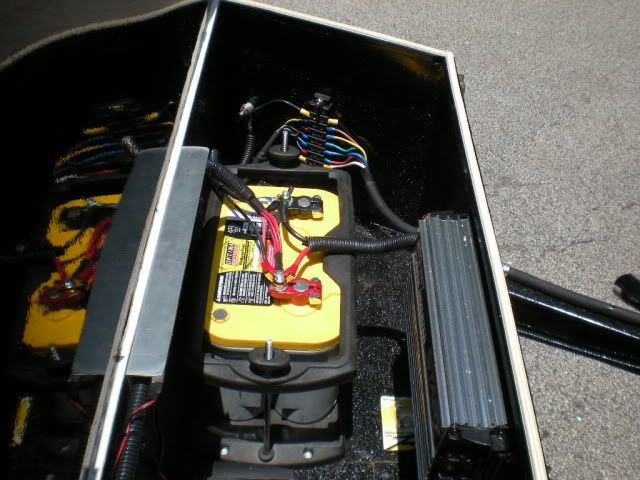
DSCN1818.jpg


Inside the box.

Pretty self explanatory, junction blocks, wires, battery, inverter, and charger. The battery is a Optima Yellow Top, and when the trailer is hooked to the jeep with the 7 pin plug, I have two batteries to use for the trailer accessories since I have a dual battery set-up on the jeep, all while keeping my starter battery separate from the whole system.

Everything is sealed with silicone, or uses a water proof type rubber fitting. Its fairly water tight, but probably not 100%. Long-term submersion is all I would have to worry about.

DSCN1822.jpg


DSCN1820.jpg


DSCN1819.jpg


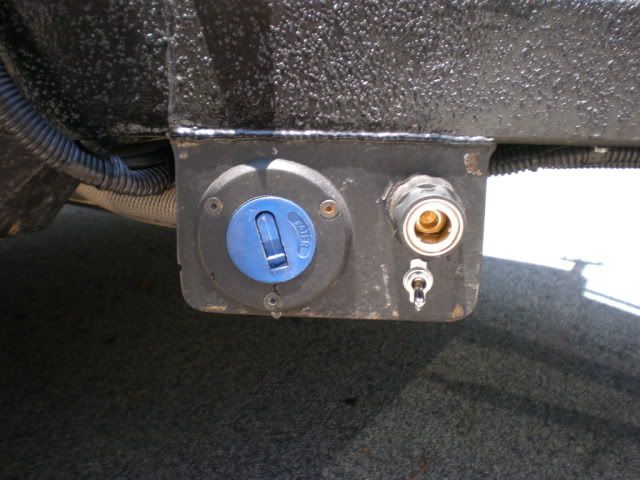
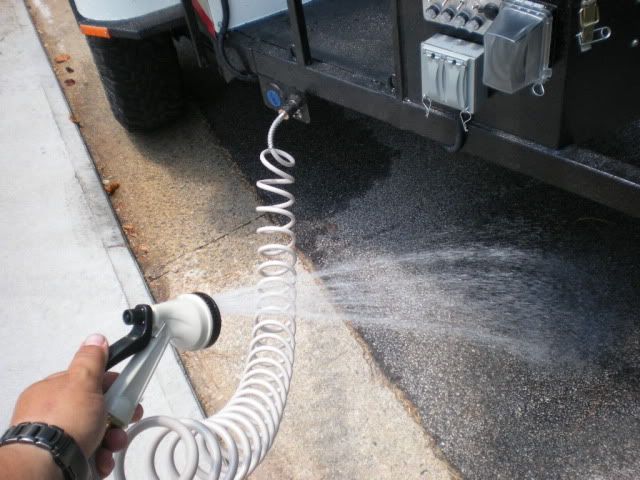
This is my water station, the blue thing is the fill hole for the 16 gallon water tank located underneath, right in front of the axle. I have a quick disconnect coily water hose that I put together from parts from Home Depot, and another power switch for the pump. Its kind of redundant with two switches, but I figure its a little bit of a safety factor, so I went with it.

DSCN1825.jpg


Here it is in action, I decided to scrap my old recirculation pump idea, and just buy a new ShurFlo pump. It is SOOO much easier, and seems to be a great little set-up. Puts out a surprising amount of pressure also.

DSCN1826.jpg


Here is the Kitchen lights/auxilliary plug I wired in. It uses a Deans style plug, rated at 40 amps (although the circuit is wired for 10amps), and I use it primarily for my LED strip that I incorporated into my kitchen set-up. makes cooking a breeze in the dark! I can also use this plug for virtually any other 12 volt accessory I choose, fans, lights, etc etc.

You can also see where the wiring for everything else goes into the RTT.

DSCN1827.jpg


I say 98% wired because I still have to wire up the electric brakes in the jeep, and on the trailer.

the trailer is pretty much done with major work, except for re-doing the tongue area to accept a receiver style MAX coupler, and moving the jack back a little to allow a proper angle on the RTT ladder. Few little things here and there, but she is basically finished!

~ Stump
 

Titanpat57

Expedition Leader
Great job...nice, clean install.

Looks like you'll be able to plug in mutiple "Low Clearance" signs to warn Big Bill....:ylsmoke:

Pat
 

StumpXJ

SE Expedition Society
Great job...nice, clean install.

Looks like you'll be able to plug in mutiple "Low Clearance" signs to warn Big Bill....:ylsmoke:

Pat

Thanks guys!

Maybe even an electric fence around the camp to keep Bills favorite animal out?

Mmmm.... bear. Its whats for dinner.

100_4578.jpg
 

cavedave

Observer
I appreciate the functionality of this trailer. Many great ideas and adaptations here.

I must say, the Teal B***h is looking a little thin now that everything was moved from her spine to the trailer. What are you going to do with all the free space?
 

StumpXJ

SE Expedition Society
I appreciate the functionality of this trailer. Many great ideas and adaptations here.

I must say, the Teal B***h is looking a little thin now that everything was moved from her spine to the trailer. What are you going to do with all the free space?

Building new stuff now... but it wont be much. You would not believe how much better it is without a huge roof rack and rtt on top of the jeep. SOOOO much better to drive and picked up 2 mpg (actual).
 

cavedave

Observer
2 mpg gain - I bet your quarter mile time is less as well. :)

I don't recall where you mentioned the following, but you said something about a new winch on the nose (of which I saw pictures of - impressive), and your old winch being mounted in the rear. How do you plan on doing this with obstructions like the rear hatch and trailer hitch being in your way? Or have you already done this modification, and just ninja'd it somewhere secret until the time was right to flick a switch and have it transform from a beer can, or glove box, into a rear facing winch?
 

bobDog

Expedition Leader
fantastic job so far,,, the laws for trailers must be pretty steep there to do what you did instead of build from scratch. out here its a simple matter of taking the trailer down so they can basically measure it and then its $112 or so for a lifetime reg.

but to my Q, is that your home garage or what? very clean.

are your shearing and bending that sheet yourself?
Oregon doesn't require title, inspection or plate up to 1800 lbs loaded. We are so easy. :smiley_drive:
 

bobDog

Expedition Leader
I never saw this thread.....didn't know how long it has been running until just now.
did you ever paint the XJ white?:coffee:
 

StumpXJ

SE Expedition Society
2 mpg gain - I bet your quarter mile time is less as well. :)

I don't recall where you mentioned the following, but you said something about a new winch on the nose (of which I saw pictures of - impressive), and your old winch being mounted in the rear. How do you plan on doing this with obstructions like the rear hatch and trailer hitch being in your way? Or have you already done this modification, and just ninja'd it somewhere secret until the time was right to flick a switch and have it transform from a beer can, or glove box, into a rear facing winch?


Hey Dave, its already finished. its towards the end of my build thread, lots of pictures of it.

Starts here:

http://www.expeditionportal.com/forum/showthread.php?t=16097&highlight=stumpxj&page=18

No ninja gadjets on it persey, but managed to get it tucked fairly tight, and picked up two inches of ground clearance from a factory mounted trailer hitch. Check it out.


I never saw this thread.....didn't know how long it has been running until just now.
did you ever paint the XJ white?:coffee:


No yet Bob, it is a winter/spring project. My dad owns a hotrod shop, which has a body shop, and he slows down during the first of the year. I will likely do it then at his place with his guidance.

Unless the teal continues to grow on me. I kinda like the name *Teal *********** that i have lovingly dubbed it, and it just wouldnt be politically correct to call it *White ***********. :D

~ James
 

Forum statistics

Threads
186,900
Messages
2,889,081
Members
227,437
Latest member
Top Jimmy
Top