Another OVRLND Camper Build

dstefan

Well-known member
Thanks! I'm still an amateur when it comes to woodworking. It's been fun though!

Given your needs, I think a larger truck with a bigger bed would definitely be beneficial. With our 5'2" bed we have about 20 inches from the end of the bed platform to the rear wall. It's enough to stand, climb up and down from the bed, and change clothes. But if we want to hang out in there, we need to have the platform stowed for more room. I think one of the benefits with OVRLND's design is that longer bed trucks get more open space beyond the bed platform-- not always the case with other designs I noticed. Also, the width of the bed is a little bit larger too. I can say that 16" of more open space, and a few more in width, would feel nice and spacious compared to ours.

I think you should go big lol. Easier said than done. Especially since your Tacoma sounds like it's pretty well sorted already. Sorry I've been slacking on photos. I'm heading out camping this weekend so I'll try to take a few!
Thanks for the feedback. Yeah, we’re a lot of the way there to going big, but we’re really attached to the Tacoma, sadly though I think you’re right.

Thanks for the picture offer when you’re out. Will probably seal the deal …
 

Pshin

Member
Thanks for the feedback. Yeah, we’re a lot of the way there to going big, but we’re really attached to the Tacoma, sadly though I think you’re right.

Thanks for the picture offer when you’re out. Will probably seal the deal …
Just got back from a couple nights with some friends at a chilly PNW beach. Super smoky from the recent wildfires. Sadly I forgot to take any rig pics while we were out.

While we were unpacking, I remembered to take a photo of the area you were wondering about. After standing there, I think it would be pretty tight to do much stretching. Photo is below.
 

Attachments

  • 5F1C3931-BC52-4D9C-95A1-2A10FAA3711C.jpeg
    5F1C3931-BC52-4D9C-95A1-2A10FAA3711C.jpeg
    1.4 MB · Views: 239

Pshin

Member
Recent new additions on the camper: bug screens and some lighting.

I ordered a magnetic bug screen from Amazon (magzo brand) that is meant for French doors on a house. The screen was 60x80 inches, which was perfect because I needed a 60 inch width. Just needed to trim the bottom to fit. It has a nice magnetic closure down the middle and installed super easy with self adhesive Velcro around the perimeter of the door. It’s not 100% perfect seal all around, but it should keep out the majority of insects.
DB3F5BE4-1886-49E5-A775-D0076555ECD9.jpeg

An added bonus was that the excess material that I cut off fit perfectly for the side doors. It even had excess Velcro to use too. For the side screens I put the magnetic portion downward to act as a weight and also stick to the side of the truck. I can also just toss it over the side door if I want to keep it out of the way. Also, not a 100% seal, but should work decently.
33E7BFCC-C230-4558-907B-D2669BEEE21D.jpeg 922248ED-B80B-4536-B78F-1781D9F08875.jpeg

For lighting I first added warm white led strips on the inside just beneath the upper aluminum extrusion for the interior, as well as the underside of the rear door for the tailgate area. I also added two exterior flood lights in the rear upper corners. These were described as “natural” white, but ended up being a little harsh. I also added a couple small red led “accent” lights on the interior for some night lighting.
85D258A2-E116-44DD-A6BC-8C2508A92812.jpeg

F3E41DAD-58E1-4B7F-985D-814E435CF84E.jpeg

I wired all the lights to a 12v switch panel and built a small box for the wires. I decided to use an all-in-one portable power station (Jackery Explorer 300) rather than building a battery setup, mostly for simplicity and ease of removal. Also a bonus to use in the house or away from the vehicle if we needed.

969670A7-266E-4900-AA9C-E7C9A0B3BFFA.jpeg
(ignore my little wire loom pretzel. not entirely sure on the location of the battery yet)

We had a chance to test out the lights on a trip this weekend and they were awesome. The warm white has plenty of output, but is still easy on the eyes. The white flood lights are actually too bright and kind of harsh. They would be great as work lights, but really blow out a relaxing camp setting. Might add some amber film and see if that helps. I forgot to take any photos of the lights in action, but hopefully I’ll remember on a later trip.
 
Last edited:

bgraboyes

Member
what did you use for those outside lights? can you control from in the truck as a spot light for campsite finding or just from the camper? Haven't gotten anything done on mine yet, moving next week so decided to put off any work until after that so we have the full bed available to move.
 

bgraboyes

Member
Thanks for the feedback. Yeah, we’re a lot of the way there to going big, but we’re really attached to the Tacoma, sadly though I think you’re right.

As a former taco owner turned F150 4 door 6.5' bed owner... full size makes the ovrlnd, as my partner calls it, "palatial". it's huge. I love the extra space in the bed as well as well as the cab since we do a fair number of trips with another couple or friend and can fit all the gear, 3 dogs etc. Definitely not at nimble as the taco and only time will tell how durable the ford ends up being. So far no problems. I don't wheel it hard, mostly forest service roads but occasionally some pretty rough spots here and there and find the full size totally navigable. Not nimble though if you have to turn around anywhere... overall super happy so far and as a bonus, the f150 does about 5 mpg better. YMMV
 

Pshin

Member
what did you use for those outside lights? can you control from in the truck as a spot light for campsite finding or just from the camper? Haven't gotten anything done on mine yet, moving next week so decided to put off any work until after that so we have the full bed available to move.
I used these from Super Bright LEDs in the Natural White (4000k)
(https://www.superbrightleds.com/mor...h-and-utility-light-700-lumen-12v/5568/12478/)

I didn't wire them to be controlled from within the cab. That would be super cool though! I think it's totally doable to just run a switch up to the cab if that's what you wanted.

Good luck with the move. The full bed functionality of the camper is my second favorite part lol.
 

dstefan

Well-known member
Just got back from a couple nights with some friends at a chilly PNW beach. Super smoky from the recent wildfires. Sadly I forgot to take any rig pics while we were out.

While we were unpacking, I remembered to take a photo of the area you were wondering about. After standing there, I think it would be pretty tight to do much stretching. Photo is below.

Thanks PShin, I really appreciate the photo. Definitely helps to know. Smoke and all we're envious here in Phoenix. Love the WA and OR beaches and hope to get back there soon. Just very sad to see the fire destruction. Sure hope you’re finding ways to cope with the smoke up there! Stay safe!

As a former taco owner turned F150 4 door 6.5' bed owner... full size makes the ovrlnd, as my partner calls it, "palatial". it's huge. I love the extra space in the bed as well as well as the cab since we do a fair number of trips with another couple or friend and can fit all the gear, 3 dogs etc. Definitely not at nimble as the taco and only time will tell how durable the ford ends up being. So far no problems. I don't wheel it hard, mostly forest service roads but occasionally some pretty rough spots here and there and find the full size totally navigable. Not nimble though if you have to turn around anywhere... overall super happy so far and as a bonus, the f150 does about 5 mpg better. YMMV

I really appreciate the the comparison of full size to Tacoma. Very helpful. Think we’re about 90% decided on full size, most likely a Tundra, but have to see. While we used to do some tough trails in Tacoma, honestly can’t think of any in the past few years that a well built Tundra or F150 couldn’t do. Plus, an iffy back and really gnarly trails don’t mix well in any vehicle!

Which engine did you go with and what year?
 

skyfree

Active member
This is great info because I have one on order for my Colorado to pick up in February, and it's great to see what other people have done.

About the shell, you said it has 2" extra height to store bedding. Does that mean the cabover is 2" deeper? It looks like you also got an extra 2" cab clearance, possibly so it could be used on a Tacoma? So that would be an extra 4" overall?

I'm mulling these choices over and will definitely go for the "fit a tacoma" option, but how important did you find the other 2" for the cabover to fit bedding?
 

Pshin

Member
This is great info because I have one on order for my Colorado to pick up in February, and it's great to see what other people have done.

About the shell, you said it has 2" extra height to store bedding. Does that mean the cabover is 2" deeper? It looks like you also got an extra 2" cab clearance, possibly so it could be used on a Tacoma? So that would be an extra 4" overall?

I'm mulling these choices over and will definitely go for the "fit a tacoma" option, but how important did you find the other 2" for the cabover to fit bedding?
Good to hear there are more Colorados in the OVRLND lineup! You have a good eye. You're right about everything you noticed. We added 2 inches of height, and also had it sized to fit a gen 3 Tacoma (for resale purposes). This makes our whole rig a few inches taller vs if you went with standard height and fit it exactly for a Colorado. The extra bedding height is nice, but it's still somewhat tight to stow two 0 degree down bags. It's doable, but you have to pay attention to how the front hinges and canvas fold in and make sure to leave room for everything. I should also mention that we use a 3 inch foam mattress, so when they are stacked it's 6 inches. You could buy yourself extra space by using a thinner mattress, for example a 2 inch thick mattress would buy you 2 inches more bedding space because it's only 4 inches stacked.

To be totally honest, I think it would look better aesthetically if we kept it slimmer and fit it exactly for a Colorado, but we wanted to have a little room for bedding and have a bigger market in case we wanted to sell the camper. Something I've been dreaming about is adding a roof rack on the cab, especially for the open area in front of the camper. I went as far to email Prinsu about their dimensions and I think a full Prinsu rack would actually fit between the cab and camper and even have a little room for any flexing. That would open up some exterior storage, create a small wind fairing, and help fill in the roof line aesthetically. For now, that's just a dream though...
 
Last edited:

Pshin

Member
Finally got around to taking a quick video of the removal/install process of the interior storage. Removal is fairly quick by just removing 6 bolts. Installation takes a little longer to line up the holes and use a hand screwdriver. I found out the hard way that it’s not a good idea to install using a cordless drill and cross thread a bolt.

 
Last edited:

bgraboyes

Member
Which engine did you go with and what year?

2019 with the 3.5 ecoboost (4 door long bed doesn't come in 2.5 otherwise probably would have gotten that). pre-camper i was getting almost 22mpg on a good day. now getting about 18. got a wind fairing that i'm interested to see if it helps. truck has a ridiculous amount of power. i think the only 2 things holding it back from harder trails is the wheelbase. and the width.
 

Pshin

Member
The other day, I built what I would call a low-tech cooler slide. I wanted something to lift my cooler a little bit for shoe storage underneath and make it match the height of the bench/box.

FCC2B72F-3AD7-4BB8-9D1F-543A72F5F817.jpeg F1CD7A44-3E5F-4D7B-AAC1-B0952B0AF0D5.jpeg

It’s a pretty simple design. The cooler attaches to a sled which slides on a base. It’s mostly built out of extra plywood I had laying around and I ordered a small sheet of ultra-high molecular weight (uhmw) plastic on Amazon to reduce friction for the sliding.

8901E529-4D15-4AF2-9685-3EA7B88CE965.jpeg 7C37E619-E4B5-4C38-BFEE-A7C143C9B463.jpeg

I added a couple attachment points for some straps to secure the cooler to the sled. Since the sled is basically free floating, it’s possible to just lift the cooler w/ attached sled completely if I wanted to set the cooler on the ground, table, etc. Since my cooler fits perfectly in the location, there isn’t any room for it to move back and forth when the tailgate is closed. Because of this, I didn’t build in any sort of locking mechanism since it can’t actually move anywhere. Theoretically, the sled could bounce off the base, but that would take a huge bump— I would probably have more to worry about than my cooler falling over.

Used it on a couple trips so far, and it’s been good. The tilted position makes it easier to grab stuff and we appreciate the little extra storage underneath (every cubic inch counts in the shortbed!)
 
Last edited:

Pshin

Member
Heater Setup:
I recently picked up a Chinese made diesel parking heater similar to name brands like Webasto, Espar, Planar, etc. I purchased an “all-in-one” unit on Amazon that comes pre-assembled in a red box. Space is limited in the camper so I wanted this to be a modular setup that could be set up outside the camper and we could simply leave it behind in warmer months. I was inspired by some roof top tent users online and decided to set the heater on the ground and run the heat outlet hose into the camper. I chose to run it through the side door rather than cutting a hole in the camper.

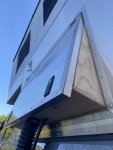
Photo of the heater set up outside the rig. The photo on the right has a simple rain cover that I made to protect the heater from the elements. The cover is made out of corrugated plastic that I glued together and cut out all the necessary openings and clearances for the intakes and exhaust. Ignore the orange strap on the wheel. We used that to tie down an EZ-UP canopy that we had behind the truck.
2EBCFA3A-E5D6-421A-98A9-1061EE044ECE.jpeg 750B53B6-D9A7-4B56-9948-E5BEC986F76B.jpeg

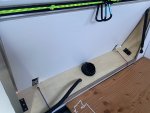
Close up photo of the window. I built a window spacer out of some plywood to give me an area to cut holes and run the heater hose and 12v power supply. The spacer is held in place by a couple small bungees and is foldable for storage. The disadvantage to this setup is that I can't open the side door when this is all in place. If I really want to commit, I could cut a hole in the side of the camper, but I'm nervous to cut a 3" hole for something we will likely only use for a few months out of the year.
789ee0ba-f48a-4a82-8266-c9d8a88f7616-jpeg.629738
f5938ff5-e09f-4084-ac24-fbb84df97546-jpeg.629739


Overall Conclusion:
Outside of some initial "driveway testing," we have only used the heater for 3 nights. So far, it works! Before using it overnight, I ran the heater for a few hours in my driveway. It was a windy day around 40F. I placed a thermometer on the mattress and about an hour later it was in the 60's. A couple hours later it was almost 70F. We have run the heater overnight (8+ hours) a few times and it has worked great.

Finer details:
The heater requires both diesel and a 12v power supply to operate. The "all-in-one" unit comes with a fuel tank (roughly 1 gallon). For the 12v power, I extended the original power cable to reach our Jackery Explorer 300 (293 wh) battery unit. This heater has a thermostat control, however I have only used it on the manual setting. The camper is such a small space that I have only ever needed the lowest possible setting it can run. On the lowest setting, the heater draws about 6 watts of power. However, during the startup and shutdown it draws about 100-130 watts for about 5-10 minutes in order to heat the glow plug. Since the heater draws the most power during startup and shutdown, I think it is most efficient to just leave on low rather than starting and stopping repeatedly.

Using the lowest setting, it will deplete the Jackery 300 battery by about 35% when used overnight. Diesel consumption is really minimal-- less than 25% of the tank is consumed after running overnight.
 

Attachments

  • 789EE0BA-F48A-4A82-8266-C9D8A88F7616.jpeg
    789EE0BA-F48A-4A82-8266-C9D8A88F7616.jpeg
    903.6 KB · Views: 759
  • F5938FF5-E09F-4084-AC24-FBB84DF97546.jpeg
    F5938FF5-E09F-4084-AC24-FBB84DF97546.jpeg
    2.8 MB · Views: 777
Last edited:

s.e.charles

Well-known member
Finally got around to taking a quick video of the removal/install process of the interior storage. Removal is fairly quick by just removing 6 bolts. Installation takes a little longer to line up the holes and use a hand screwdriver. I found out the hard way that it’s not a good idea to install using a cordless drill and cross thread a bolt.


that's one of the reasons i'm suspicious of the ubiquitous
"nylok" nuts. sometimes the cross thread is confused with the nylon insert, and vice-versa.

if a time comes to cut in the heater hose, something like this may make the unused season appearance look okay: MARINE BOAT 4" round access Hatch cover lid, Screw out Deck - Black - $8.79 | PicClick
 
Last edited:

Forum statistics

Threads
186,725
Messages
2,887,515
Members
227,160
Latest member
roamingraven
Top