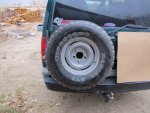
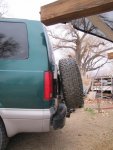
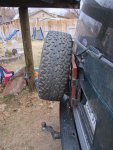
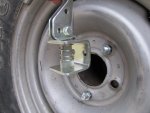
Astro gets a rear tire carrier....Finally.

mtnmike

Observer
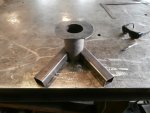
Thanks for the comments and compliments guys. Herbie the hinge pins are stainless rod turned down to .340, of course they are longer with a washer welded to the top. My hinge mounts are a bit chunky but i wanted to

leave material on so I would have options on where to weld the frame on. As far as critical dimensions, the real critical ones are the 3 1/8" inside demension to fit over the stock hinge and 7/8" clearence or depth to allow it

to pivot. You are correct in your edit that a separate piece pivots on the heim joints to allow the hatch to be opened. I'm thinking of using a trailer tipper latch mounted to the outside of the tire that latches onto a

piece that sticks thru the center hole in the rim, clear as mud right, hopefully i'll have more of this together soon and can show you all with some pictures.

Mike
 

Herbie

Rendezvous Conspirator
Thanks Mike. Since we're sharing info, I dug up my notes from when I was sketching this concept and dug up the following:

The OE GM Rear Hinge Pins are 11/32" diameter x 3-1/4" long (from my notes, not sure if this includes the tapered portion that protrudes slightly from the hinge). Pin head is 1/2" OD.

For this project, one can consider two other parts that might be useful:
Help! Part# 38410 which is 11/32" (0.342" nominal) diameter but 3.57" long or
Help! Part #38400 which is same diameter but 4.167" long.

Note that 38140 also includes a couple of grooves for an E-clip, which might prove useful, though the longer 38400 might allow for beefier material above and below the hinge.

Also: note that the bushings included with those pins do NOT have the correct OD, so you'll need to reuse the OE bushings or pick up new ones via:
Help! Part# 38469 which should be the direct match for GM Part# 15598845 (OE door pins). Interesting note, I think there's an error on the Dorman page for that part, it lists the Pin as having a 0.354" diameter, but lists the ID of the included bushings as 0.342". Given this and the fact that it lists the GM part# as a match, I'm betting it's the same 11/32" diameter pin.
 

mtnmike

Observer
Nice! I am reminded often when I start posting builds I'm doing that my sourcing skills for OE parts that would work for my application are severely lacking. I like the E-clip for some applications but find that eventually (at

least for me) they have a tendency to go "ping" into the dirt.

Thanks again for the Part#s.

Mike
 

mtnmike

Observer
Another piece of the puzzle

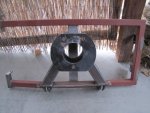
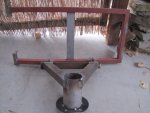
Rough tire mount pieces mocked up. This will be welded to the plate with the heim joints.

Tire mount.jpg

Three studs will be welded on the rounded plate for lug nuts and an similar rounded plate will mount on the front of the rim (minus the studs) sandwiching the rim. The front plate will have a latch attached

to hold the mount in the upright and locked position. There will be a piece of steel protruding thru the center hole from the framework mounted to the door for engagement with the latch.

As always, more to come.

Mike
 

Herbie

Rendezvous Conspirator
Last nosy question: What size bar stock did you start with? Looks like 2" x 5/8" thick? (Guessing from the pics).
 

mtnmike

Observer
I did get a chance to tack some more pieces together and order the latch while on Thanksgiving break, but mostly I was "busy" doing this..

IMG_3096.jpg

I should have more on the build to post this week.

Mike
 

mtnmike

Observer
Still waiting on my tipper latch to arrive, so Iv'e been at a bit of a stand still. So what's left...

1. Fab plate to attach tipper latch to the outside of the rim.

2. Fab matting latch catch for rack side.

3. Finish paint and mount!

Here's a picture of where i'm at in assembly.

IMG_3127.jpg
IMG_3128.jpg
 

mtnmike

Observer
Getting close to completion!

Ask and you shall receive!

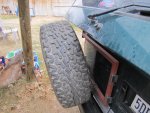
I ended up with just enough room for the hatch to open with the tire resting on the bumper. I will be making a custom bumper in the future and want to keep this kind of spacing.

IMG_3129.jpgIMG_3130.jpgIMG_3131.jpgIMG_3132.jpg
It's held in the upright position with tie wire in these pics.
IMG_3133.jpg
So this is the tipper latch I've been mentioning. I'm gonna get to this portion of the build this week.
Mike
 

foytix

New member
very nice looking, that tire brings back memories, it's what came on my trooper (first vehicle) when I bought it in 96 but it was a 235/75r15
 

mtnmike

Observer
I've hit some motivational snags, ie great snow at Mammoth Mountain, so I've shifted my focus to getting my passenger seat to swivel. Also I need to rethink my latch system as it isn't looking right in mock up.
Later.
Mike
 

Forum statistics

Threads
187,880
Messages
2,899,444
Members
229,073
Latest member
fireofficer001
Top