Atrais's Build Thread

Atrais

Adventurer
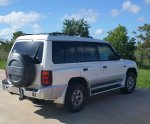
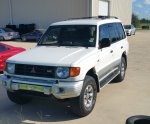
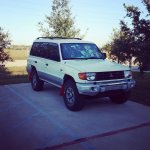
So I thought I should go ahead and start a build thread. Originally I got the Montero because my other car (an '03 Honda S2000) got ran off the road by some idiot on her phone (go figure). So the body shop was taking FOREVER and I had already forked out close to $500 in rental car fees when I said screw it, I'll just buy another car. So ended up picking up the Montero from a very nice gentleman who simply didn't use it anymore. Had around 190k on it when I got it:

20150916_094833_zpsepxq42vk.jpg

20150916_094815_zpsdcbug8g1.jpg

Overall it was in great shape, everything was there and everything worked (including the sunroof!). It had the winter package and even had a rear LSD! First things first though, for about 2 weeks it didn't move at all while I ordered parts in preparation for the timing belt job. I also went ahead and did everything related to it as well (spark plugs, wires, water pump, cam seals, lifters, valve cover gaskets, etc etc). I also went ahead and got a new alternator in at the same time as the old one was doing weird things. After I was done I drove it around for a couple days until (again) I started ordering more parts. Basically, the truck was wallowing as ********. Hitting bumps in it felt like falling down a flight of stairs in leg-irons.

Turns out the driver's side front wheel bearing was gone. SO I went ahead and did both wheel bearings and all 4 shocks. Because this is what was going on in the back:
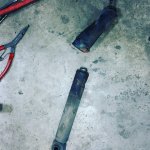
12036856_10100872239906458_4410895932674545193_n.jpg

Yea.

Around the same time I also replaced all the ball joints, steering arms, idler arm, and tightened up the steering box and MAN did it feel better haha.
 

Attachments

  • 20150916_094815.jpg
    20150916_094815.jpg
    527.9 KB · Views: 76
  • 20150916_094833.jpg
    20150916_094833.jpg
    515.9 KB · Views: 68
Last edited:

Atrais

Adventurer
So next item was my quasi-dry rotted, plastic-y tires. Went ahead and got some 33x10.5" BF Goodrich's and chucked them on. Also made some mudflaps as I noticed with the stock running boards taken off I was kicking up a bunch of ******** all over the body. (Also note my kickass sun shade. Yea, be jelly.)

IMG_20151115_192308_zps3o1kiuiu.jpg
 

Attachments

  • 12227634_10100901328837008_2592292479346570886_n.jpg
    12227634_10100901328837008_2592292479346570886_n.jpg
    113.6 KB · Views: 62
Last edited:

Atrais

Adventurer
So at this point I'd had the truck a couple of months and had taken it offroad a fair bit (enough to realize I needed more tire to body clearance!). So after reading Eurosonic's thread and learning about the bodylift he did I went ahead and ordered a 2" lift. My brother also bought me a snorkel for my birthday and I put that on as well haha. After that drove the truck from Houston, TX to Asheville, NC and back for Christmas (and a little wheeling!). Long *** road trip and I honestly was worried if the truck would be okay, but it didn't skip a beat. OH, and I ditched the "Montero" side badges and installed some JDM corner lights, I also ordered a "Pajero" name plate for the rear licence plate thing and put that on as well.
IMG_20160107_164808_zpswmesrmex.jpg
 

Attachments

  • IMG_20160107_164808.jpg
    IMG_20160107_164808.jpg
    270.3 KB · Views: 67
Last edited:

Atrais

Adventurer
So when I got back I did some little things:

-Smittybilt seat covers
-Replaced all the exterior lights (except turn signals) with LEDs
-Ran 12ga wire to the headlights and installed some relays to run higher-wattage headlight bulbs (95w low beams)
-Installed a second wire from the alternator to a breaker, then the battery in anticipation of a second battery and to aid in charging
-Made a 2.5" SS exhaust to replace my now rusting fart trumpet
-Installed a CSF Radiator as I suspected my OEM one had a small leak
-Fixed the transfer case shifter

FB_IMG_1460314323828_zpsjln5vdax.jpg

FB_IMG_1460314316328_zpsl8ydrlgr.jpg

20151126_190535_zpsv0ntorh1.jpg
 
Last edited:

Atrais

Adventurer
So next I snagged a Con-Fer roof rack from a local guy for $200. It came with some KC lights which I sold for $200 so I essentially got it for nothing (well maybe a little gas). It was about a foot too wide as it cam off an older full-size Suburban, so I had to cut it down and re-weld it. Then I spent the next couple of days knocking off the rust and priming it before hitting it with some bed-liner I had sitting around. For mounts, I removed the OEM chrome rain gutter trim and used Smittybilt gutter mounts. Turned out really well and I've already had to strap stuff up that otherwise wouldn't have fit in the cab. Only thing I have left to do is make a floor for it somehow:

20160114_185409_zpspd7ogzej.jpg
 
Last edited:

Atrais

Adventurer
So in that last picture you can see my rear bumper is still sitting low from the body lift. I had made brackets to raise the front bumper up to match the lift, but the rear bumper was pretty banged up from the previous owner, and the backup lights kind of sucked so I had pretty much decided I was just going to make a new rear. Sooooo after months of driving around with a droopy *** I started the rear bumper:

IMG_20160312_165235_zpsafexkwbe.jpg


So I've gotten a bunch of questions on how I set this up and to be honest I didn't take a lot of pictures, but I'll do my best to describe how I did it.

Another member on here has a build thread where he built a bumper out of square tube with dual swing-outs. He had some pretty good pictures of the ends of the frame rails and that's what I looked at when I was designing mine (if I remember your name I will gladly give you credit, your thread helped a TON!). My truck came with a tow bar that I'd already used and intended to keep so that basically set how far back I could modify the rails.

So first things first, there's a plate on each side with some welded nuts on it that the OEM bumper bolts to. I cut those off. Next I drilled out one of the existing holes on the end of the frame rail to .75" and drilled another one closer to the truck on the rail. Then I put two pieces of 1" OD .120" wall DOM in the rail to keep it from collapsing and welded it all together. This is what holds my bumper on; 4 .75" grade 8 bolts, and the 2 vertical M12 bolts from the tow bar.

My end plates that I ran all the tubes from my bumper off of were plasma cut from a piece of 3/8" strap steel. My plates cover the sides, top, and front of the frame rail end. This lets me put the bumper on and hold it with one hand while I run the bolts through (if you just sandwich the frame rail the bumper will move around while you're trying to install it).

IMPORTANT: When you're making your mounts be sure to leave a little wiggle room when you weld everything up. By this I mean when you mock up the side of your mounts by running the bolts through them and the frame, put a washer between the frame rail and mount on one side of the frame rail. This will leave you with enough room to get the bumper on and off after you weld. Don't worry about the gap as it will get taken up when you bolt it together. If you don't it will be VERY hard to get the bumper to slide on and off the rails!
 
Last edited:

PacS14

Adventurer
Congrats on the rig! And yes we are multiplying in Houston. Note for whatever reason I can only see the pictures on your first three posts... use photo bucket or the picture host of your choice and just add the picture code here so that they don't have to be stored on the expedition portal.
 

Atrais

Adventurer
So after I welded up the mounts, I started making the tubular portion of the bumper. All the tube is 1.75" OD .120" DOM. The first step is making the outer "bounds" of the bumper. These are the two "U" shaped bars you see in the above picture. I basically just measure how wide I wanted the bumper and bent a tube with two 90 degree bends on each end to achieve the correct width. Then I bent another "U" that was slight (I believe ~2") shorter for the lower tube. You want this so that the face of the bumper isn't completely flat. This does 2 things: first it matches how the OEM body looks a little better than if you simply had a square shape and second it allows things (knees, rocks, small children) to slide up the bumper rather than just hitting the lower bar.

Next I added the four small spacers that form the height of the bumper. These go between the 2 "U"s I made and locate them to each other as well as define how "tall" the bumper will be. Basically just 4 straight tubes with fishmouths cut at either end. Once I had everything where I wanted it I went ahead and tacked it all together.

Then I added a secondary bar between the legs of the upper "U". This formed the leading edge of the top of the bumper and is the tube closest to the rear door in the above picture. Once I had it where I wanted I tacked it in place.

Now comes the super ****ty part haha. So you have this skeleton of a bumper and you have to get it squared up to the chassis so it's not crooked in ANY way. That's what I'm doing in the picture above (I of course cheated and used a lift to hold it at the height I wanted and a bigass jackstand to get the tilt right). TAKE YOUR TIME HERE!!! Remember to check clearance to the spare tire, the door, the door hinge mechanism, and anything else you may have dangling off the rear. Once I had everything lined up I measured the distance between the lower "U" bar and the mounts on the frame rails. Then I cut a piece of tube to the correct length, fishmouthed it and tacked it to the mounts and bumper. I double checked everything and then fully welded this piece. Then I removed the jackstand and lift and looked at my tacked together, sort-of-a-bumper.
 

Atrais

Adventurer
Picture links don't work :(

Congrats on the rig! And yes we are multiplying in Houston. Note for whatever reason I can only see the pictures on your first three posts... use photo bucket or the picture host of your choice and just add the picture code here so that they don't have to be stored on the expedition portal.

Nice build!

Looking forward to the photos, also.

BAH! Working on it, sorry about that :(
 

Atrais

Adventurer
20160327_194025_zpsky2zbap7.jpg


So, skipping ahead a bit (because I never took a lot of picture of this) you can see how the bumper has progressed. The two lower standoffs from the mounts to the lower "U" have been reinforced with a 3/8" triangular gusset. I've also added two more tubes that run from the inside faces of the mounts to the center of the lower "U" to help with impact protection. I've also added another tube parallel to the the upper and lower "U" standoff on either side that will serve to frame and protect the LED reverse lights I'll install. Of course I also skinned the center portion of the bumper face with some 14 ga steel that I dimple died for strength (and it looks cool! lol). You can also see how I ran a very short support from the mount to the cross tube from the upper "U" just to give it some more strength.

The biggest change however is the area under the lights. I knew this part was going to be a PITA from the get go and this portion was really just a lot of trial and error to get that bend right and the mirror it on the other side. I couldn't do a straight tube as it would stick out from the body too much and look weird but at the same time I didn't want to leave the space under the lights empty so I cam up with this. It's a shallow angle bend (I don't remember the exact degree!) that is capped at the top and bottom. Then I made two short 90 degree bends and ran them off to get the finished product.
 
Last edited:

Atrais

Adventurer
IMG_20160401_221106_zpsym1pooeo.jpg


IMG_20160403_184747_zps4vvuytvf.jpg


So the very last thing I did was weld in the light mounts for the LEDs, and then I made a LARGE paper template, did a little layout work on it, and dimple died a "skin" for the upper deck of the bumper. I also ran a square tube underneath it to give it some more support in the middle so it wouldn't dent or deflect over time. Then I spent about forever cleaning it up, priming it, and painting it with the same bed liner stuff I used for the roof rack. And that's about it. I'll try and get some more pics of the finished product too.
 
Last edited:

Forum statistics

Threads
188,362
Messages
2,906,024
Members
230,117
Latest member
greatwhite24
Top