Barn Door for JK factory hardtops

kojackJKU

Autism Family Travellers!
Awesome. Thanks, I just wasted 49 bucks on the MBRP reinforcement kit. ha ha. Can you show us the heavy duty tire mount now?
 

greggNJ

Observer
Yes, those will also be available this summer, as will the hinge-mount Rotopax carrier (which is also in the photos I posted the other day of the tailgate reinforcement/HD spare carrier). And within the next few weeks, the hinge-mount HiLift carrier and the spare-mounted Excursion Rack will also be available. It's been a busy couple of months for me,

That's great. I've been trying to decide between 285's and 315's to replace my almost worn out stock tires. The tire carrier for the 315 has been the one thing I couldn't decide on.
 

jscherb

Expedition Leader
That's great. I've been trying to decide between 285's and 315's to replace my almost worn out stock tires. The tire carrier for the 315 has been the one thing I couldn't decide on.

The way I've designed the components, they can be installed together or separately. So you could start with the hinges, then add the HD spare carrier, and if you later decided you needed additional reinforcement of the tailgate, that could be installed later. Or if you liked the factory spare carrier, you could install the hinges and the reinforcement and use the factory carrier with those. I wanted the system to be budget-friendly and allow upgrades as needed.

My first upgrade would be to replace the factory hinges while they're still good - you can sell the good hinges and plastic covers on eBay or Craigslist to recoup a lot of the cost of the new hinges, but if you wait until your factory hinges are shot, they won't be worth selling :).

Once doing the hinges, when I got around to doing larger tires or maybe adding a HiLift or Rotopax to the tailgate, I'd decide whether I needed the HD spare carrier, the tailgate reinforcement, or both, and add them as needed, along with the Rotopax carrier or HiLift carrier.

Awesome. Thanks, ... Can you show us the heavy duty tire mount now?

I don't know, it's sort-of not mine anymore. I'll have to check with the company - I don't know if they want detailed photos posted just yet.

I know for sure they don't want me to post detailed photos of the side-mount jerry/Rotopax carriers, since nothing like it has ever been done before they've begun a patent process and even asked me to put a sticker on each side mount...

PatentPending_zpsbgwnn7y5.jpg
 

Dan Grec

Expedition Leader
Hey Jeff - congrats on getting more of your designs picked up for production!

Did the JK Barn door get picked up?
Any estimate on when it might be available for purchase if so?

I'll buy #001 :)

Thanks,
-Dan
 

Amphibeast

Adventurer
So are you selling your designs to the manufacturers? I'd be curious to speak to you in PM as I have done lots of product development for the last 20 years…. interesting...
 

jscherb

Expedition Leader
Hey Jeff - congrats on getting more of your designs picked up for production!

Did the JK Barn door get picked up?
Any estimate on when it might be available for purchase if so?

I'll buy #001 :)

Thanks,
-Dan

Dan,

Thanks. I don't plan to make any decision about the barn door being a commercial product until after I've molded all of the parts for the first prototype JK Safari Cab. Once I've done that, I'll decide if I think the Safari Cab should be a commercial product, and if the barn door should be a separate product for use with factory hardtops.

I'll be starting work on the Safari Cab roof panel mold master and mold in the next week, so it won't be long before I've got the first complete set of parts molded.

Right now I don't feel like there would be enough demand for either the Safari Cab or the barn door standalone to make either of them commercial products. Maybe I'll feel differently in a month or so when I start assembling all of the parts for the first Safari Cab prototype, but right now I don't think there would be enough demand to justify it.

And it's not totally my decision anyway, if no company turns out to be interested in marketing either the barn door or the full Safari Cab, it doesn't matter what I think because I'm not in business to sell anything. I just design this stuff and make prototypes :).
jeff
 

jscherb

Expedition Leader
So are you selling your designs to the manufacturers? I'd be curious to speak to you in PM as I have done lots of product development for the last 20 years…. interesting...

The best way to communicate with me privately is via email. My PM inbox is too small and fills up too quickly to be a practical way to carry on a conversation.
 

jscherb

Expedition Leader
Project update: The last work I did on the JK Safari Cab hardtop/barn door project was right after I got back from Easter Jeep Safari about 2 months ago. Since then I've been busy with a few other projects, including the JK hardware accessories I posted in this thread over the past few weeks, and also sewing a canvas cargo top for my military replica trailer (details in trailer section of the forum).

With those projects out of the way I've gotten back to work on the Safari Cab - the only major part left to mold before I can start assembling everything on the JK is the main roof panel, so I'm working on the mold for that now. It'll probably take me 2 weeks to make the mold master (the pattern for the mold), and then another few days to make the mold, so hopefully I'll have the first roof panel out of the mold by the end of June. I'll post photos along the way.
 

jscherb

Expedition Leader
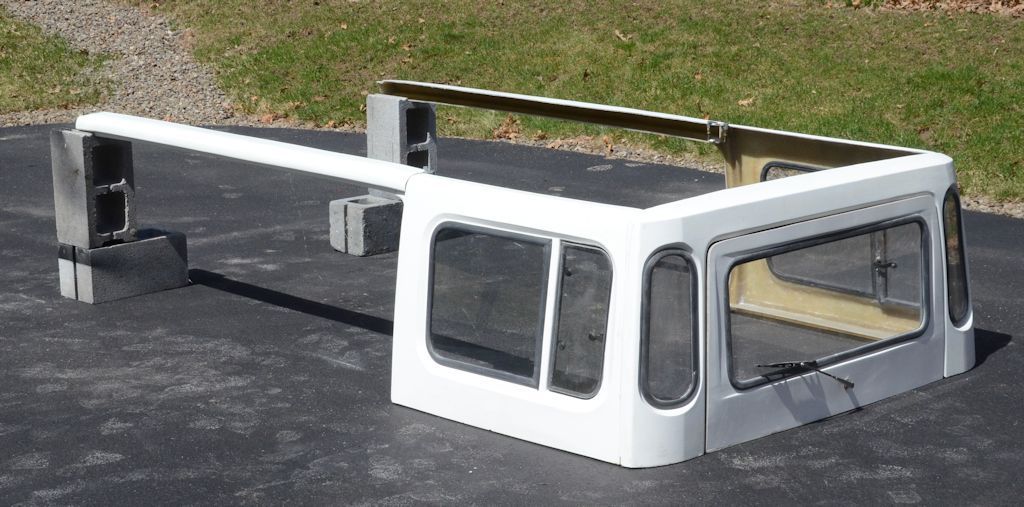
The last work I did on the JK Safari Cab was about 6 weeks ago, when I molded the upper door jambs and front parts of the drip rails. I posted this photo of the parts mocked up back then:

Mockup30_zpsi9pm1tv3.jpg


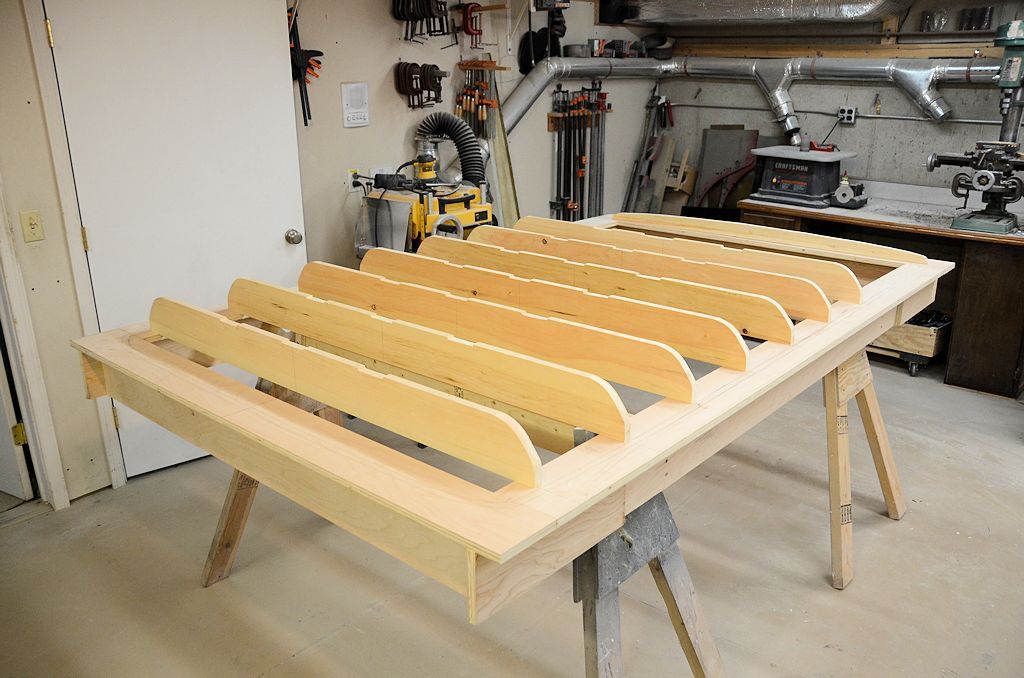
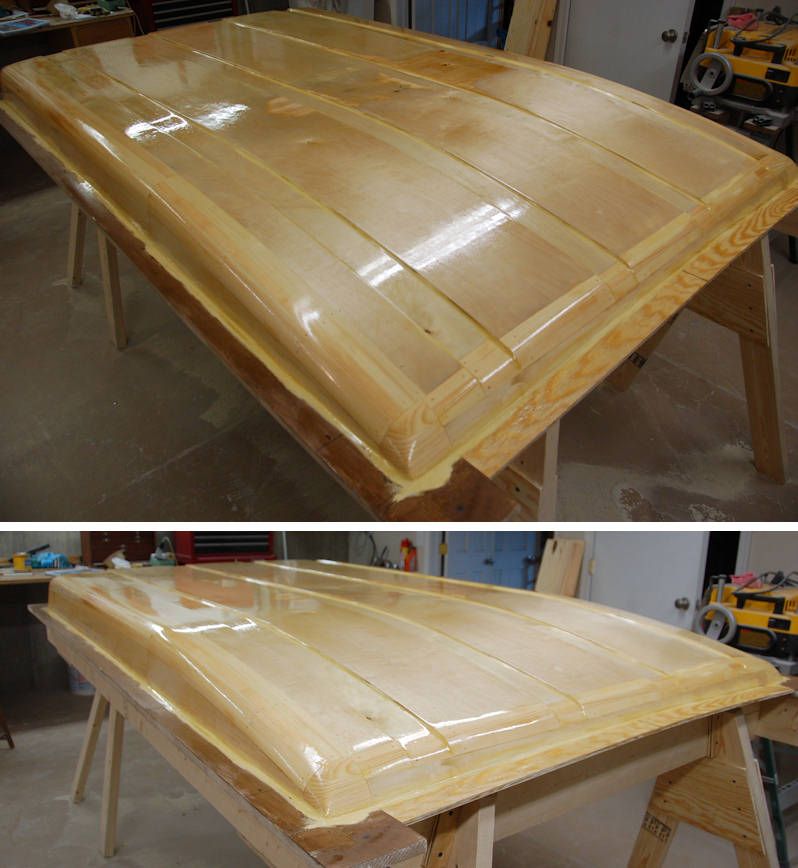
I'm now working on the master pattern for the roof mold. A master (also called a "plug", "model" or "pattern" by some fiberglass people) is a full-size replica of the part the mold is to be made for. It can be made of any material that will stand up to a fiberglass mold being made from it. I've made masters from metal, fiberglass, modified factory parts, and wood, among other things. In the case of the Safari Cab roof, I'm making the master from wood.

Here are a few detail photos, I'm not sure if people are interested in this level of detail, but here goes...

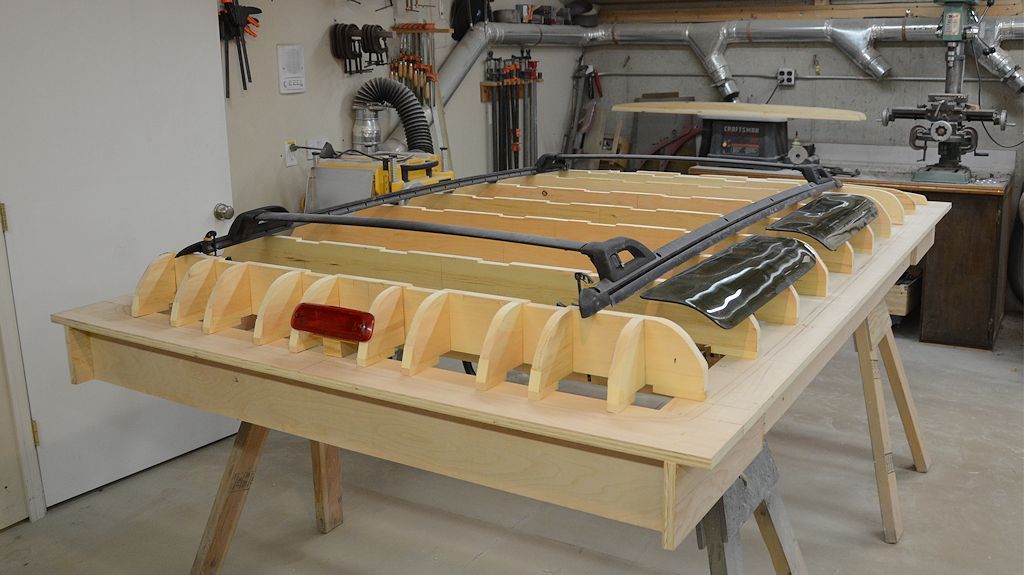
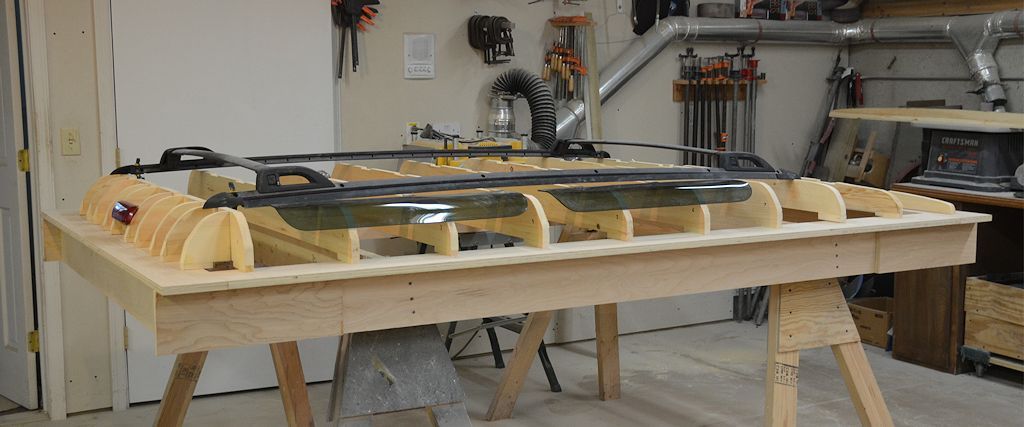
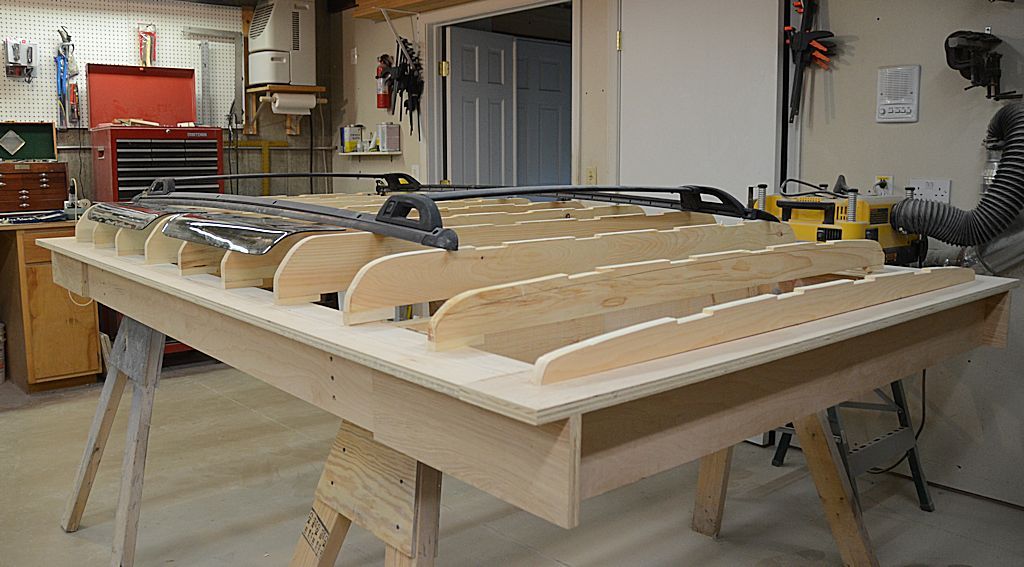
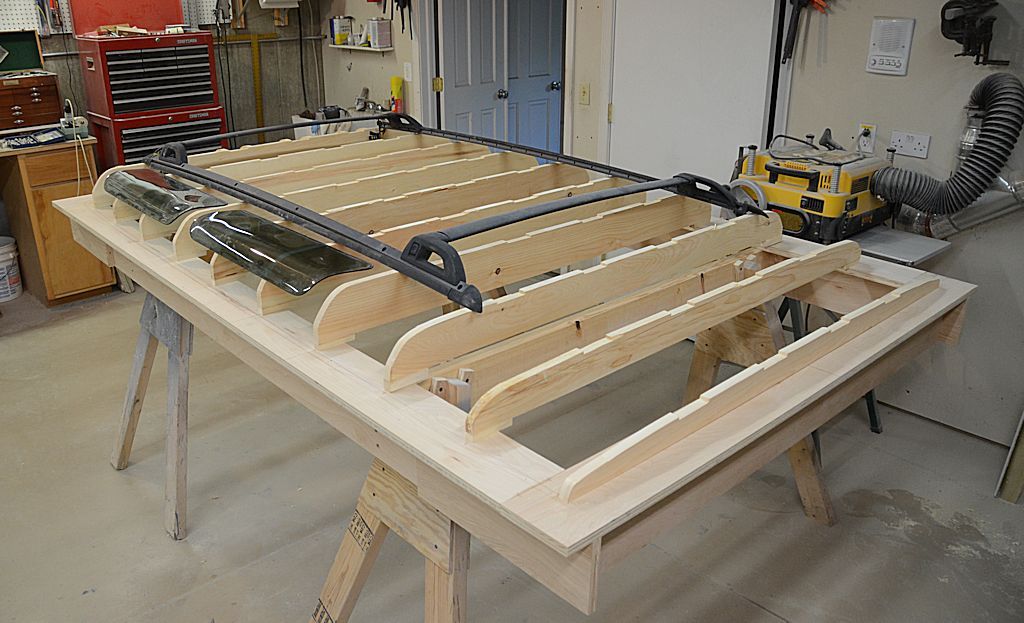
In this photo I've got a frame set up to build the master on. The frame has cleats on it to accept sawhorse legs so it's easy to work on. At the far end of this photo (the front of the roof) there's a curved rib that matches the curve of the top of the windshield. Laid on top of the frame are the drip rail parts I molded earlier, I'm using them as templates to trace the outline of the roof panel onto the frame to ensure I make the roof the correct size. The roof will set down in the grooves of the drip rails and be bonded to the drip rails - the portion of the drip rail flange of the roof edge will serve as the bolt flange to bolt the roof to the side panels.

RoofFrame2_zpshnvenq68.jpg


In this next photo I've got the main ribs setting in place. There will also be two ribs in the front sloped portion of the roof, but I haven't made them yet. Once all the ribs are in place, the skin will be put on the ribs, it'll be part birch plywood (the flatter parts) and part pine stripwood (the sharper curves). All of that will be planed and sanded so the curves are perfectly smooth.

RoofFrame3_zpskldwuc37.jpg


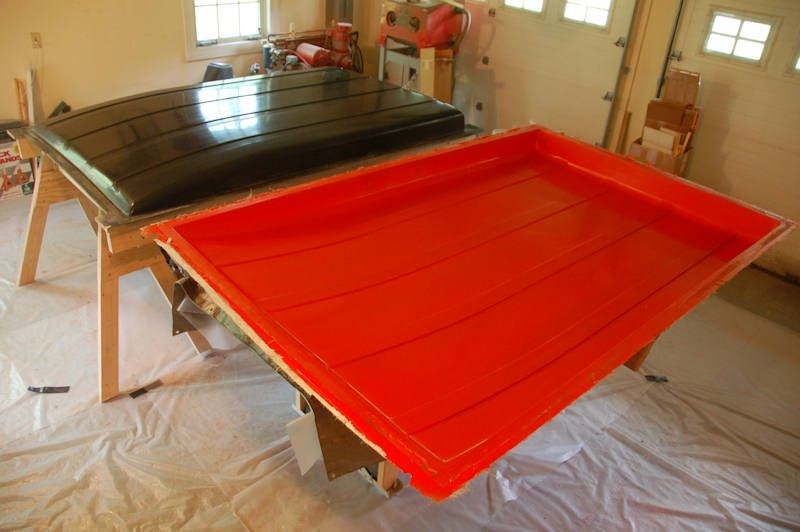
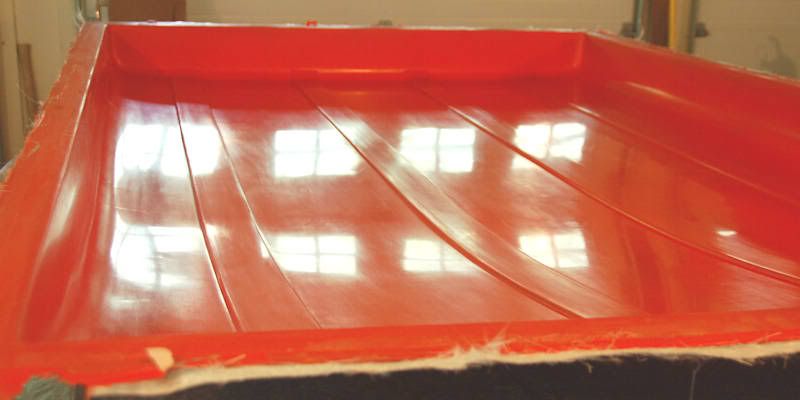
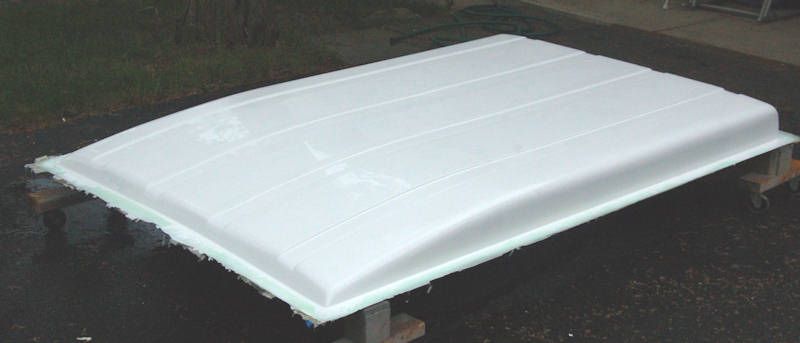
Once the skin is completed, a finish will be put on everything and then I'll make the mold from it.

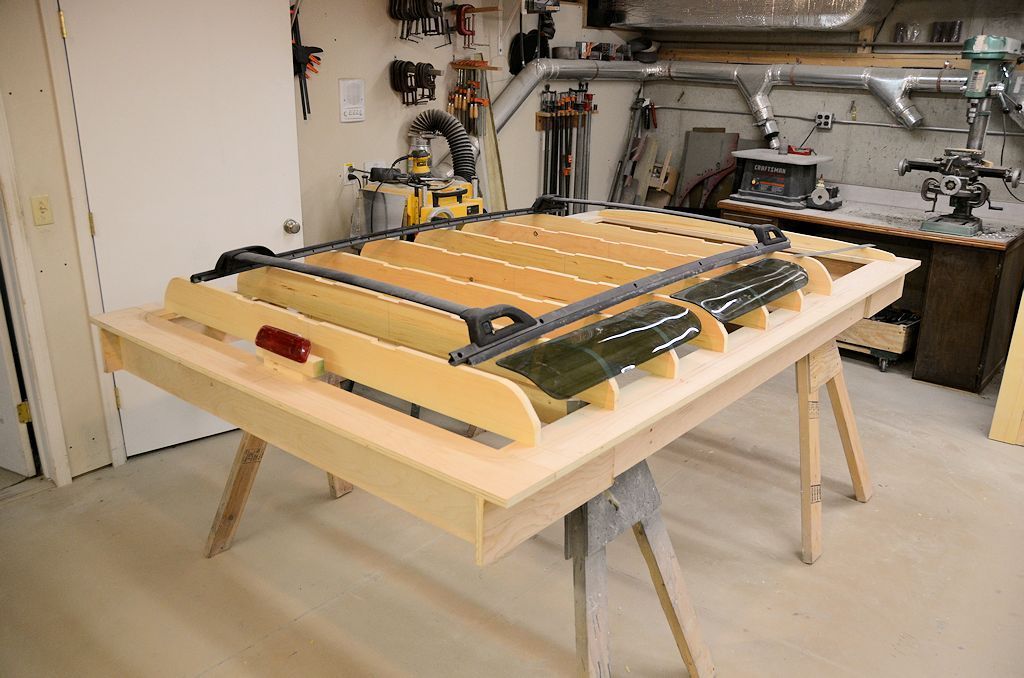
Along the way I do frequent mockups so I know how the finished shapes will look and how the components will fit - here's the framework with two alpine windows, the ZJ roof rack, and an XJ third brake light mocked up.

RoofFrame4_zpswznzazgo.jpg


All of the components mocked up are optional, the roof panel will come out of the mold without cutouts for the alpine windows or other components, so a Safari Cab without alpine windows could be assembled from a part out of the same mold.
 

stomperxj

Explorer
Thanks for always documenting your builds so well Jeff. I learn a lot from your threads. I'll be needing to build a top from fiberglass similar to this in the future (not for a jeep) and your pictures and descriptions are invaluable to us people that are totally new to fiberglassing. Keep up the good work.

Also when I click the link for your website in your sig it doesn't go to your site. Is that just me or did something happen to it?

Jess
 

jscherb

Expedition Leader
Thanks for always documenting your builds so well Jeff. I learn a lot from your threads. I'll be needing to build a top from fiberglass similar to this in the future (not for a jeep) and your pictures and descriptions are invaluable to us people that are totally new to fiberglassing. Keep up the good work.

Also when I click the link for your website in your sig it doesn't go to your site. Is that just me or did something happen to it?

Jess

Jess,
I'm glad someone finds the detail useful :).

About the link, for years I hosted that stuff using the free hosting I got for being a Time Warner cable subscriber, some months ago without notice, they stopped providing that service. I haven't gotten around to finding new hosting for it yet.
jeff
 

jscherb

Expedition Leader
It was exactly 5 years ago that I was doing exactly the same woodworking to make the mold master for the roof of the LJ Safari Cab project, so for those of you who are wondering how the top panel framework I posted yesterday gets turned into a finished fiberglass roof, here's a flashback...

The end of the woodworking project results in a roof panel that looks like this, here's the LJ roof master after the woodworking was finished and a few coats of polyurethane sanding sealer were applied:

RoofPanel1_zps516db2c7.jpg


Next a high quality finish gets put on the master, on the left below is the same wooden LJ master after finishing. The finish will be reproduced exactly by the mold, so the nicer the master is at this stage, the nicer the final parts will be. I often do a black finish at this stage, because black often shows imperfections better than a lighter color.

On the right in this photo is the finished mold, this photo was taken right after the mold was made and removed from the master:

Roof10-1_zpst0l4kdnc.jpg


Another shot of the mold:

Roof10-3.jpg


Then the mold is ready to make parts. Here's the first roof out just out of the mold, it hasn't been trimmed yet:

RoofPopped1_zps3ce12918.jpg


And after trimming and finishing, the end result (shown with the project I did right after the LJ Safari Cab, my fiberglass Jeep-tub trailer kit):

STTKwSafari6.jpg


I'll be going through the same process to get from where I am today with the JK Safari Cab roof framework to a finished part. Stay tuned...
 

jscherb

Expedition Leader
For those who want to follow along with the detail... I finished the framing for the roof master, here are some photos with the windows and other accessories mocked up. Hopefully at this stage you can start to get a feel for the shape of the roof.

The next step is to put the skin on, which starts with plywood on the flatter parts that the plywood can bend to.

RoofRibs5_zpsfkn8mm5n.jpg


RoofRibs6_zpsaga67npt.jpg


RoofRibs7_zpslmiz01l3.jpg


RoofRibs8_zpsoanyl0o7.jpg
 

Forum statistics

Threads
186,676
Messages
2,888,793
Members
226,864
Latest member
Nowhereman
Top