Barn Door for JK factory hardtops

jscherb

Expedition Leader
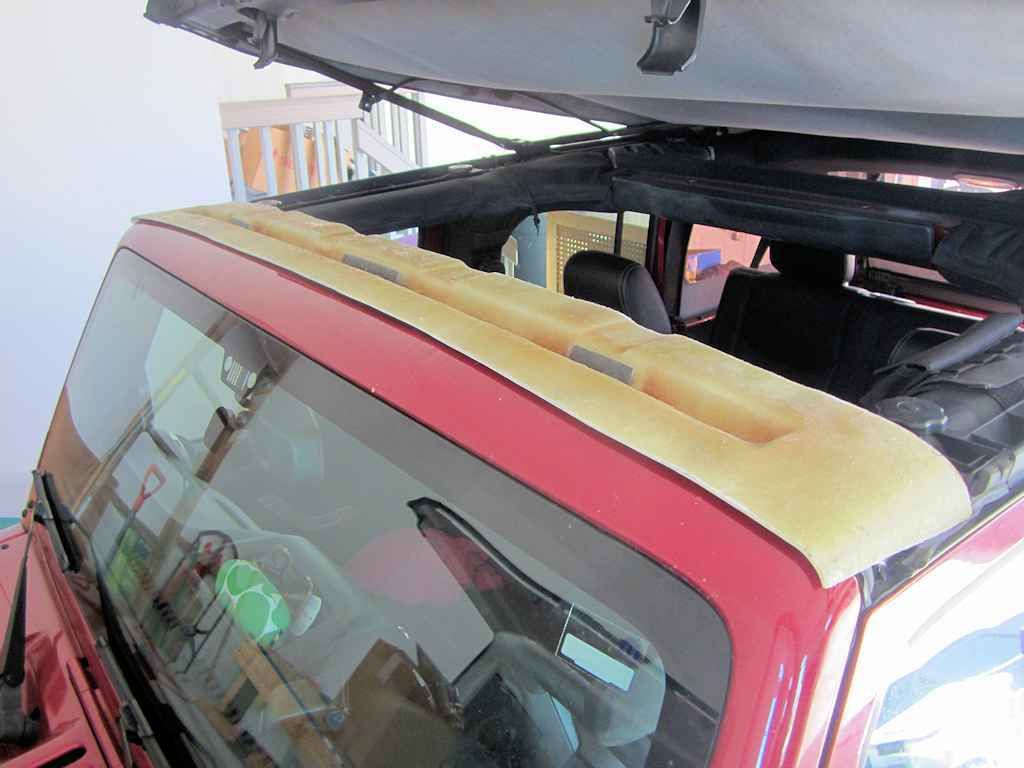
Today I did a quick test of the header I just molded to see how it fits on the windshield. I haven't done a final trim on it yet, but I wanted to see if I got the curves and shapes just right to ensure the roof will seal perfectly to the windshield.

First I laid it on top of the windshield to verify the shape. It's a perfect match, so once it's trimmed and can sit down on top of the weatherstrip it'll seal very well.

HeaderTest1_zpsew7jqsx4.jpg


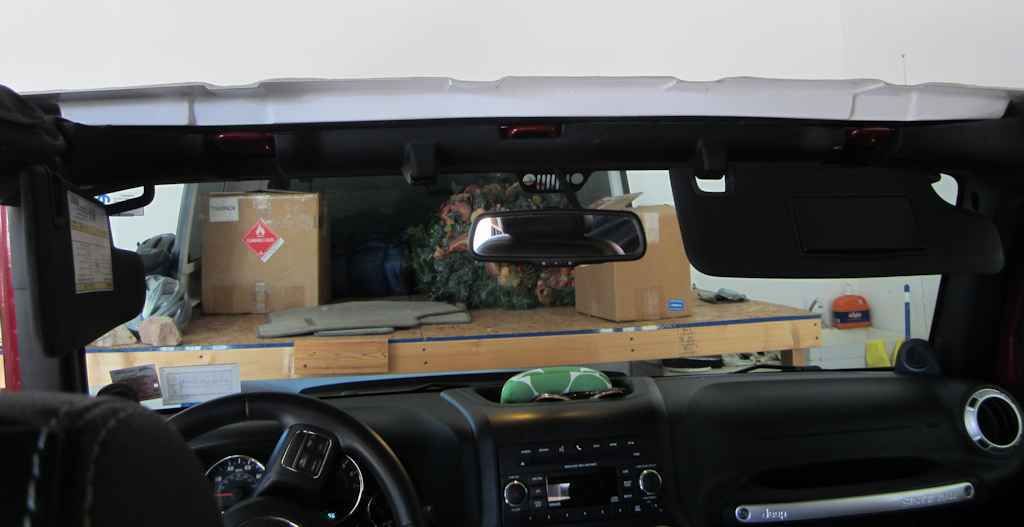
Then I checked the fit on the inside.

HeaderTest2_zpsxedfzxap.jpg


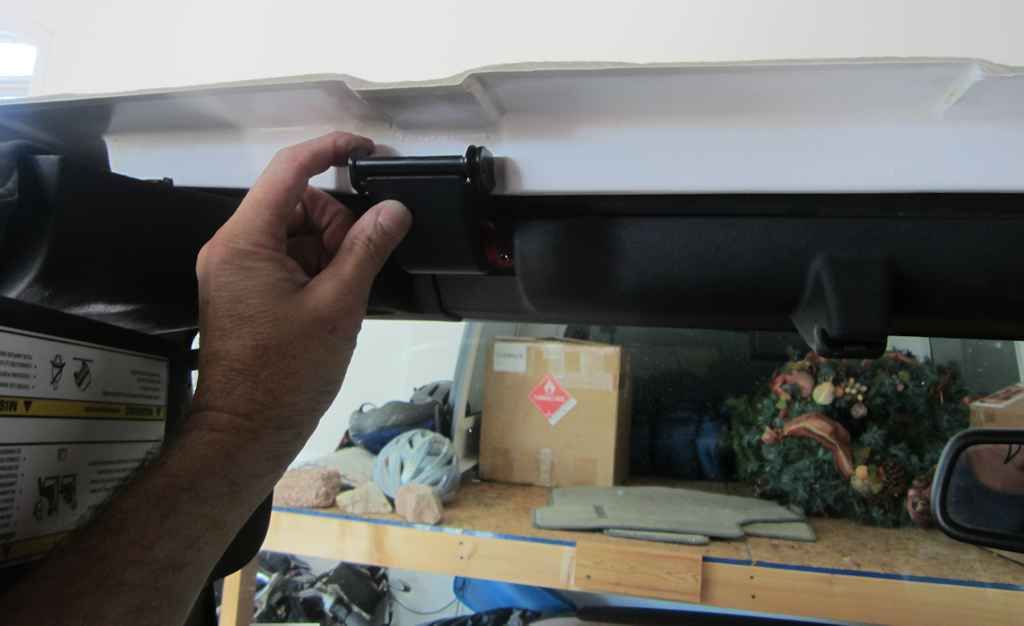
I've designed the header to accept TJ hardtop latches. In this next photo I'm holding one in place to check how it hooks onto the loop on the windshield. Since the header isn't trimmed yet it's sitting a bit high, once it's trimmed the latch will mount slightly higher on the header.

HeaderTest3_zps0josvidp.jpg


If you check the first photo you can see the metal plates I embedded in the header to secure the latches - I'll drill and tap holes in the plates for the latches to screw to. I've also put a plate in the center of the header just in case - it lines up with the center loop on the windshield, so if I decide a middle latch is necessary one can be added there later.

It'll be about a week before I have time to do the final trimming and fitting of the header, but I just wanted to verify that all's well since it just came out of the mold yesterday. I really couldn't ask for it to fit any better than it does, I'm very pleased with it.
 

jscherb

Expedition Leader
A few weeks ago I motorized the rear vent windows for the prototype JK Safari Cab with motors from a Chevy Venture minivan, I posted this video at the time:


Since then I've been looking for appropriate switches to control the vents, and yesterday I was in a junkyard and found some in a Land Rover that should be perfect. They're also available in the aftermarket and very affordable, this image is from an aftermarket site that sells them for about $12. Here's an image from an aftermarket site:

cl1


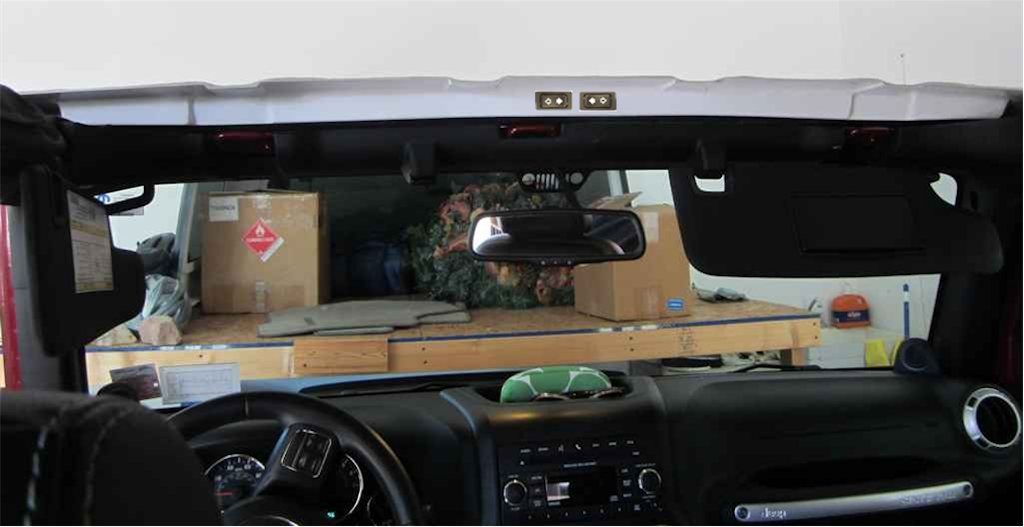
The switches are pretty compact, I'm thinking I could even mount them in the header I just molded. I've digitally installed them in this photo:

SwitchesInHeader_zpsjx22gfjk.jpg


Installed there, if I go ahead with one of the overhead console designs I've shown, the switches could be moved to the overhead console and the console would cover the holes which were used to mount the switches in the header. Also, the switches wouldn't be needed with the top was off, so mounting them up in the header means they would come off with the top.

I haven't decided on this yet, just thinking about the possibilities with these switches.
 

JDaPP

Adventurer
I saw somewhere else you mentioned that there was some company interest in the top. Are they going to try and make the tilt up camper version as well or is that more of a side "possibility" project that may or may not happen?
 

jscherb

Expedition Leader
I saw somewhere else you mentioned that there was some company interest in the top. Are they going to try and make the tilt up camper version as well or is that more of a side "possibility" project that may or may not happen?

It's not clear yet what configurations beyond the basic top they might be interested in. They have asked about a custom configuration, and I did a concept drawing of their custom idea for them which they liked a lot, but beyond that I don't know if they're interested in the camper version, or the soft sides or the soft roof. I'm pretty sure they're not interested in marketing the barn door as an option to fit to factory hardtops. I'm waiting to hear more from them about what their interest is.

There is a another company interested as well and I know for sure they aren't interested in the camper version, although they are interested in the standalone barn door.
 

jscherb

Expedition Leader
This morning I wired up the Land Rover window switch I got the other day to make sure it worked properly with my Chevy Venture window motor attached to my Toyota FJ40 vent window hardware...


All good. I'll probably order two brand-new switches rather than use junkyard ones since they're less than $10 each.
 

jscherb

Expedition Leader
I think I've posted about this project before - I've been working on a slider retrofit kit for JK half door uppers. The idea is that the slider window would get installed in a factory upper half door, replacing the vinyl window. Here are some prototype slider windows installed in factory uppers:

InstallDone_zpsmqmzvrtu.jpg


In addition to working with factory uppers, the retrofit kit is designed to work with Bestop and Rugged Ridge uppers.

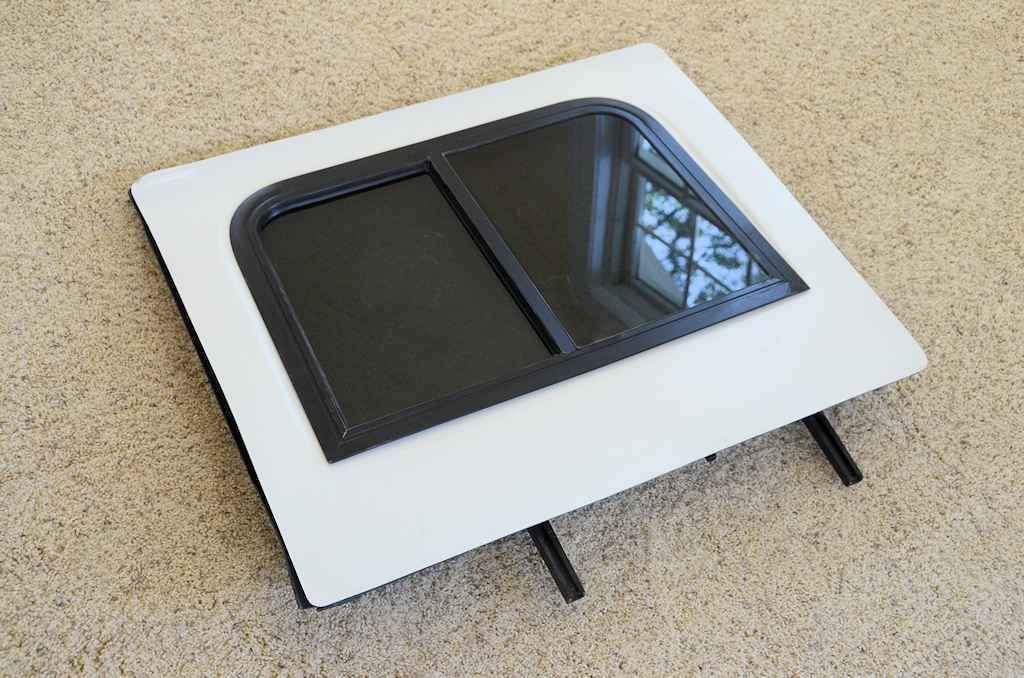
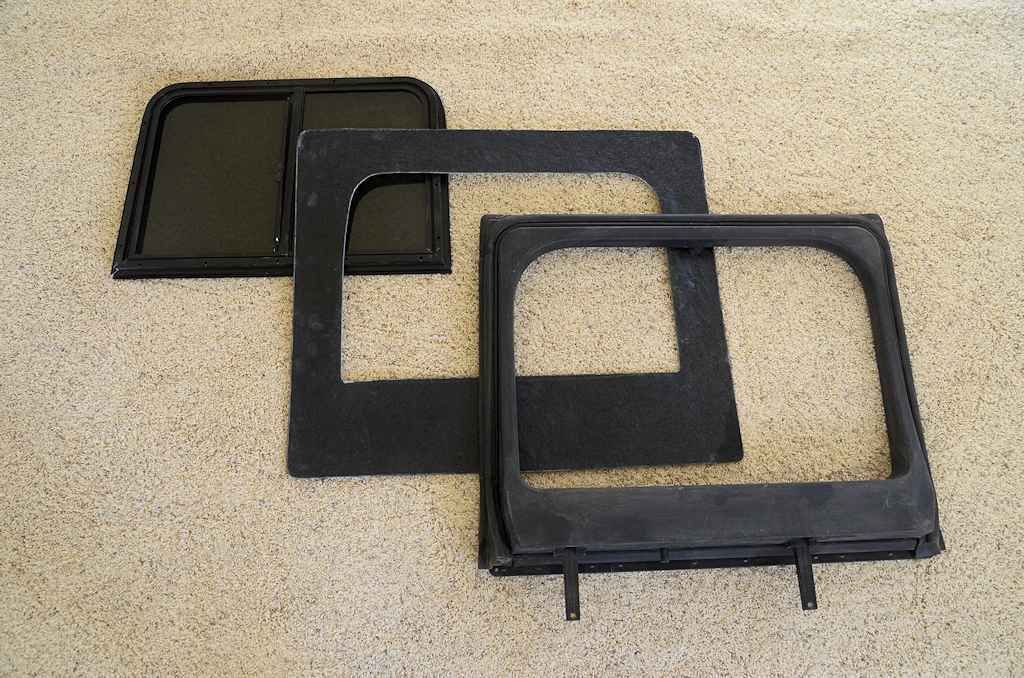
Another idea for half door uppers I'm experimenting with is a "hard shell retrofit kit", which is the same as the kit above except the factory canvas skin gets replaced with a fiberglass skin to form a hard shell upper.

Here are the parts - a slider window, a fiberglass skin, and a factory upper shell with the canvas skin removed. The factory weatherstrip is used, and doesn't even have to be removed from the factory shell shell to perform the conversion from soft shell/vinyl window to hard shell/slider window.

HardShellRetrofitKit1_zps4zb9x3mf.jpg


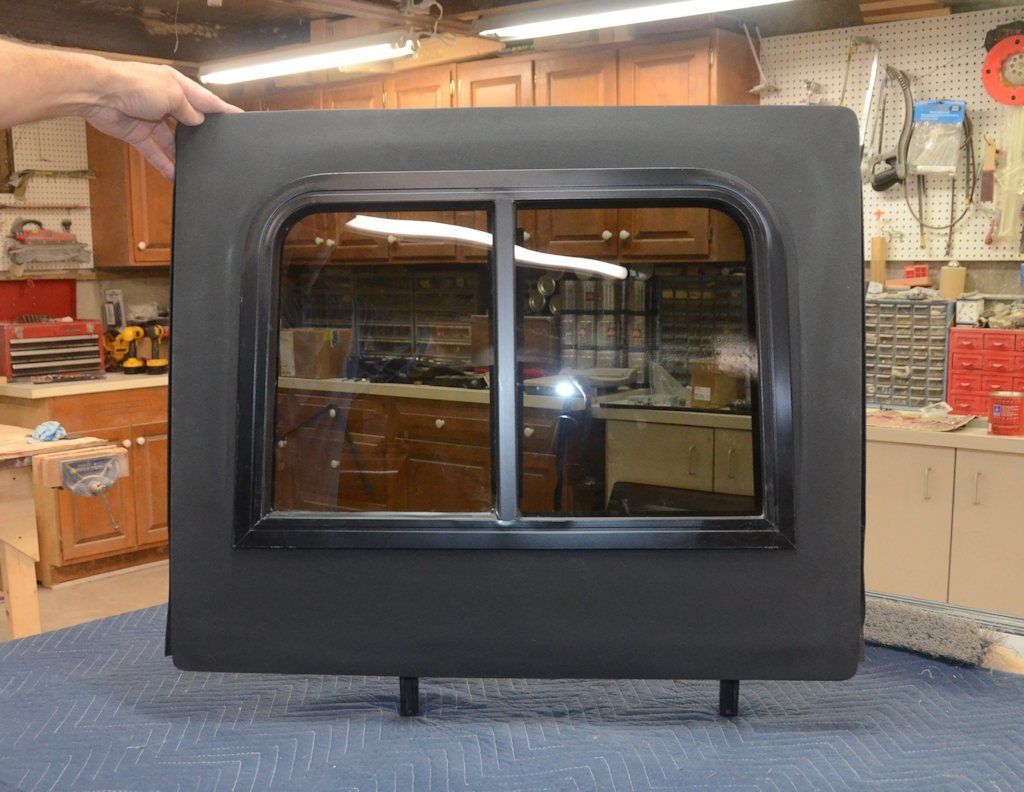
The fiberglass skin in the photo above was molded with black resin, so the inside doesn't have to be painted. The outside was molded with white gelcoat because that's what I had on hand, but could be molded in black, and even could be molded with a texture to match the hardtop. Fiberglass takes paint very well, so it could be painted to color-match the body color of the Jeep as well. In this next photo the parts are just sitting together, they haven't been assembled yet but you can see the white gelcoat finish of this prototype:

HardShellRetrofitKit2_zpspm1f1dlq.jpg


The fiberglass skin is attached to the shell with 3M VHB tape (http://solutions.3m.com/wps/portal/3M/en_US/Adhesives/Tapes/Brands/3M-VHB-Tape/). This tape is very commonly used in the RV and automotive industries (and other industries) for structural bonds between parts. The VHB tape should be a strong and very DIY-friendly way to attach the fiberglass skin to the plastic shell, although since this is the first prototype, the bond will have to be tested in actual use to see if it's strong enough.

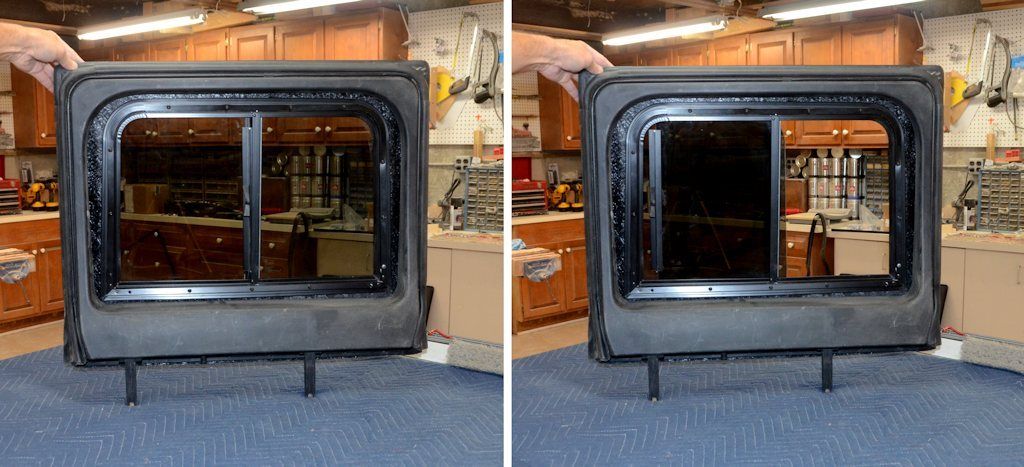
I've painted this prototype with in black with a slight texture. Here are a few photos of the assembled upper...

HardShellRetrofitKit4_zps0dz0absi.jpg


HardShellRetrofitKit5_zps3vc1h6oe.jpg
 

jscherb

Expedition Leader
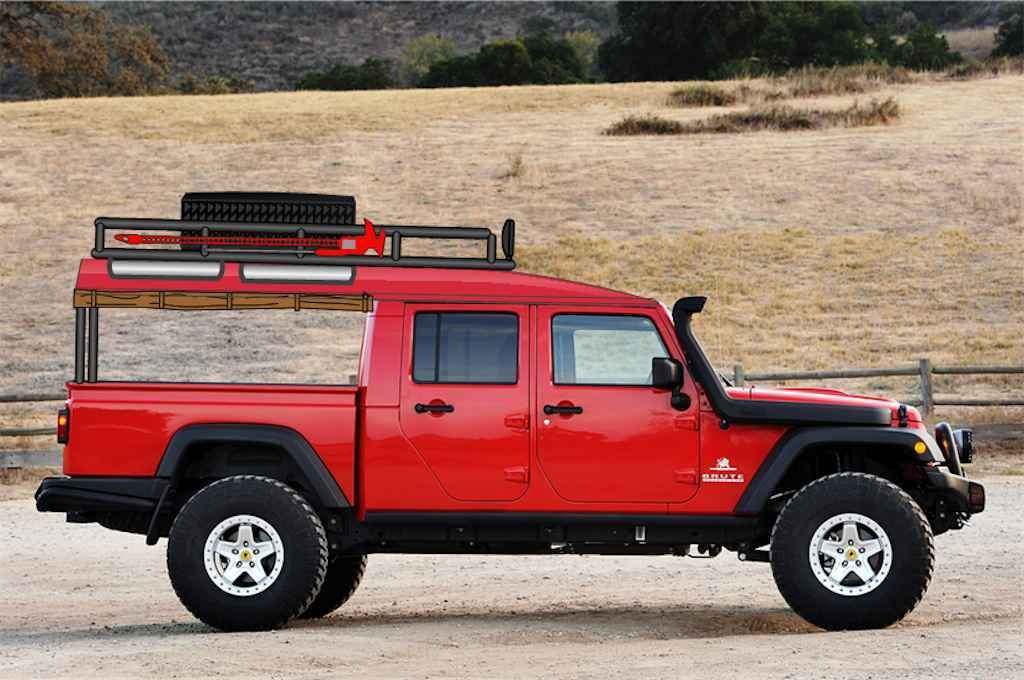
Someone asked me the other day if the roof panel from my JK Safari Cab design could be installed on a JK pickup like the Brute double cab. Although my roof panel would have to be lengthened, the answer is probably yes, so I did a quick concept drawing for him. Just thought I'd share it here too. The concept has roll-up soft side panels to enclose the bed when needed.

BDCSafari_zps4nekjrsu.jpg
 

jscherb

Expedition Leader
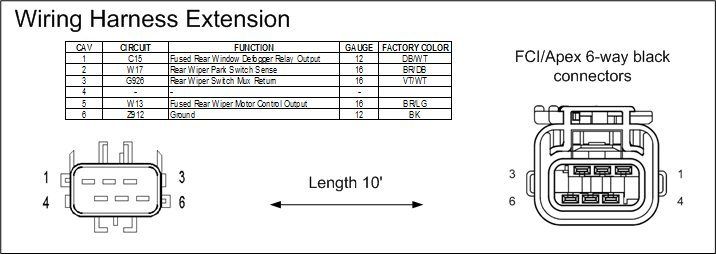
I'm in the process of finalizing the design of the wiring harnesses for the JK Safari Cab. The Safari Cab wiper and defogger are compatible with the factory JK hardtop wiring, so they'll plug directly into the factory hardtop connector for wiper/defogger control, although since the wiper and defogger are part of the barn door, the wiring will have to enter the barn door on the tailgate hinge side. An "extension cord" is required because the factory hardtop connector is on the driver's side of the tub.

The extension will have factory 6-pin hardtop connectors on each end (male on one end, female on the other); one end will plug into the factory hardtop connector in the Jeep, and the extension will run under the carpet/plastic cubbyhole to the other side of the Jeep, and then it will follow the existing third brake light wiring from the tub to the tailgate and plug into the barn door. The extension is pretty simple:

WiringExtension1_zpsvw2axtql.jpg


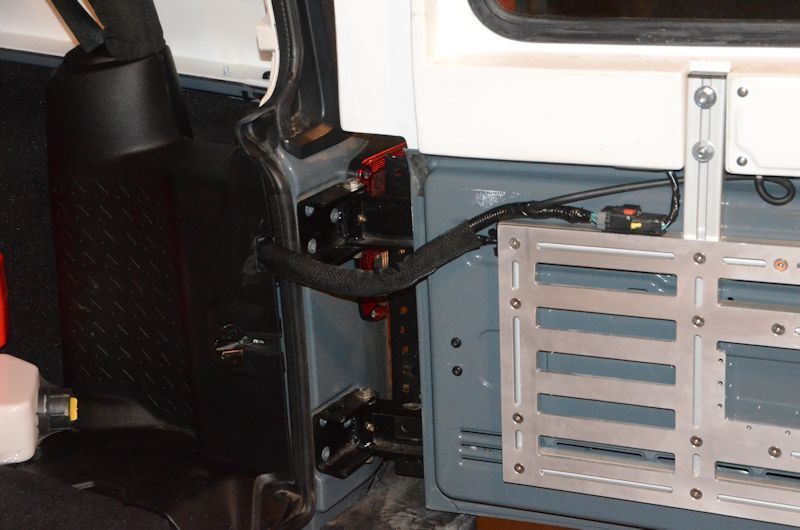
The sleeve the factory wiring runs through from the tub to the tailgate isn't large enough for the extension to run through as well, so I'll make up a zippered cover; it'll zip over the new extension plus the existing factory wiring. I made up one of these when I installed a test barn door on a friend's JKU last year and it worked great:

WiringSleeve2a_zps0c5ae5b5.jpg


Installed on my friend's JKU, it looked like this. He was also designing a tailgate cargo system, which is seen in this photo, but the important part for this post is how the wiring extension goes inside the zipper sleeve.

BarnDoorWiring_zpsigvyizk3.jpg


A hose for the washer fluid also follows the extension under the carpet and through the sleeve to the barn door because the washer nozzle for the Safari Cab is installed in the barn door.

That's half of the necessary wiring for the hardtop, and it's pretty easy - a plug-and-play extension that runs under the carpet. The other half of the wiring equation is getting switched and battery power to the hardtop to run the vent windows and other accessories that might be mounted in the top. That's for the next post, stay tuned.
 

jscherb

Expedition Leader
The second part of the JK Safari Cab wiring is bringing switched and unswitched power to the hardtop for the power vent windows and electrical accessories that might be installed in an overhead console.

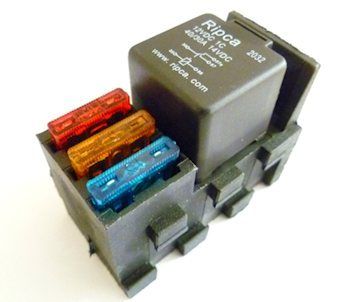
The basic plan is to pull power directly from the battery for both the switched and unswitched power. The JK battery connectors have stud terminals on them, which makes it easy to attach extra wires for power and ground. Both will need to be fused, so some provision will have to be made for mounting fuses. The switched power needs to be on when the ignition is on and off when the ignition is off, so that'll be done with a relay that's operated from some other existing switched circuit. Since there are switched circuits accessible in the TIPM (Totally Integrated Power Module) right next to the battery, that's where the switched control will be taken from. So what's required is 3 fuses (battery power, switched power and the relay control line), plus one relay.

I've found a perfect relay/fuse holder - it supports one relay and three fuses, and is small enough to mount right next to the battery in the cramped JK engine compartment:

FusePanel1_zpslbanha5k.jpg


I haven't decided on the exact routing to get this harness from the engine compartment back the the rear of the tub, but I'm thinking of running it down the passenger side because that's where the wiper/defogger extension will plug into the hardtop; might as well have both electrical connectors on the same side. Depends on where I can find an existing hole in the firewall to pass the wires from the engine compartment to the interior.

This harness will be an easy plug-and-play installation - mount the fuse/relay panel to an existing bolt in the engine compartment, attach the power and ground wires to the existing studs on the battery connectors, plug the switched power control into the appropriate place in the TIPM, and route the harness to the back of the Jeep. Oh, maybe drilling a hole in the firewall to get the wiring through if a usable one doesn't exist already, I still have to study that.
 

jscherb

Expedition Leader
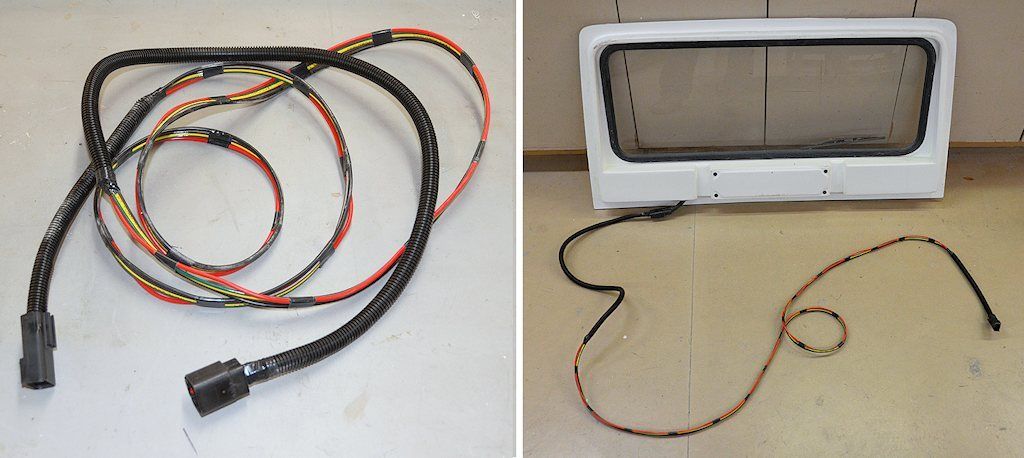
The first part of the Safari Cab wiring is ready to install - the extension that plugs the barn door wiper and defogger into the factory harness. This extension will plug into the factory hardtop plug in the tub, run under the carpet to the passenger side, and out to the barn door following the factory third brake light wires.

WiringExtension2_zpsranmfny5.jpg


Before I run it under the carpet and the plastic panels, a quick test... the wiper works just like the factory one, with the proper delay:


As soon as my fuse block/relay socket arrives I'll make up the accessory power harness.
 

jscherb

Expedition Leader
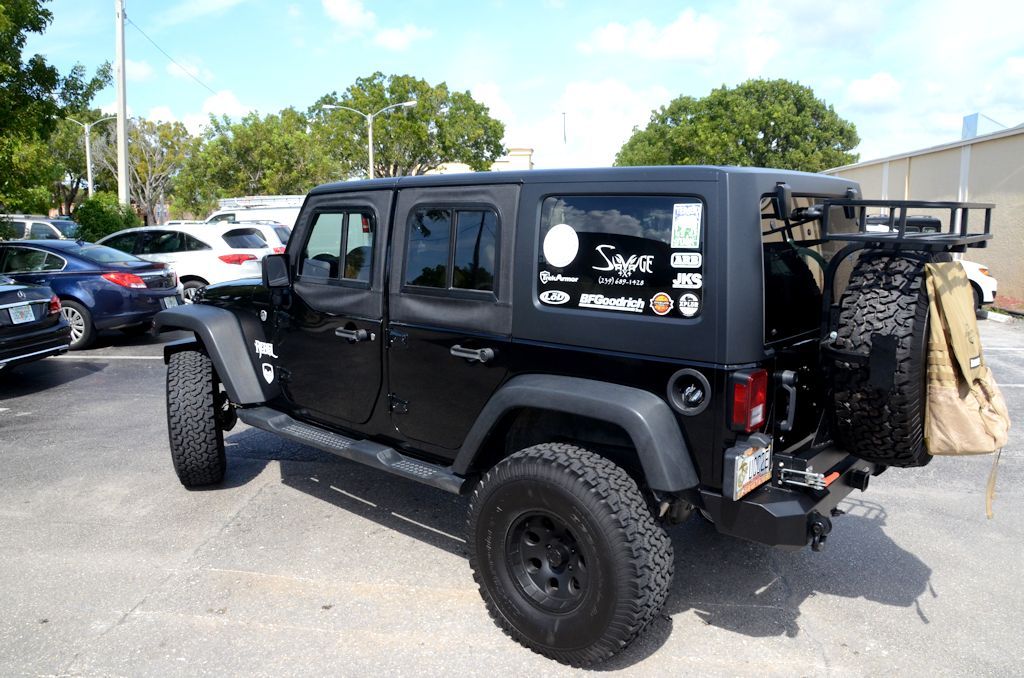
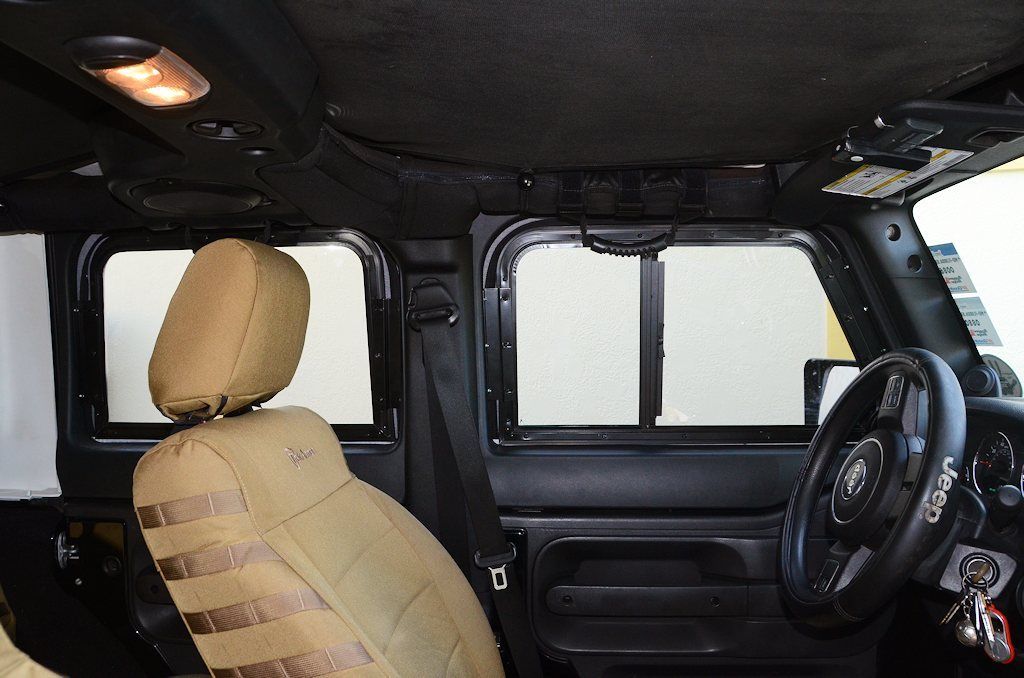
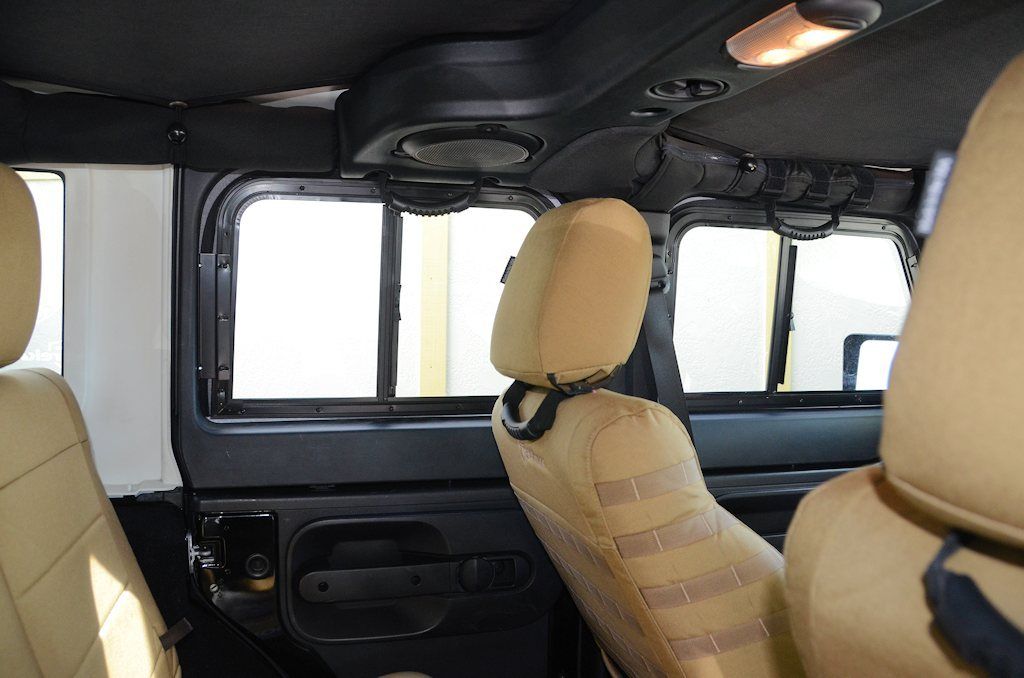
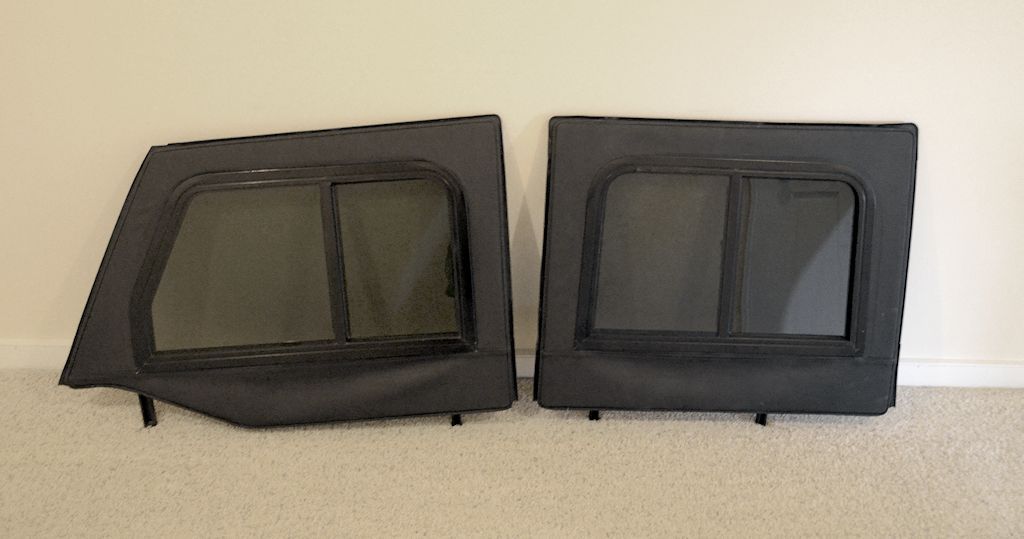
From time to time in this thread I've posted photos of the JK half door slider window project I've been working on. Today I took a prototype set of sliders for a high-speed test ride today in my friend Donny's Jeep. This was actually the first time I've ever ridden in a half door JK with factory uppers, and I was surprised how much flapping the factory canvas/vinyl uppers do at speed - seems worse than my TJ soft uppers. But with the sliders installed, the uppers are very quiet - no flapping or noise. If you were blindfolded, I'll bet you couldn't tell whether the Jeep had full doors or half doors sliders based on the noise level. I couldn't be happier with how the project worked out.

SlidersInstalled1_zpsrdifbrcf.jpg


A couple of inside views.

InsideView1_zps8exolo4y.jpg


InsideView2_zpsysd7mr6y.jpg


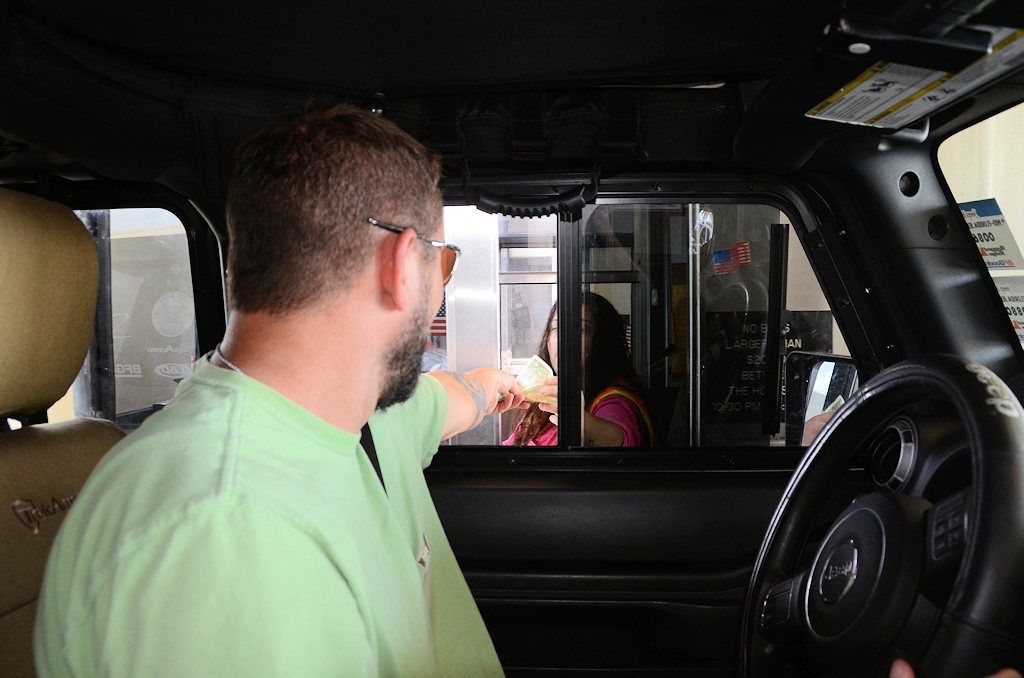
We didn't do the supersize drink test at McD's, but we did do the tollbooth test... test passed!

TollBooth_zpslbzv4xa9.jpg
 

Topo.Ranger

Adventurer
Yes I do have concept drawings, but I'll save them for when/if I start a thread on the project.

I'll show this though - at the top is an unmodified FSJ "Rhino" grille. At the bottom is one that's been "selectively scaled" to reduce it to an appropriate size for the JK. Some elements are the same size, but the center grille has been made smaller and the entire panel is smaller, so things are closer together.
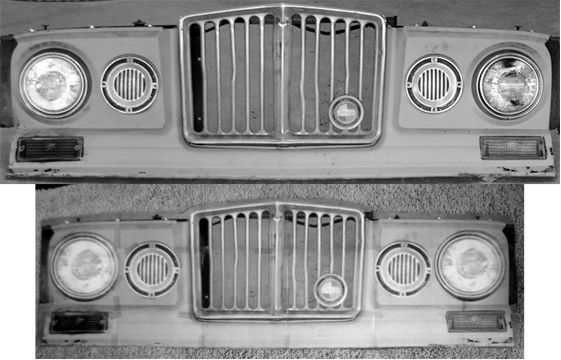
SelectiveScaling2_zps492ec260.jpg


Here's a printout of the scaled grille held up to a JK:
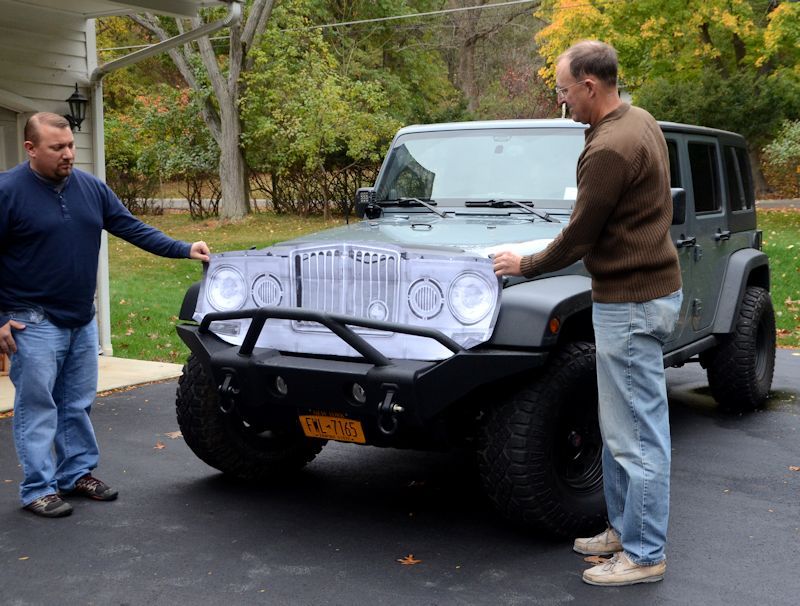
JK-Gladiator_zps2d02529a.jpg


I'm going for a more retro look than the Nuikizer/J12 concepts - the Jeep designers did a great job updating the Rhino look to be more modern, but my goal is to stay a little more faithful to the original.

For now this is a design exercise, I definitely won't start construction until after the Safari Cab is on the Jeep and in daily use. For now I'm just working ahead on the design and collecting parts I'll need to make it a reality.

Any updates on the grill?
 

Forum statistics

Threads
188,334
Messages
2,905,568
Members
229,959
Latest member
bdpkauai

Members online

Top