Battleship Jones: 2015 Tacoma DCLB Build Thread

Adventurous

Explorer
So nothing revolutionary here, but I finally got the opportunity to do the differential breather extension. There are plenty of ways to do this, so this is just one.

Tools used:
14mm wrench
10mm wrench
10mm ratchet and socket
T30 torx wrench
1/8" and 3/8" drill bits
2 smallish hose clamps
Shears
Your choice of hose
Primer & Paint
Zip ties
Plumbers tape

20150108-P1010247 by Tim Souza, on Flickr

Luckily this is a fairly straightforward install. The first step is to remove the tail light, in my case it was on the driver's side. Remove the three bolts on the side and give it a healthy yank to pop the tail light out. You'll end up with something that looks a little bit like this.

20150108-P1010248 by Tim Souza, on Flickr

There's a whole lot of real estate back there to relocate the breather to. In the most scientific way possible, I grabbed my drill, gave it the ole eyeball, and put a hole in my truck. I enlarged the hole size to 3/8", chamfered the hole, the gave it a quick shot of primer and paint.

20150108-P1010249 by Tim Souza, on Flickr

While the paint was drying I removed the stock breather with a 14mm wrench, put a wrap of plumbers tape around the new breather port, and put that back in using a 10mm wrench. I secured the hose to the breather port using a small hose clamp for the time being but I may end up throwing a small piece of marine heat shrink down there to really seal things up. I routed the hose up and over the frame, zip tied it to the electrical harness, and snaked it up to the new breather.

20150108-P1010251 by Tim Souza, on Flickr

Now, pro tip. Don't be a dumb@ss like me and reach your arm up there and try to put the hose on. While it could work, it was rather awkward and painful. So, just remove the cubby and you'll have plenty of space to work with. Once I did that the struggle was no more. Another hose clamp and tada, breather in.

20150108-P1010250 by Tim Souza, on Flickr

Barring a water crossing that's midway up the doors, this should keep the rear diff water free and happy!
 
Last edited:

Adventurous

Explorer
And in other news, the flood of electrical related supplies have started to arrive. Got some 2 gage wire for the aux. fuse block, terminals, a lug crimper, a wire terminal crimper, heat shrink, marine butt connectors and ring terminals, cable cutters, etc. Time to wire up the Hella lights and get the ARB compressor in there!
 

Adventurous

Explorer
Life finally slowed down enough to take a couple pics. I didn't do the install, the prior owner did. The location works pretty well in that it's easy to get your fist around the hose to plug it in, without banging your hand on other things. Plugging the hose in takes a little force, so most people will need a good grip on it.

Thanks for the pictures! Unfortunately I don't think that location will work for me due to the auxiliary fuse block, though that's a damn good way to do it. Have you been pleased with the compressor so far?
 

SDDiver5

Expedition Leader
Did you order a specific electrical set that came with everything or did you piece it all together? I'm in need of a complete electrical kit that provides me with everything.
 

Adventurous

Explorer
Did you order a specific electrical set that came with everything or did you piece it all together? I'm in need of a complete electrical kit that provides me with everything.

So far it has all come in pieces except for the butt connectors and ring terminals that I just bought an assortment of. The majority of the stuff has been sourced through West Marine and Amazon.

If you want more specifics feel free to PM me. I'd be happy to share.
 

DaVikes

Adventurer
The compressor works great, and is really nice to have in the truck. It takes about 4 minutes per tire to go from 15psi to 30psi. (285/70/17) Eventually I'd like to run an air line out to the bumper, but it's not a high priority. Wal-mart, believe it or not, sells a nice pistol-style air chuck with a gauge for about $15.
 

Adventurous

Explorer
To the top!

I began mounting my CB radio and antenna yesterday. On my last truck I had the BAMF tailgate antenna mount. For multiple reasons I decided to go in a different direction this time around and ordered up the Relentless Fab hood hinge mount. I have to hand it to the fellas at Relentless, he was prompt getting back to me through email (less than 30 minutes) and shipped out my bracket the day I placed an order. Big thumbs up to them!

Anyway, the installation of this sucker

20150110-P1010253 by Tim Souza, on Flickr

is fairly straight forward. In order not to let the hood shift at all when removing the bolts, I took the top one out first and mounted the bracket, snugged up the bolt, then removed the lower bolt. I then rotated the bracket into place and put the lower bolt back in. It took all of 5 minutes and the mount is everything I could have asked for. For mock up purposes I mounted the stud and antenna and have had those on for a couple of days now. I cannot discern any movement from the mount and am pleasantly surprised to report that it has not greatly impacted visibility like I was anticipating. Overall a pretty solid mod and I'm looking forward to getting the radio mounted up.

20150116-P1010256 by Tim Souza, on Flickr

I'll add a few more pictures tomorrow of the final position of the antenna when the hood is down. It clears everything just fine.
 
Last edited:

Adventurous

Explorer
Last edited:

Adventurous

Explorer
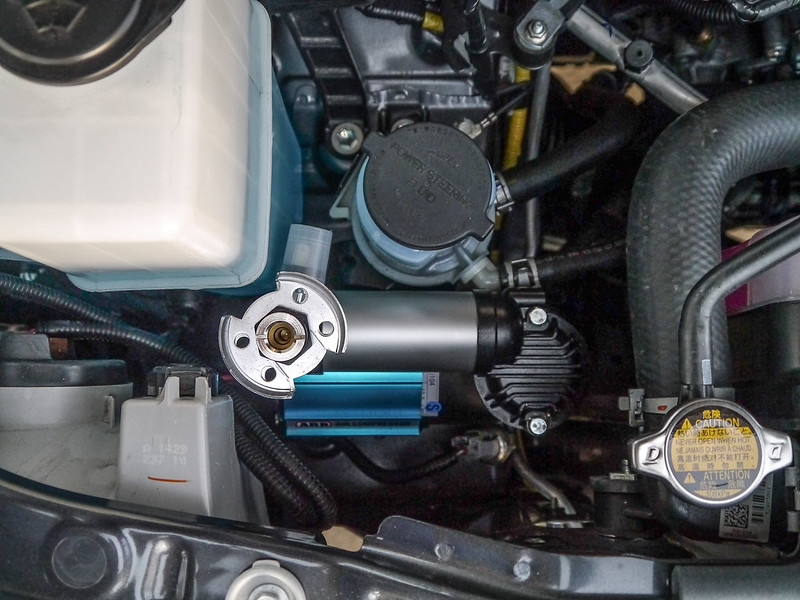
So I managed to get a few minutes of alone time towards the end of the week and today to finish up mounting the air compressor. I ended up going with the proposed location behind the passenger side headlight. I really wanted it under the hood for a combination of reasons and with the exception of the real estate near the fuse box, which will be taken up by the auxiliary fuse block and breaker, this was the only real space under the hood that could accept it.The compressor drops snugly into the space available and with the proper space and clocking does not touch any other components.

I will admit that this location is not the easiest to secure the compressor into. I had to test fit several times, go to work with the drill and files, and make multiple trips to the hardware store to get the correct configuration. That being said, there were definitely some lessons learned along the way that I will get into at the end of the post for those considering mounting one of the ARB compressors in the same location.

Tools & materials used:
- 4mm extended hex bit
- 4mm short hex bit
- 4mm allen key
- 1/8", 1/4", and 5/16" drill bits
- flexible drill coupling
- right angle drill adapter
- 10mm socket and wrench
- 40mm M6 flange head bolt
- 1/4" ID x 1" L spacers
- M6 fender washers and nuts

One of the biggest challenges to mounting in this location is access to the fasteners. ARB supplies the compressor with carriage bolts which anti-rotate within the slots on the mounting bracket. This happens to work out great if you have a flat area to work on with sufficient access at the front and back. The location I chose had an angled reinforcement piece that prevented me from simply bolting things up. This combined with the fact that I had to space the compressor upward to clear a radiator line meant that I had to ditch their mounting hardware and source my own.

Their instructions say to use the backer plate as a template for drilling the mounting holes. Again, if it was a flat mounting area, sure, that would have worked out handily. Unfortunately due to the geometry of the area I also had to take some liberties with the locations of my holes. I also had to drill them slightly oversize (ARB recommends 1/4" holes, 5/16" max for misalignment) to give myself enough room to clock things properly.

A look at the underside of the fender where things mount. Currently I'm just using fender washers behind the sheet metal, at some point in the future I'll make a backer plate that correctly matches my modified bolt pattern.

20150118-P1010264 by Tim Souza, on Flickr

I ended up bolting up the mounting bracket first on accounts of the anti-rotation feature of the carriage bolts not being there. Everything went in just fine and I got lucky that the position I snugged things up in the first time around put the compressor in the right orientation. After dropping the compressor in the real challenge came, bolting it to the mounting bracket. During my initial test fits I busted my hands up trying to snug the bolts down, there was just no good way to get an allen wrench or hex socket in there to tighten things up. A quick trip to Home Depot left me with this combination of devices..

20150116-P1010259 by Tim Souza, on Flickr

It worked like a charm. I zipped in the back bolts in all of 2 seconds but had to change technique for the front two. One went in using a ratchet and extended length hex bit, the other using a ball end allen key. Here's to hoping I never have to take this thing out!

20150116-P1010255 by Tim Souza, on Flickr

I also hooked up the wiring harness to see what kind of modifications I was looking at making. Luckily the routing to the other side of the truck is pretty clean, of course, being that it is just about the longest possible trip across the perimeter of the engine bay, the cables to hook up to power are too short. Looks like I'll be ordering up some more cable to splice onto the end of those.

I routed the cables underneath the cowl alongside the current wiring harness. A couple of zip ties to hold things in and it looks like it belongs.
20150118-P1010265 by Tim Souza, on Flickr

20150118-P1010266 by Tim Souza, on Flickr

I had originally planned to put a mounting bracket for all of the relays where the auxiliary fuse block is going, however, this would mean extending the wires leading to the current connection and traversing over to the other side of the vehicle. I may just say screw it and put the relay by the air intake and the windshield washer fluid bottle in the following location...

20150118-P1010267 by Tim Souza, on Flickr

Now, the lessons learned portion of the post:
- Get the right angle adapter and flexible coupling. It'll make your life loads easier.
- Unless you have ample room and a flat place to mount, skip using the backer plate as your drilling template. It made things far more work than they should have been. In hind sight I would have drilled the holes where I wanted to and fabricated a backer plate after the fact to match those hole sizes and locations. Trying to use the backer plate as my drilling template just led to excess frustration and an extraneous hole.
- Even if you have a fairly straight forward place to mount things, unbolt the mounting bracket from the compressor and bolt that in separately. I tried for a while to mount with the bracket attached to the compressor and getting the bolts to line up properly with their respective spacers and holes quickly became a nightmare.

Hopefully next time I get a chance to work on the truck I'll be able to get the auxiliary block in there and get power to this. Chances are I'll wait a little bit until I figure out how I want to mount my electronics in the cab before I go tearing the dash apart.
 
Last edited:

Adventurous

Explorer
Also, as I have an SR5 without ATRAC, the yellow wire mod (tucking this link here for later in case I forget http://www.tacomaworld.com/forum/technical-chat/51946-4low-trac-32.html) will go on the to do list until I can afford a locker.

Secondly, I have to ask the opinion of those out there who have LED light bars on their trucks. Do you feel it was worth it to pony up the extra cash for a name brand light bar? I'm looking at adding a 50" across the top of the hood and there is quite a bit of price disparity on the market. Looks like you can get a well rated one for $200 off of Amazon (http://www.amazon.com/dp/B00OTBCIRE...olid=G8CGBUZ1FPAP&coliid=I1J5FI18K4BP2V&psc=1) versus $1K+ from some other companies. Thoughts?
 

SigSense

Adventurer
Do you feel it was worth it to pony up the extra cash for a name brand light bar?

I've purchased and installed various sizes of LED light bars and fog lights, with a concern for price verses performance. I'm sure that the Rigid line is great and the quality control superb, but their prices are too high for my wallet. Have had good luck with the Chinese LEDs that were installed in my 4Runner and old Taco. Some would say that the lifetime warranty on the Rigids is worth the price....
 

cdrewferd

Observer
Awesome build. I am just off 104th and Wads. Hit me up if you need any help wrenching or have room for an extra vehicle on local trips.
 

Adventurous

Explorer
Awesome build. I am just off 104th and Wads. Hit me up if you need any help wrenching or have room for an extra vehicle on local trips.

Cool man! We must nearly be neighbors. I'll be sure to hit you up sometime, as a fairly recent transplant to the area I don't have a huge network of friends, especially those who like to explore.
 

Rotorgeek

Adventurer
Nice build, you really are making good progress. I'm on Wads near I 70, seems like several of us in this general vicinity, we should have a mini meet-up.
 

tunernewb92

New member
Did you ever get your tires sipped? Still suck in the snow? And I missed it but you have the 255/85/16s? The "skinny 33's"?
 

Forum statistics

Threads
188,343
Messages
2,905,864
Members
229,959
Latest member
bdpkauai
Top