Buying & Building a Medium Ambulance into an RV – The FAM-BULANCE

patoz

Expedition Leader
Bob,

I remember you asking about how big the gray water tank should be. I was reading the specs on a bunch of RVs last week, and noticed on every one the gray water tank was about 70% larger than the freshwater tank, which I thought was odd. I guess their theory is fluids other than from the freshwater tank may be dumped down the sink, and fresh water is easier to get than finding a legal place to dump gray water. Therefore, you can top off the fresh water tank almost twice before you have to dump the gray water tank.

I'll build a shelf that sits just above the water tanks to support two Trojan golf cart batteries, a fire extinguisher or two, and maybe some more miscellaneous stuff.
All I can say is, you better build a very stout shelf because just the two Trojan T-105 batteries will weigh 124 lbs. by themselves.
 

rlrenz

Explorer
They may be assuming that you're connected to a water line and a shower is dumping into the gray tank as well. For what I'm planning, with just a sink, probably equal sizes would make the most sense. I'm only talking about a 15 gallon tank for each, and without a shower, that should be plenty.

A 124 Lb load isn't a problem since I haven't built a shelf yet. It will probably be about 22x24" so it just matches the size of the compartment, and I'll probably make it from 1/4" aluminum with a 2" lip and the corners welded. I'll put some standard compartment tiles in it as well just to keep things off the bottom of the shelf. The shelf will also probably hold the water pump on a small raised platform (maybe about 6x12x2" high). I'll set up the water tanks with manual drains, plus a powered drain for the gray water. The gray water tank will probably have a high water alarm/indicator.
 

rlrenz

Explorer
I decided that the air conditioning was kinda weak, and it probably needed a few ounces of R134a added to it. When I coupled up the gauges, the at-rest pressure was only 40 PSI, so I knew I didn't have to pump a vacuum and purge the system. The air conditioner was unimpressive when I picked the buggy up in May 2014, so I figure that the mechanic verified that it worked - it was May, and it was probably a little difficult to really test an air conditioner. I wasn't worried about the apparent leakage - I had no idea when the system was last serviced, plus the many feet of hose and fittings resulted in a large system with many more fittings than a conventional Freightliner cab air conditioner.

At any rate, the Freightliner service manual told me the pressures that I should be seeing when the system was charged. It was cool today, probably about 70-75 or so, (when else would you fix an air conditioner?), so the specs called for a low pressure of about 20-22 PSI and a high pressure of about 144-150 PSI. I had learned from the Medic Master manual that the system should need about 4#-6 oz if totally empty, so I had a number to work from.

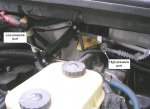
Finding the AC pressure taps took a little searching - the system in my ambulance uses a single compressor for both the cab and the module (Medic Masters were also made with a dual compressor system), but after a little searching, the taps were found.

TIP: avoid those simple automotive recharging can taps with a gauge - you pay an absolute premium for the package ($32 on Amazon) - and a 12 oz refill can that contains leak sealer and dye can cost $18. If you want to use a can tap with a gauge & hose, buy the can tapper/hose separately, then just buy 8 oz cans of R134a. You shouldn't need leak sealer or dye additives, which drops the cost of a can to about $6 or so. The cans are only 12 ounce, which works out to $8 per pound. By working from a 30# bottle of 134 at a total cost of $90, my cost per pound is $3. Its a nice saving if you don't mind having some on the shelf for future use.

I had to keep turning down the module temperature setting so the compressor would stay engaged - I finally had it set at 55 degrees. When I finished, the cab was definitely cool, and the module was on its way to 55 degrees. I added a total of 2.5 Lbs of R134 to the system.

Here's a photo of the pressure tap locations for a Medic Master/Freightliner (on the driver's side, just in front of the firewall):

FL AC port locations.jpg

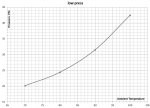
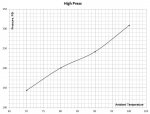
I also saved the pressure/temperature curves as JPEGs. Note that temperature is the horizontal axis, and pressure is the vertical axis

low pressure.jpg high pressure.jpg
 
Last edited:

rlrenz

Explorer
Talking to my ambulance electrician friend, I learned a new trick today. As I've been replacing my module warning lights with amber, I sometimes find screw holes that are stripped out. I've been installing Riv-Nuts in those holes, but today I learned that there is another solution - use a #12 stainless steel sheet metal screw instead of a 10-32 screw. A #10 hole that has stripped out works nicely for a #12 screw, and the fix is about as easy as it can be.

Whelen regularly calls out a #10 sheet metal screw to install their lights, so this is probably a logical progression.
 

rossvtaylor

Adventurer
Bob, thanks much for taking the time to post that AC information. It will certainly help us, when we get to that phase.
 

rlrenz

Explorer
I got kind of a warm fuzzy today -- I'd mentioned to my ambulance electrician friend that I was impressed by the AC installation on the ambulance, and he told me to remember that Medic Master was built by American LaFrance, and that ALF was owned by Freightliner at that time. He commented that ALF was always fussy about their builds.

So it looks like I probably made a good choice going with the Medic Master -- no second thoughts!
 

rlrenz

Explorer
Late every summer, The Chicagoland Emergency Vehicle Show takes place. This year, it's held in Oswego, Illinois, on August 5-7. Lots of collectors showing their restored police cars, fire trucks, and other emergency vehicles. They even have a flea market!

There is also an emergency vehicle parade that covers a 15 mile route, and takes about an hour. Check it out at: https://www.emergencyvehicleshow.com/2016/index.php

EV show.JPG
 

rlrenz

Explorer
Time to finish some odds and ends-

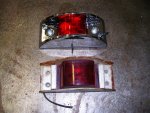
The ambulance came to me with one very oddball marker light - it looked like it was just painted, and on closer look, the lens was riveted in place. Even though my plans are to install all LED markers, I decided to replace this one with a new Peterson 122 marker - the way I work, it might be there for years before it gets replaced.

DSCN5346.jpg

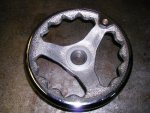
I also enjoyed the hot humid weather by hiding in my basement shop for a while. I am in the process of building a spare tire holder for compartment 3 (driver's side, rear), and I decided that I wanted to "do it right", so I scrounged a chrome plated cast iron machine handwheel, bored it out, and tapped it for 7/8-9 (which should be able to hold a vertical tire tightly to an upright). Overkill? Yes, but what else is this hobby other than overkill?

DSCN5345.jpg

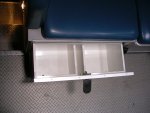
And the last thing I accomplished has been hanging over my head for more than a year. My wife and I had been trying to figure out what to do about the squad seat - do we remove it, modify it, or leave it alone? We're still not sure, but it now looks like we'll make minimal changes to the squad seat. My wife found that with a few extra pillows, she can lounge on it very nicely, and after I add some reading lights and a TV, she thinks it will work just fine. I also have a nice folding cot and several air mattresses in my collection, so we should be OK.

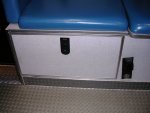
I removed a small drawer from the squad seat because it needed new slides, which I ordered, then lost. I finally found them again, and since we will probably save the squad seat, I installed them today. As I expected, they were a giant PITA - the drawer is nearly on the floor, so I got to lie on Lonseal flooring (the stuff with little raised lugs embossed in the surface), while I tried to reach into a small space. I got smart (finally) and used some pieces of aluminum as spacers so the slides were installed the same height above the bottom of the space, and parallel with the bottom. I them measured the offset for the drawer, measured the vertical space I had to work with, and wound up adding 0.060" to my side spacers for the drawer. It came out perfectly, but the combination of a drawer that's nearly flush to the floor, plus 8" long slides makes for loads of fun....

DSCN5347.jpg DSCN5349.jpg

I have no idea what was originally stored in that shallow drawer, but we''ll think of something.

By the way, if anyone needs some Southco latches like the ones used on the drawer, let me know - I wound up with about 50 of them when American LaFrance went down.
 
Last edited:

rlrenz

Explorer
I decided to double check the AC today. First, I wanted to verify that the pressures hadn't dropped (=leak), and second, I wanted to see how well the pressures matched the Freightliner AC section in the shop manual since today was significantly warmer than when I had topped off the charge. Everything matched perfectly.

One warning - it's very normal for an ambulance to have fluorescent leak detector added to the charge, so plan on having a rag in your hand to wipe up any that drips while you are assembling or taking your manifold apart.

I also revised the pressure-temperature graphs to include minor gridlines:

low pressure.jpg high pressure.jpg
 

Ozrockrat

Expedition Leader
Hi Bob

Do you have the raw data for the pressures. Its easier to stick a list of numbers inside my door frame than a copy of the graphs. (I put all the torque settings, tire pressure etc on the trailing edge of the drivers door so I don't have to chase them down later and because I am a forgetful bugger)

Oh and did I mention FDL (Fat Dumb and Lazy) that's me. I had a duh moment when I wrote this originally. Its not too hard to read the graph and do my own data list.

OK back to the original program.
 

Ozrockrat

Expedition Leader
And since the graph doesn't go past 100 I just worked out I need to do it early in the morning before the temp reaches 100. Good excuse for telling the missus I cannot fix the AC until it cools down.
 

rlrenz

Explorer
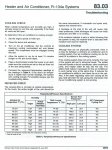
I'll scan in that page from the Freightliner manual as a JPEG so you can print a copy. It would be nice if we could post PDFs on the Expedition site, wouldn't it?

The actual Freightliner data has different numbers for normal summer humidity (55%) and for low humidity - which probably would apply to Phoenix. Count your blessings that at least you have dry heat instead of 95 degrees with 90+% humidity (right, Pat?).

I'll post them later this morning
 

patoz

Expedition Leader
It would be nice if we could post PDFs on the Expedition site, wouldn't it?

Count your blessings that at least you have dry heat instead of 95 degrees with 90+% humidity (right, Pat?).

Actually, you can 'attach' PDFs directly to a post, but the file size is limited to 195.3 KB, which is ridiculously small. You could convert it to a Word document and attach it, but that is limited to 390.6 KB also.

It was 98% when I got up this morning, but it's starting to look like it might even clear up for a day or two.
 

rlrenz

Explorer
I have a happy air conditioner. Today's temperature is 90F, with 65% humidity - definitely a day to make you appreciate shade.

I drove to the gas station for some diesel this morning, with the AC in the module and the cab both running. The cab got comfy quickly, and within 15 minutes, the module was down to 70F and still dropping.

I can definitely say the the Freightliner pressures and temperatures work just fine!

I think I'll concentrate on some indoors projects until the heat wave breaks this weekend....
 

Forum statistics

Threads
186,626
Messages
2,888,236
Members
226,766
Latest member
Josh00333
Top