Buying & Building a Medium Ambulance into an RV – The FAM-BULANCE

rlrenz

Explorer
That wall mounted sofa / sleeper looks very interesting. Time to get out the tape measure. Thanks for the info.
 

rlrenz

Explorer
Well, I stand corrected. I learned from Freightliner that the front brake lines (the ones with an integral segment of rubber hose) have NOT been discontinued - they are just out of stock. My local contact figures about a week delivery. In the meantime, she's sitting in a nice, warm, comfy shop waiting for the shipment to arrive. I'm using the down time to get other projects completed - since I'm in MN, the land of the "Frozen Chosen" (a term originally applied by GIs to Korea when the GIs found out how cold it could get in a Korean-war winter), I need to tunnel into the garage to dig a hole the size of an ambulance, and the bay I need to use has been "vacant" long enough to get filled with odds and ends --- LOTS of odds and ends.
 

rlrenz

Explorer
Well, I stand corrected again. Freightliner told me today that the last supplier of that brake line has gone out of business, and that they are now searching for another supplier. The shop I go to had some suggestions, and MNtal offered some ideas as well. And just because I like to cover all my bases, I also asked a nearby ambulance dealer for their ideas. Tomorrow, I am confident that I'll find a replacement as a special.

When I said to look closely at your brake lines - this is what I had:

The failed line
DSCN4606.JPG

The corroded section of the line:
DSCN4608.JPG
 

Ozrockrat

Expedition Leader
JEGS for a braided line for the flexible and then get the other bits made to suit. NAPA probably would even stock 3 generic parts that would make that up.

Another alternative is a mobile hose doctor. Make all types of hydraulic hoses on the spot. Or measure it up. Get good details on the ends and get Speigler or someone like that to make a braided hose.

Looks like that inspection they did before you bought it missed a bit. Surely corroded brake lines would be part of a Ambo safety inspection.
 

rlrenz

Explorer
These are the type of guys I was thinking of. http://www.pirtekusa.com/service/main.asp

I already had their name - they have 3 shops here in the MSP area, and when I called them today, they told me to bring it in. Another local shop is Brake Equipment Warehouse in Minneapolis. A local ambulance dealer, North Central Emergency Vehicles, recommended them as well - they send anyone needing brake parts for a being-restored fire truck to them for new lines.

The vehicle came with a NY 2014 safety inspection sticker, so who ever did the NY inspection may have missed the lines. The good news is that the line blew in my driveway, which made it a PITA instead of a disaster or catastrophe. But please, gents, if you are working with an ex-emergency vehicle that was used in the snow belt and lived in a warm fire house, take a good hard look at your brake lines.
 

rlrenz

Explorer
In other news, I installed some LED light fixtures in my S250 military radio shelter - both because I needed light, and also to test out the LEDs for ambulance applications. I installed six of them, three on a side, spaced at 19" to match the framing spacing. The end result was excellent - I'll probably install them over the action station in place of the fluorescent, and probably over the reading nook (squad bench) as well. They wouldn't be too good in a conventional outside storage compartment since they'd just light the top shelf, but one will also wind up in the oxygen bottle (future propane cabinet) since there aren't any shelves in that cabinet.

The lights came from Super Bright LEDs: https://www.superbrightleds.com/mor...led-round-dome-light-led-fixture-3w/1544/3514

Here's what they look like:

DSCN4605.jpg

DSCN4603.jpg
 

rlrenz

Explorer
Well, she's back from the shop. I believe every brake line has now been replaced. Murphy's Law was included, probably with Murphy's personal attention as well -- When they installed the custom made brake line (the one with a hose section in the middle), they found a pinhole leak in the silver soldered joint that connected the hose fitting to the stainless tube.

BUT---

Knowing that Herr Murphy was around somewhere, I had bought TWO custom brake lines instead of just one. I handed the shop the spare line at 0630 the next day when they opened. This one did the job, and the project is now completed.

The shop did a great job - it's a fairly small family owned truck and trailer garage who normally has some fairly large customers who don't run their own shops, so they are normally open until 10 PM or later. After I got the ambulance back, I stopped off and picked up a big box of donuts for their afternoon coffee break. It doesn't cost a lot to say "Thank You!", and the donuts will be remembered the next time I need their help.

It felt fantastic to drive the beast again. Stutter horns, a Cummins diesel, air ride seats -- it doesn't get any better.

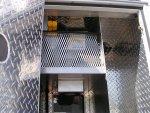
Now, I can continue to tunnel into the garage so she can hide in there for the winter. Measuring carefully, the module's side door will align perfectly with an existing aisle in the garage, so working inside will be fairly straightforward.

MNtal and I have been arm waving over the optimal size of a propane bottle. There are arguments for both a 60 Lb and a 100 Lb bottle. MNtal went with a 100 Lb bottle, which barely fits into his oxygen compartment. I had thought about a 3" narrower 60 Lb bottle, but I figured out how to handle a 100 Lb bottle, plus I have a wider door on my oxygen compartment anyway.

DSCN4280.jpg

My collection of stuff includes a war surplus (not sure which war - probably WWII) 250 Lb chain hoist, and a 250 Lb capacity I beam trolley - which should be able to handle a 170 Lb total weight propane cylinder. Since I removed my suction pump, I have extra headroom in the oxygen compartment, so I can rig a 3" aluminum I beam with an end support within the compartment, then support the outboard end with some telescoping aluminum tubing I have in the garage. The trolley will roll out, hook onto a bottle, lift it up, and roll into place. The assembly will then be dismantled and stored. I needed to have something that can be used by one (older...) person, and could be used anywhere, which is why I came up with what I decided on. Photos will be posted when there is something to photograph.

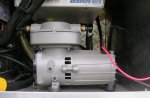
Original oxygen cabinet configuration -- Vanner plus suction pump
DSCN4409.jpg

Oxygen cabinet less suction pump = about 6" more headroom
DSCN4413.JPG
 

Attachments

  • DSCN4281.jpg
    DSCN4281.jpg
    528.3 KB · Views: 78
  • DSCN4410.JPG
    DSCN4410.JPG
    482 KB · Views: 76

rlrenz

Explorer
MNtal stopped by tonight so we could grab a couple burgers and try to figure out how to modify medium ambulances. We moved farther forward than we did backward - I'm still leaning to make the minimum changes to my interior, and MNtal still plans to build mostly custom cabinets. This will probably wind up as 6 of one, and half a dozen of the other...

I'm still going to add a 120 VAC air conditioner to the system. Hoseline makes a combination 12 /120 volt system, but that would require a quite a few changes (new evaporator, new condenser, 80 amp 12 volt supply, 3000 series controller, 120 volt relay panel). Another option would be to add a top mounted condenser, a 120 volt compressor (in the top of the old oxygen cabinet), and a new, separate evaporator/fan located in a separate location from the existing vehicle AC system. No connections would be made to the existing ductwork, and air return / supply would be from the same location via grills. Since the blower and condenser fan would be 12 volt, a 12 VDC supply would be needed. The 120 volt system would have its own thermostat instead of trying to use one thermostat to control both the original vehicle AC and the 120 VAC system. The end result would be kinda like sawing an RV rooftop unit into pieces and then installing the separate chunks.

We also closed the heater bypass valve for the cab heater - it hadn't been closed in a LONG time, so it fought us a bit.

Ht-3.jpg

We ran it for a while, but no warm air - then we started feeling heater hoses. The hose up to the cab heater control valve was nice and warm, but the hose on the other side of the cab control valve was cool, which said that the valve wasn't opening. The Bowden control cable moves well, the operating link into the valve moves well, but it looks like the valve itself doesn't move. MNtal figures that cab heat was never a concern for the users, and that the ambulance crew just left the door to the module open and didn't worry about cab heat. The module heating system has more than enough output to handle the cab as well, and if the cab heat selector was set to recirculated air, the defrosters would probably be OK, particularly coming out of a warm fire house.

So, it's time for a pilgrimage to Freightliner for a heater control valve. I just ordered a couple of hose pinch pliers from Amazon since I don't want to risk damaging my silicone heater hoses, and I don't want to drain the cooling system and try to figure out what I could drain it into (since I don't have any idea how much I would be draining...)

It looks like the weekend work will have to include some door screw repair. The doors have panels fastened with self-tapping 10-32 machine screws, and they are old enough that some of the threads are mostly gone. I'm probably going to use both press nuts and Riv-Nuts for new threads since the original threads are useless. Some of the existing screws were Loctited, and that sealed the threads enough that they haven't corroded, but the uncoated threads are the problems. Either Riv-Nuts or press nuts ill provide more thread length, so the problem shouldn't reoccur.
 
Last edited:

rlrenz

Explorer
Life is a whole lot better today - the new valve cost less than $50, and it looks like it was made by Kysor. The old valve turned very easily, and this valve is much stiffer, so the percentages favor it operating correctly. Peeking inside, it uses a rotating flat disc for the valve portion, and I'll bet that there is a graduated slot in the disc so it will range from a little water flow to maximum flow. We checked the antifreeze with a genuine Prestone anti-freeze checker ($2.99 at NAPA), and found that the coolant was good to -45F (it's getting cooler here in MN...)

The valve
DSCN4627.jpg

I can see why no one caught the corrosion on the brake lines - they are darn near completely hidden. If you have an ambulance, take a good look at your brake lines - use a mirror or a video borescope if you have one available.
DSCN4621.jpg

As much as I hate to loose the storage space, the cabinet near the side entry might become the home of an add-on 120 volt air conditioner. If I treat it as a totally separate unit from the vehicle's existing Hoseline AC, it might all get easier, and maybe even a little cheaper. The back of the existing storage cabinet has a removable panel for the ambulance's Whelen flasher, so that might have to be relocated as well.
DSCN4615.jpg

DSCN4617.jpg
 

rlrenz

Explorer
I found something interesting - SelectTech, AKA www.ambulanceparts.com, has an electric heater valve for less than $50. It is made by the Thermotion Company (http://www.thermotion.com/topic/19-automotive-heater-control-valve.aspx), and uses a heating element to turn a liquid into a vapor. The rise in pressure when the liquid is vaporized causes a rolling diaphragm to move, which opens the heater valve (within a half minute). The valves are available in 12 & 24 volt models, and are normally closed.

This would let someone add a heater, such as a school bus under seat heater, and have an electric control valve so the heater would be completely shut off (nice in the summer). It would be mighty easy to glue a 12 volt thermostat into the system as well.

electric valve.jpg
 

Attachments

  • electric valve.jpg
    electric valve.jpg
    62.5 KB · Views: 55

rlrenz

Explorer
Not too much ambulance happening lately - I've been building a new deck and patio (checkbook, not my hammer...) and waiting for my checkbook to recover, so planning has been the action item right now. I've also been tunneling into my garage to dig a hole for the ambulance this winter as well.

I decided that my initial plan for the 120 vac panel would be confusing to most people, so it has evolved. First, I'm going to use a pair of 30 amp circuit breakers mounted close to each other (but not in the same panel) - one for the generator, and one for the "shore power". Instead of interlocked circuit breakers, I decided to use a Blue Sea rotary selector switch - the one that's labeled SHORE-OFF-GENERATOR. With a little rewiring, the panel I already bought will work fine - I'll just pick up a few more spaces for 120 breakers. I also decided that the Vanner (inverter) won't feed the panel as a source. The Vanner only puts out 1050 watts, and if it fed the panel, someone might try to run everything from the Vanner (briefly...). Instead, I'm going to let the Vanner feed the old action station area like it always did, and use one of the spaces in the 120 panel for a Vanner output breaker. It will be wire-connected for both supply and load side instead of using the Blue Sea buss-bar feed.

Don't worry - I'll provide photos and diagrams after this gets farther down the pike.

I also have been trying to figure out what to do for a refrigerator. Anything from an RV supplier will be propane fueled, which means that the ambulance has to be level for the refrigerator to work correctly. When MNtal and I looked at RV components, we found they are about as cheaply made as possible. We are not impressed.

As a result, we've been looking at marine components instead of RV products.

My first two thoughts were for Norcold or Dometic as refrigerators. I keep hearing horror stories about Norcold's customer support, but they are more generally available. Dometic marine refrigerators are harder to track down here in MN. Neither seems to have the size I'm looking for.

Instead, I wound up looking at an Isotherm. They're European, and designed for installation in sailboats. They're rated for operation with a rolling boat, or one that's heeled over from the wind-sail interaction, plus they use a high efficiency design so they will operate in a sailboat with only solar cells or a small wind turbine as a power source. West Marine seems to be a good source for them, so I'm gonna cross my fingers and order one today. Instead of sizing it to be a press fit in the available space, I'm going to go with one a bit smaller so it can be installed a whole lot more readily. Photos will be provided when I have something to photograph.
 

NEPolarbear

Observer
Have you thought the pros and cons of using a cooler instead of a fridge?
I'm going with a cooler that will hopefully drain to the outside when needed.

My long overdue thread on my buildout should happen this week.
 

rlrenz

Explorer
In MN, the DMV specifically references "refrigerator" in their requirements list for an RV license plate, so because bureaucrats are bureaucrats, I will buy a refrigerator, with a receipt that says "refrigerator". They want to be able to see receipts and photos of before and after when I plead my case for an RV plate.

I also have several exterior cabinets that will also hold a large cooler, with foamy beverages packed in ice - which is why I don't plan to install a large refrigerator. When all is said and done, nothing will cool a can of beverage like old fashioned ice.

Once I add the refrig, a LP cooktop, and running water (all as per DMV), then I can become an RV
 

Gatsma

Adventurer
rlrenz- Another brand of fridge you might check out is NovaKool; they're 12VDC/120VAC, and from what I've heard, fairly rugged. And because of that, a bit pricier than the average RV fridge.
Just another possibility you might want to be aware of. Happy trails, man!
 

Forum statistics

Threads
186,726
Messages
2,889,417
Members
226,872
Latest member
Supreet.dhaliwal
Top