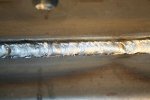
That dark line is probably a figment of the poor photography. I'll take a closer look. I believe I was getting full fusion. The machine is capable of welding this as you can see on the tack weld. And since we're concerned about nitty gritty details again, it is 20% duty cycle now that I looked it up.
I certainly won't be buying a MIG welder at this time. I already tried that when I built the trailer and the Minister of Finance rejected my funding application.
")
I don't think a Miller 180 would even do a better job. I'd have to 212 and... just ain't happening right now.
If and when I have to, I have a Precision TIG 375 at work. I just prefer TIG over MIG. Especially once I get to the front side with visible welds.