Colorado camper build

billiebob

Well-known member
looks fabulous, looks lightweight, I see plenty od triangulation, super build
love the bungee to suck in the sides.
ot needs colour

the turkish kettle is impressive, never heard of it before, more detail would be appreciated.

you should have an option to resize pictures on you computer, on a Mac it comes up under tools
 
Last edited:

billiebob

Well-known member
As a general rule, flat roofs are bad. I know rv dealers do it, that doesnt make it right, it makes them lazy. Flat roofs lead to pooling or water, and failure.
Not to mention, add a ridge to a roof halfs the flat part adding, more than doubling structure integrity, strength. no ponding, no oil canning plus the ultimate form of strength, triangulation..... only beat by the egg.
 
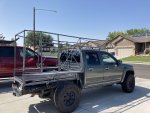
Thank you for the feedback. I was working the photos on my phone, ill have to move to the computer for resizing.
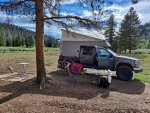
The kettle/fireplace. Search for turkish tea kettle, or samovar. There are many styles, lots of them are very fancy and not practical for this type of use. But this one came right off good ol amazon. I added some latches to the side to hold it down, but its still easily removable for cleaning if needed. Or i can use it outside if i want. this one is really cool because air holes and chimney seem to be perfectly tuned. Once you get a flame going and it warms just a little, the air moves like a rocket stove, and you have high pressure flames shooting out the chimney (in a good way, not a dangerous way). Its impressive. With the right fuel (wood sticks or instant light charcoal) it will boil a gallon of water im 5-8 minutes. Steam will be pushing out the side of the lid and around the chimney. So its nice to be able to use it outside as well sometimes.
the chimney is simple galvanized steel sheet and tube from lowes. The seams are taped, and through the side wall, its doubled up so i dont burn the house down. It works very well, and i havent had any over heat issues.
Also, its just big enough inside to set up charcoal in a slow burn snake setup (like low-slow bbq setup) or you can buy slow burn charcoal. It will then burn for hours. Wood burns very fast because of the air flow.
 
Last edited:
Well she’s been out a few times now, and we've made some improvements. Working on getting a few things changed, then will post pictures. But for now, she looks good in the woods.CC07DF2E-26A7-4C9C-8712-61A077DE85B3.jpeg
 
This is a good shot of the framing before any skin went on.
 

Attachments

  • 866A76B4-4C64-4E38-A9AC-92D9A356D323.jpeg
    866A76B4-4C64-4E38-A9AC-92D9A356D323.jpeg
    1.5 MB · Views: 40
I keep telling myself I’m going to finish a few things, but I keep ending up in the woods when I have spare time. Hilarious.
its been through multiple downpours now, no water issues, and it sure is nice to be dry and off the ground when its pouring.
 

Attachments

  • 2858B235-D30F-4533-B925-9FB27D9337DD.jpeg
    2858B235-D30F-4533-B925-9FB27D9337DD.jpeg
    237.3 KB · Views: 42

ITTOG

Well-known member
I would love to see you close up pics on how you attached your canvas.

Sent from my Pixel 5 using Tapatalk
 
Unfortunately, i dont have any close pictures of the canvass. I used tightbond 3 glue, thinned just slightly with some water, put it on with a paint roller and brush. I put it on as thick as I could without it soaking completely through. Its a little trial and error at first, but I found the right ratio quickly. Then the paint went on super thick, then silicone super thick on top of that. So far, its holding up very well.
 

Forum statistics

Threads
186,796
Messages
2,888,139
Members
227,280
Latest member
Smithmds77
Top