LivinDaDream
Member
This will be a bit long, but perhaps helpful to someone considering the same sort of battery build.
I've had a Battleborn 100AH battery in my camper for about 3.5 years and couldn't be happier with it...it just works. My power needs are modest...compressor based fridge being the biggest draw and second is my laptop if I'm doing photo or video editing. I have all LED lighting, so that is pretty minimal. I'm good for about 3-4 days of heavy overcast before running low on power and can run the truck or a small generator to recharge if need be. Needless to say, more battery would be a good thing, but given my space constraint of a single battery box, adding another battery would require some sort of kluged up system external to the camper itself. I looked at putting a couple 50AH Lithium units on either side of the camper in the space between the camper base and the sidewall of the bed, forward of the wheel humps, but that requires wiring and installation and removal when loading or unloading the camper.
For a while I've been thinking about building a 280AH DIY battery pack using some of the cells and parts available direct from China on AliExpress, but hadn't yet pulled the trigger on ordering the parts. Well, a couple weeks ago as I was browsing the local CraigsList, I ran across a guy selling the parts he bought to build exactly what I had in mind, as well as some other odds and ends that he had ordered as well...4 ea. 280AH 3.2V cells, 150A 12V 4S BMS w/Bluetooth and PC interface, 25' 6GA paired cable, a bunch of lugs, a 150W battery load tester, Battery monitor w/500A shunt, heavy lug crimper (hammer driven)...all for $500. He hadn't even opened most of the items, only one of the cells. He and his girlfriend had been planning on going full-time in a camper, but he got a job opportunity that he couldn't pass up and that idea was out the window, so he decided to sell all the parts he'd just bought. I checked the cells out carefully and all were very closely matched in terms of SOC as shipped and had the barcodes intact.
When I got the items home, I set about prepping and testing the cells...discharging them down to 2.55V/cell and then full charge up to 3.55V/cell wired in series and finally up to 3.65V/cell with all 4 cells bussed together in parallel...leaving them bussed together for a day to equalize amongst themselves. I did all the charging with a 30V, 10A lab power supply and double checked cell voltages with a known accurate VOM. Next I configured the pack in series again, added and configured the BMS and did a capacity test on the completed bank. Measured capacity was 284AH to the 2.5V/cell cutoff point when one of the cells reached that voltage...color me impressed! My plan is to run below the max capacity and operate in the 10% to 90% range or around 224Ah or 2900Wh, so better than double what I have with my BB 100Ah. Which, by the way, I just tested and after almost 4 years is still delivering 103AH from full charge to cutoff...I have plans for it, too!
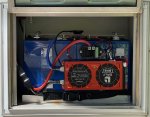
Next, step...how to configure the cells and BMS to fit in the battery compartment in the camper. Most builds I've seen of these type cells have them arrange 4 in a row and while that would have fit in the space, I would have to mount the BMS on the top of the battery and there wasn't as much vertical clearance as I'd like and that would make accessing the cell terminals difficult with the BMS mounted above them. If I configured the cells in a 2x2 layout, I still had enough opening width to squeak in the opening and enough front to back space to mount the BMS on the side of the cells with plenty of space for the door to close...and plenty of top clearance now.

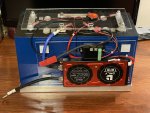
I considered several ideas on how to physically package the cells and one of the challenges was that going with the 2x2 layout was that I was left with only about 1/2" clearance between the cells and the inside opening width of the door. Whatever I did to secure them to each other couldn't exceed 3/8". So, I got some 1" x 1/16" aluminum angle and welded up an open bottom tray to secure them at the bottom...a snug fit once I installed wrapped the base of the cells with captan tape as an added protection beyond the plastic wrap on the aluminum cell bodies. I'll check this at some point for any signs of wear. I made my own buss bars out of 3/4" x 1/8" Aluminum bar stock and mounted an 1/8" plexiglas top cover on standoffs above all the terminal connections. As you can see from the photos the bolts for the cells on each end are exposed and there is voltage potential between one end and the other, though not between the bolts on each end...something I'll deal with shortly.

The BMS and a Thornwave Bluetooth power monitor are mounted on another piece of 1/8" plexi that is attached to the side of the cells with 6 squares of hook/hook velcro. The BMS is mounted on 1/4" standoffs to allow air circulation behind it. Likely not needed as the power levels I'm be running in my system rarely get above a 20A load or a 35A charge rate, either from Solar, Camper Battery Charger or the truck alternator. Connection from the battery to the house 12V system is via Anderson PowerPole connectors with 75A contacts.
I threw all this together more quickly than I'd expected and hadn't planned to have it all together before taking off to Norris Lake in TN for a few days, but I was able to get the basic package together and installed in time, so was a perfect opportunity to see how it worked. I do need to add a few things, one being small buss bars to attach a couple Anderson PP75 pigtails for external loads or my other MPPT controller and remote panels. Overall, the system is performing as expected and I've got my solar controller and the BMS all set up to keep the system operating within the limits I established (10%-90%). Key is being able to set custom parameters for both the solar controller and the BMS so that both can do their job properly. With the system at rest, not charging and with minimal load, I'm seeing cell balance within 3mv and while charging near full capacity, cell balance is generally within 50mv...which in my understanding is pretty darn good.
I hope someone finds this useful and I'll be glad to answer any questions...
Cheers!
I've had a Battleborn 100AH battery in my camper for about 3.5 years and couldn't be happier with it...it just works. My power needs are modest...compressor based fridge being the biggest draw and second is my laptop if I'm doing photo or video editing. I have all LED lighting, so that is pretty minimal. I'm good for about 3-4 days of heavy overcast before running low on power and can run the truck or a small generator to recharge if need be. Needless to say, more battery would be a good thing, but given my space constraint of a single battery box, adding another battery would require some sort of kluged up system external to the camper itself. I looked at putting a couple 50AH Lithium units on either side of the camper in the space between the camper base and the sidewall of the bed, forward of the wheel humps, but that requires wiring and installation and removal when loading or unloading the camper.
For a while I've been thinking about building a 280AH DIY battery pack using some of the cells and parts available direct from China on AliExpress, but hadn't yet pulled the trigger on ordering the parts. Well, a couple weeks ago as I was browsing the local CraigsList, I ran across a guy selling the parts he bought to build exactly what I had in mind, as well as some other odds and ends that he had ordered as well...4 ea. 280AH 3.2V cells, 150A 12V 4S BMS w/Bluetooth and PC interface, 25' 6GA paired cable, a bunch of lugs, a 150W battery load tester, Battery monitor w/500A shunt, heavy lug crimper (hammer driven)...all for $500. He hadn't even opened most of the items, only one of the cells. He and his girlfriend had been planning on going full-time in a camper, but he got a job opportunity that he couldn't pass up and that idea was out the window, so he decided to sell all the parts he'd just bought. I checked the cells out carefully and all were very closely matched in terms of SOC as shipped and had the barcodes intact.
When I got the items home, I set about prepping and testing the cells...discharging them down to 2.55V/cell and then full charge up to 3.55V/cell wired in series and finally up to 3.65V/cell with all 4 cells bussed together in parallel...leaving them bussed together for a day to equalize amongst themselves. I did all the charging with a 30V, 10A lab power supply and double checked cell voltages with a known accurate VOM. Next I configured the pack in series again, added and configured the BMS and did a capacity test on the completed bank. Measured capacity was 284AH to the 2.5V/cell cutoff point when one of the cells reached that voltage...color me impressed! My plan is to run below the max capacity and operate in the 10% to 90% range or around 224Ah or 2900Wh, so better than double what I have with my BB 100Ah. Which, by the way, I just tested and after almost 4 years is still delivering 103AH from full charge to cutoff...I have plans for it, too!
Next, step...how to configure the cells and BMS to fit in the battery compartment in the camper. Most builds I've seen of these type cells have them arrange 4 in a row and while that would have fit in the space, I would have to mount the BMS on the top of the battery and there wasn't as much vertical clearance as I'd like and that would make accessing the cell terminals difficult with the BMS mounted above them. If I configured the cells in a 2x2 layout, I still had enough opening width to squeak in the opening and enough front to back space to mount the BMS on the side of the cells with plenty of space for the door to close...and plenty of top clearance now.

I considered several ideas on how to physically package the cells and one of the challenges was that going with the 2x2 layout was that I was left with only about 1/2" clearance between the cells and the inside opening width of the door. Whatever I did to secure them to each other couldn't exceed 3/8". So, I got some 1" x 1/16" aluminum angle and welded up an open bottom tray to secure them at the bottom...a snug fit once I installed wrapped the base of the cells with captan tape as an added protection beyond the plastic wrap on the aluminum cell bodies. I'll check this at some point for any signs of wear. I made my own buss bars out of 3/4" x 1/8" Aluminum bar stock and mounted an 1/8" plexiglas top cover on standoffs above all the terminal connections. As you can see from the photos the bolts for the cells on each end are exposed and there is voltage potential between one end and the other, though not between the bolts on each end...something I'll deal with shortly.

The BMS and a Thornwave Bluetooth power monitor are mounted on another piece of 1/8" plexi that is attached to the side of the cells with 6 squares of hook/hook velcro. The BMS is mounted on 1/4" standoffs to allow air circulation behind it. Likely not needed as the power levels I'm be running in my system rarely get above a 20A load or a 35A charge rate, either from Solar, Camper Battery Charger or the truck alternator. Connection from the battery to the house 12V system is via Anderson PowerPole connectors with 75A contacts.
I threw all this together more quickly than I'd expected and hadn't planned to have it all together before taking off to Norris Lake in TN for a few days, but I was able to get the basic package together and installed in time, so was a perfect opportunity to see how it worked. I do need to add a few things, one being small buss bars to attach a couple Anderson PP75 pigtails for external loads or my other MPPT controller and remote panels. Overall, the system is performing as expected and I've got my solar controller and the BMS all set up to keep the system operating within the limits I established (10%-90%). Key is being able to set custom parameters for both the solar controller and the BMS so that both can do their job properly. With the system at rest, not charging and with minimal load, I'm seeing cell balance within 3mv and while charging near full capacity, cell balance is generally within 50mv...which in my understanding is pretty darn good.
I hope someone finds this useful and I'll be glad to answer any questions...
Cheers!


