DIY Composite Camper T100 Expedition Vehicle Build

I just had a look at Carbon Core, and they have low prices on 2lb 19mm PU sheet... only $28.80. https://www.carbon-core.com/product/pu-pir-structural-foam-sheets/

Their shipping is sort of a flatish rate ~$350 IME, but it might be worth checking out. Also, have you looked at PU sheet suppliers locally? Boat builders may have it or can get it.
I did look for any PU or EPS type 9 in my area, but didn't find anything that suited my needs. Found some PU, but only in thicker sheets that would have resulted in a lot more work and expense.

I'm going to give the pour foam a try as soon as I can. At the cost of any alternatives that I have found so far, it will be much cheaper even if I end up wasting product with the overfill-and-shave down technique.
 

rruff

Explorer
Curious to know what your technique will be. Pouring into a thin cavity seems like it would be tough to get good coverage.

Good luck though! Hope it works.
 

RJ Howell

Active member
Vlog the pour experience please. I've chased a couple folks doing it, but not like what you are doing. Seems being creative with this has many possibilities.

I wonder how to easily sandwich the foam between layers of FG cloth (or finish material of choice). I assume expansion of the foam can be calculated? I would like to eventually re-build my roof to something more rigid without gaining a lot of weight. Seems this could be a way to incorporate some structure elements...

Please do pass along what you find/figure out. Following with great interest!
 

rruff

Explorer
I would like to eventually re-build my roof to something more rigid without gaining a lot of weight.

Thicker core... plus I think you'd appreciate a thicker skin too for greater durability. Could make the skin thicker just on the outside. 2.5oz FG is super light!.. I have more than 10x that amount and a core that is ~2.5x as dense. ?

2" 25psi XPS is ~.26 lb/sq ft. 10oz FG is ~.15 lb/sq ft. That's still only .56 lb/sq ft for the core and 2 skins. If the roof is 80 sq ft, that's only 45 lbs.
 
Last edited:
UPDATE

I have completed the subframe!
As planned, it is constructed of 1x2 steel, rectangular tubing. A mix of 16g and 1/8 inch wall thickness.

subframe pic2.jpgsubframe pic.jpg


It is bolted to the 6 stock bed mounts with grade 8, 1/2 inch bolts. The plan is to attach the camper to the subframe with ten 3/8 inch bolts and a slathering of Sikaflex 252, hopefully distributing the load nicely throughout the camper floor.

Since I work in the marine industry, I got a discount on a primer for boat trailers and decided to use it for the subframe. It's called Pettit Rustlok. It went on nicely and has good reviews in the boat world. It is a moisture cure polyurethane coating. I'm hoping that the Sikaflex 252 (also a moisture cure polyurethane) will adhere relatively well to this after a bit of sanding.

Here's the video if you want to see more of the process:
 

RJ Howell

Active member
I ended up using 1.5 x 3. 1.5 to match my cabin sizing, yet need the 3 to get over items factory installed in the frame. Nice you didn't have that issue! You do weld better than I!! I did a lot of sanding to come that clean!! LOL

You're at that point where I skipped making the lower boxes, thought I'd do it later. I wish I hadn't now and had welded at least the outer frame for them.

Lookin' good!
 

Third

Member
Highly recommend spring mounting that subframe. The twist from the truck frame isn't going to do your camper any favors

Agreed for an off-road rig. It would be simple enough to add a set of captured springs onto the forward portion of the frame.

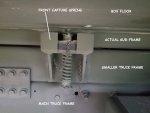
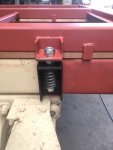
My M1079 box is mounted of four points. The rear set are basically hard-bolted (there is a rubber bushing, but it's not much give). The forward on each side have captured springs. My box is 7.5' x 12.5" and that works quite well. But any longer of a box and I would swap to a (at least) three point cantilever system (possibly four-point depending on length).

Here's what the captured springs the military designed into it (note that it's also "boxed" for lateral capture):

20191229_170635.jpg

Here's the rear hard mount:

20191229_170557.jpg
 

Third

Member
Here's the "why".
*not my truck, but identical

Keep in mind that this truck actually has two hardened frames as well as one subframe. It's considered to be a "slight" flex compared to some...

128446128_3038274346272123_3798215522644441153_n.jpg
 

RJ Howell

Active member
I can see a captured spring mount on that M1079, yet on a smaller Rig/Pickup? I have hard point mounts (6) and have no issues so far. I also don't cross terrain like you do! If I did, I might do something along those lines. The issue I avoided was connecting the Cab/Cabin. There's where I saw potential of flex damage/cracking occurring.

Bottom line for me.. can't hurt to do it, yet I don't see a personal reason for mine.

P.S. Came close to pulling the trigger on a M1078 last season. I now wish I had.. $$ has gone nuts since!
 
I ended up using 1.5 x 3. 1.5 to match my cabin sizing, yet need the 3 to get over items factory installed in the frame. Nice you didn't have that issue! You do weld better than I!! I did a lot of sanding to come that clean!! LOL

You're at that point where I skipped making the lower boxes, thought I'd do it later. I wish I hadn't now and had welded at least the outer frame for them.

Lookin' good!
I was back and forth on doing the boxes and bumper before the camper, but decided to do the camper first. I may regret this later, but shouldn't be a big deal
 

Forum statistics

Threads
188,032
Messages
2,901,443
Members
229,352
Latest member
Baartmanusa
Top