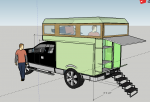
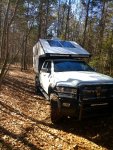
DIY Composite Flatbed Camper Build

Terra Ops

Adventurer
That was definitely it. No other damage to the camper electrical system. However...…. I'll share an embarrassing mistake that I hope will save someone
some grief. After disconnecting and taping off potential hot wire ends except for the leads from the truck. I thought I had unplugged the Anderson connection. These two wires came into brief contact and created a startling spark. It blew the 250amp terminal fuse on the truck battery and fried the alternator. A $12 fuse turned into a $300 repair. Luckily, my son
was home on college break and had me up and running in no time.
I think the Keurig coffe maker may have been the cause of the blown fuse. When we first started using it, all was good. Recently the switch had been malfunctioning. It would start
then stop and sometimes create a surge.

I think I'll be using my back up from now on: My Jo coffee maker https://www.amazon.com/Presto-02835...&qid=1579354114&sprefix=my+jo+,aps,216&sr=8-2

Hind sight, this overall was a good experience in preparedness. Luckily we had shore power while on this trip. I brought a space heater as a back up which kept us comfortable when
the temps dipped into freezing overnight. While its nice to have some creature comforts of home, in the event of failure, of few back ups can make all the difference.
 

RJ Howell

Active member
I just caught up to this build! Well done!

I am about to head down a similar path. Screen Shot 2020-01-13 at 2.19.11 PM.png

First question is: Why did you keep the flatbed? I'm figuring I can lower a bit by camper-on-frame. Very curious if I'm missing something.. major..
Then comes: Did you look at fiberglass cloth vs. FRP? If so, again very curious why the FRP instead of cloth? I'm looking at going cloth, I can shape a bit with cloth..

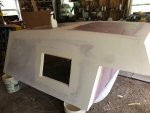
I scanned through the shell build which is of most interest to me and it seems you used corner brackets to attach your panels. Am I reading this right? Or was that just an extra step. I did a topper from foam (PMF skin) and glued the panels together with Gorilla Glue.. IMG_0884.jpg
BBIVIMGm.jpg
 

Terra Ops

Adventurer
First question is: Why did you keep the flatbed?
Wanted camper to be easily removable and have use of the truck. Flatbed also provides rigidity to keep camper from flexing. My truck uses coil springs which also reduces
flexing. You can also go with various mounting systems.

Did you look at fiberglass cloth vs. FRP?
Yes, initially I was going down the path of carbon fiber cloth. However, I have no experience with this application and it would require
substantial fit and finishing. Panels were easy to bond together and required no painting.

Corner brackets bonded to the panels inside and out holds the box together.

Hope this helps, good luck with your build!
 

Manutara

New member

Mostly a lurker here, I've been following your thread for a while, great build. Having electrical appliances is nice, but there are times that simpler is better (and more reliable), I always use a Bialetti moka coffe maker, it has never failed me when camping or at home:
 

Terra Ops

Adventurer
Mostly a lurker here, I've been following your thread for a while, great build. Having electrical appliances is nice, but there are times that simpler is better (and more reliable), I always use a Bialetti moka coffe maker, it has never failed me when camping or at home:

Thanks for the link, looks like a nice coffee maker. I agree, sometimes simpler is better. If I were to do it again, I'd go all 12 volt and no inverter. I do however need to keep my
wife happy;)
What I like most about the My Jo coffee maker is its simplicity and diversity. Just add hot water and it will handle any K-cup pod. From coffee, tea, cider, soup, hot chocolate, and or refillable pod of choice. Clean up is simple too.
 

Terra Ops

Adventurer
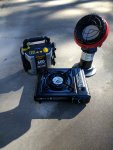
After the power failure, I thought it best to have extra backups. If shore power is not available, these items
should cover the basic needs.
 

Attachments

  • IMG_20200125_102822108.jpg
    IMG_20200125_102822108.jpg
    2.5 MB · Views: 77

Terra Ops

Adventurer

Attachments

  • IMG_20200129_111354818.jpg
    IMG_20200129_111354818.jpg
    1.7 MB · Views: 60
  • IMG_20200129_111326932.jpg
    IMG_20200129_111326932.jpg
    883.3 KB · Views: 59
  • IMG_20200129_125106160.jpg
    IMG_20200129_125106160.jpg
    738 KB · Views: 61
  • IMG_20200129_143911008.jpg
    IMG_20200129_143911008.jpg
    1.2 MB · Views: 61
  • IMG_20200129_143917075.jpg
    IMG_20200129_143917075.jpg
    1.4 MB · Views: 60

ai4kk

New member
Reading on the Teardrop camper foamie forum (look them up on tnttt.com ), they use a pinwheel or wartenberg wheel contraption with multiple pinwheels to make lots of little pinholes in the foam before coating it with adhesive. The glue then seeps into all the little holes, providing many deeper attachment points within the foam. Think something like that may help with delaminating or foam separating?
 

Terra Ops

Adventurer
Reading on the Teardrop camper foamie forum (look them up on tnttt.com ), they use a pinwheel or wartenberg wheel contraption with multiple pinwheels to make lots of little pinholes in the foam before coating it with adhesive. The glue then seeps into all the little holes, providing many deeper attachment points within the foam. Think something like that may help with delaminating or foam separating?
Sounds good to me. When making my panels, it was recommended by the epoxy supplier to lightly sand the foam. Since then I have thought about other methods as discussed in previous posts. I really have not had a problem with delamination which I think is due to the type of epoxy.
 

KD702

Member
Sounds good to me. When making my panels, it was recommended by the epoxy supplier to lightly sand the foam. Since then I have thought about other methods as discussed in previous posts. I really have not had a problem with delamination which I think is due to the type of epoxy.

Thanks for all the info you guy shave shared. I have been tossing the idea around of making a 5x12 removable pod for a trailer. Like your Flatbed, I could still use the trailer for normal trailer things like hauling the ATV.
 

Terra Ops

Adventurer
Thanks for all the info you guy shave shared. I have been tossing the idea around of making a 5x12 removable pod for a trailer. Like your Flatbed, I could still use the trailer for normal trailer things like hauling the ATV.

Sounds like a plan! We just got back from the Midwest where temps dropped into single digits and negative wind chill. I'm still impressed with how well the panels insulate.
The propex heater sips propane and can heat up the camper in no time.
I too have been tossing around the idea of a trailer build. This would be more of a tiny house build with the potential of docking with the flatbed camper.
So many different applications when you build it your self.
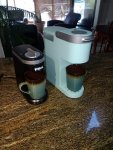
On another note, back to the coffee maker. We tried the "My Joe" for about a week and it worked fine. With the temps in the single digits, heating the water in the microwave was the most convenient. However I still wanted a coffee maker that used low amps and was similar to our hi amp Keurig whose switch fried a fuse. Found this on amazon;


Much smaller and efficient than the Keurig or microwave. 800 watts and pulls 72 amps for about 2 minutes. So far I'm impressed with this little machine, guess we'll see how long it lasts....…. made in china
 

Attachments

  • IMG_20200229_154501603.jpg
    IMG_20200229_154501603.jpg
    1.4 MB · Views: 43

rruff

Explorer
Reading on the Teardrop camper foamie forum (look them up on tnttt.com ), they use a pinwheel or wartenberg wheel contraption with multiple pinwheels to make lots of little pinholes in the foam before coating it with adhesive. The glue then seeps into all the little holes, providing many deeper attachment points within the foam. Think something like that may help with delaminating or foam separating?

They are not gluing premade skins to foam; usually hand layup with Titebond and canvas. Take a look at Styromax in Aus... they have a lot of info online about how their panels are made. They tell the adhesive they use... can't remember what it is... something by Heinkel I think.

I've done hand layup FG on Foamular 250. Adhesives don't stick to XPS very well. Sanding definitely helps by breaking the cells on the surface, but the cells are very small, and the hardware store foam is very weak anyway; ie it will be the first thing to fail even if the bond is good. Sanding first, then thoroughly cleaning, then going over it with a dog brush (creates many tiny grooves) seemed to work the best. I've heard that the Woodpecker tool is better, but they appear to be no longer made and are tough to find. When you think about it, "tearing up" the top layer of foam might give better adhesion, but it's also going to make the weak foam even weaker. But maybe the increased surface area of the bond is the bigger benefit.

When I start up my build again I might just go to with PVC boat foam for piece of mind. It's a lot more expensive, but in the grand scheme of things (time and effort) it isn't a lot.
 

DiploStrat

Expedition Leader
Sounds like a plan! We just got back from the Midwest where temps dropped into single digits and negative wind chill. I'm still impressed with how well the panels insulate.
The propex heater sips propane and can heat up the camper in no time.
I too have been tossing around the idea of a trailer build. This would be more of a tiny house build with the potential of docking with the flatbed camper.
So many different applications when you build it your self.
On another note, back to the coffee maker. We tried the "My Joe" for about a week and it worked fine. With the temps in the single digits, heating the water in the microwave was the most convenient. However I still wanted a coffee maker that used low amps and was similar to our hi amp Keurig whose switch fried a fuse. Found this on amazon;


Much smaller and efficient than the Keurig or microwave. 800 watts and pulls 72 amps for about 2 minutes. So far I'm impressed with this little machine, guess we'll see how long it lasts....…. made in china

FWIW We are using a little Nespresso as we are espresso freaques. (One can debate how close Nespresso is to real espresso, but I digress.) Same deal, only uses current for a very short time and doesn't dump a ton of grounds into the grey tank.
 

mrarmyant

New member
Is there a link to this build? Doing something similar, wondering what weight mat to use, and how many layers.

Love your build! I considered something similar, but ended up going with hand layup on 20 psi Foamular, so I could do curved surfaces. I used the cheap foam because I couldn't find anyone willing to get the 60 psi foam locally, and shipping would have doubled the cost.

What are the specs for the skins you are using? Thickness, weight? FG, polyester resin with gelcoat?
 

Forum statistics

Threads
188,029
Messages
2,901,382
Members
229,411
Latest member
IvaBru
Top