Given that this thread seems to be a hostage of the Photobucket ransom I thought I'd repost for GXWagon with updated photo links. Hope they don't mind  The photo upload per post seems to be 10 so this is post one of a few.
Welcome to the Idiots Guide to the Drifta Drawer DIY Build
...Under $300

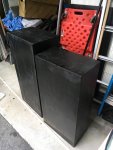
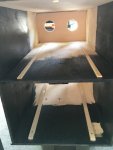
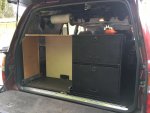
I'm gonna call these Thrifta Drawers. 90lbs of amazing.
I found out I wasn't able to get Drifta Drawers shipped to the USA so I will be building my own. I will be doing my best to get as close as possible to the drifta style, including the slide out table and using HDPE for the slides. Here is where I will detail my adventure. My goal is to make this easy for anyone to build these. I am not a professional carpenter by any stretch of the imagination. You will see my successes and mistakes. Feel free to send me feedback or hate mail along the way.
Here we go,
Supplies You will Need
3 - 4'x8' sheets of 1/2 Ply (Sanded Ply) ($130 price includes cut to custom sizes)
1 - sheet of 1/4 Ply (Sanded Ply)
Wood Glue - ($5.37)
Screws - ($4.14)
Sand Paper ($5)
Black Stain ($5)
Clear Lacquer ($5)
Foam Brush ($1 a piece)
8 x 1/8" thick HDPE (For the sliders) - ($26.21 price includes cut to custom sizes)
Trunk Liner Carpet (I got mine for $6 per yard and used 6 yards)
Automotive Spray Glue for Carpet ($5)
2 x Locking Paddle Latches - ($8 each on ebay)
Folding Table Legs
Ball Beraing Latch for Table ($2)
Spring Loaded Sea Dog Flush Pull Tie Downs ($15 for pack of 10)
Tools You will Need
Measuring Tape
Drill
Drill Bit
Countersink Drill Bit
Pen or Pencil
Chisel
Chalk Line (Nice to have but not necessary)
Orbital Sander (Nice to have but not necessary)
Chop/Mitre Saw (Only if you want to make the pull-out table)
Step 1:
Measure the H x W x D you would like your drawers to be. I will be building mine 12"H x 42"W x 37"D
The interior of the left drawer slot will measure 11"H x 20 1/4"W x 37"D
The exterior measurement of the left drawer will be 10 3/4"H x 20 1/8"W x 37"D
I account for 1/4" on the bottom of the drawer for 2x 1/8" pieces of HDPE.
I account for 1/8" on the width to leave 1/16" on each side of the drawer.
Step 2:
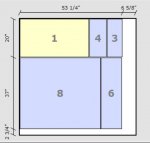
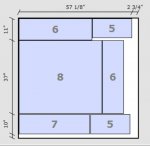
Lay out the blueprint of all the pieces you will need to get cut from 1/2" ply. 1/2" ply is what drifta uses for the shell and drawers.
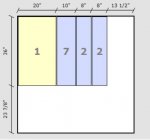
As you can see I have laid out all of my pieces and set them into 4' x 8' panels so I can make the best use of the wood, I will need to purchase and cut. You can see I need three pieces of 1/2" ply
You will also need a piece of 1/4" ply for the compartment that the pullout table will snuggle into. You can buy the smaller pieces that Home Depot sells.
(IGNORE the 30"x36" labelled "house shelf" I am putting shelves in a closet in my house and figured I would get them cut at the same time.)

Step 3:
Bring Blueprint to Home Depot or another hardware store of choice. I will be making this as easy as possible for myself and you by bringing my blueprint to Home Depot and having the saw guy do all the cuts for me right there in the store.
You can have Home Depot cut everything with the exception of the frame around the table. These need a chop saw or mitre saw to cut 45 degree angles.
It cost me $12 for him to make all the cuts. To me, that is well worth it. I know they are perfect and I don't have to worry about clean up etc.
You will also need some wood glue and screws. I used 1x6 screws and will be drilling pilot holes, so we don't crack the lumber.

Step 4:
Get all your materials together
Wood Glue
Drill
Drill bit (just smaller than the screws you will use)
Counter sink drill bit
Screws (I used 1x6)

Step 5:
Let's Begin Construction of the carcas.
Start with the bottom, then add your side middle and rear panels. You will save the top panel and table shelf for last as you will need to lacquer the inside and glue your HDPE slides first. Measure and mark where you are going to put your screws. In my case its right in the middle of the 1/2 ply, so I measured 1/4 and made my mark every 6" - 8". Drill your pilot holes then glue and screw.
As you can see I used pieces of 2x4(found free in Home Depots scrap bin) to easily (No special equipment required) help me hold the boards in place while I, glue and screw. Glue and screw. Repeat this mantra to yourself.
We will not assemble the top of the carcass at this step. We will save that for last to make it easy for us once we get to the stain and lacquer step.


Step 6:
Now we want to put the drawers together.
You are going to drill your pilot holes as well as a counter sink hole if you want. I did.
Lay a bit of wood glue on your pieces then drill them together. Glue and Screw.
In this step, I won't be putting on the face of the drawer yet as I am still waiting on my paddle handles to come in the mail.


Step 7:
Prep for Staining.
Now we just need to fill the screw holes with some wood filler and let it dry.
I find it easier to have some wet paper towel and a glass of water on standby to help me with the application of the wood filler. Wood filler is easier to apply with a wet finger.
After the wood filler is dry, we will do our first sanding. I will be using 220 grit sand paper. I will sand all the holes where I applied the wood filler. I will also be sanding the outside of the drawers to give it a smooth feel as well as the interior of the carcas.You can sand by hand or use and electric sander.
This is our preparation for applying the first coat of stain.


