Finally REALLY done!
Ah, finally finished up the project. As usual, it turned out to be much more work than I thought it would.
.
There's a cautionary tale here, too, about making sure you have the right tools and not being so impatient to get something done that you rush through the process and break something.
.
With the dual battery system functioning it was now time to turn to the whole reason WHY I put the dual battery in in the first place: So I could have a dedicated power source to run the fridge (among other things, but the fridge was priority no. 1.) In order to do that, I had to get power from my 2nd battery to the interior compartment of the truck.
.
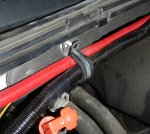
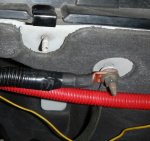
This turned out to be a major hassle. I tried to push a wire through one of the existing wire grommets but no luck. At this point I didn't want to run the risk of damaging a critical electrical circuit so I tried to figure out what to do next. The only thing I could think of was to run the wire underneath the fender to the door, then poked a hole and ran it right through the door weatherstripping and from there I could drop it into the channel underneath the sill plate.
.
.
Looking at that, I'm thinking it would be prudent to either put some wire loom over the wire or even some rubber tubing to protect the wire from damage (the door does
NOT contact the wire - I checked - but I don't want to run the even the risk of a bare wire shorting it out (although it is fuse protected at the battery end.)
.
It's not a particularly elegant solution, but given the fact that I was running out of time it was all I could come up with. I wish there was an easier way to put a wire through the firewall - I have to say that of all the tasks I've had to do on a vehicle, figuring out how to do this seemingly simple one has proved to be the most difficult of them all.
.
In the old days it was easy but modern vehicles have so much CRAP underneath the dash that it's nearly impossible to get through the firewall in a manner that is safe and "elegant" without looking like a hack job (It would be nice if manufacturers just put a blank "accessory grommet" somewhere on the firewall for just such things. Oh well, a man can dream, right?

)
.
Anyway, I was able to get most of the interior trim panels out - as others have said, they are held in with clips that just pop out. The only problem I had was with the one on the interior of the D-pillar. Since my Suburban has speakers there, the D-pillar is somehow held on with the speaker. I ended up pulling it just a little to hard and this was the result:
.
.
I couldn't see any way to remove a screw or anything so I still don't know how that panel is supposed to come off. Luckily for me, all the other panels came off without too much drama. The result was an interior that looked like this:
.
.
My plan was to find a way on the fender-cover to put the dual 12v outlet. Finding a place that was both high enough that it would not be covered up by cargo, and also not on a curved portion of the panel, proved to be a little bit difficult but after looking around, I finally decided to mount the 12v outlets horizontally just behind the 3rd row seat cup holder.
.
Unfortunately, this was another area where my impatience cost me: I needed to drill a couple of 1" holes for the 12v outlets. I didn't have any actual 1" hole saws but I did have a spade bit. Of course, spade bits work great for wood - for plastic, not so much. The first hole went OK because I took my time but I rushed the 2nd hole and the result was not pretty:
.
.
Yup, it punched out a section that was a good 1/4" bigger than it needed to be. I was able to smooth out the edges with a dremel tool and luckily for me, the cover plate for the outlet hides most of my mistake:
.
.
For a ground I just ran a wire to the metal bracket that holds the fender cover up (the aluminum bracket you can see sticking out from the side of the body in the photo above.) I checked it with the volt meter and was getting a good solid 12.4v reading, so after that I hooked up the outlet and buttoned everything up.
.
Unfortunately while reassembling the plastic panels I broke off one of the smaller pins on the fender cover. Not a huge deal, but, once again, it shows the results of impatience (it was getting dark by this time and I just wanted to be DONE!)
.
You can see from the picture that there are two outlets - one is a conventional 12v power outlet and the other is a dual USB. The USB is not currently connected to anything but eventually I'll hook it up, probably by splitting the 12g wire that comes from the battery. I had thought about running another wire all the way from the battery but I don't think that's neccessary - USB has such a small power draw and it's not like we're going to connect that to anything other than a cell phone or iPod. If I had to do it over again I'd have just gone with the single 12v outlet. Easier to position and easier to fit in.
.
So, overall I have to say I learned a lot in doing this. And of course I have to thank all the folks here on the board who helped me out, especially Dave! I certainly could not have done it without you!
.
Even though this is "done" I will probably continue to "tweak" it but at least now I have a working system.

