dustboy wants to build a camper...

dustboy

Explorer
The maiden voyage is planned for Thursday, so there is a lot to get done. Caulking of the shell is complete, door is weatherstripped. Water tank in place. Also, a very necessary item has been added (Thanks Cabrito for the mounts!):

IMG_2854.JPG


IMG_2855.JPG


Lift is up high, safe from collisions or flops. Yes, it's hard to get to, but it was the best place I could find with good frame support. From the roof, it's not too difficult, which I guess means I need a ladder! Shovel will mount to the rear door.

NOW it's starting to look like an expedition rig...
 

theMec

Adventurer
Here's an important question: What should I do with all of this space over the rear axle? Some Rotopax cans could slide in there, supported with some angle iron.
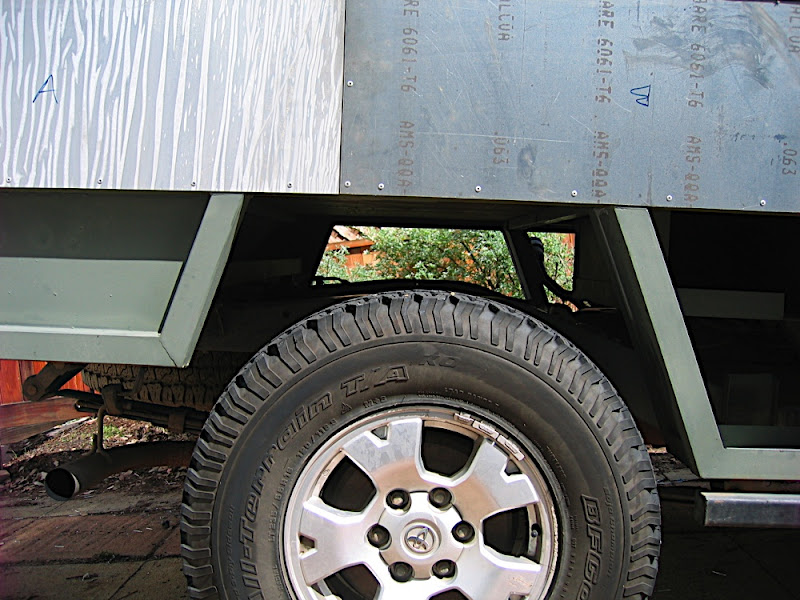
IMG_2853.JPG

When you hit bumps w/ a load, I don't think you'll have much, if any, space left over the tires. In between the tires, is different. Maybe that's what you meant ..

BTW, very cool build!!:victory:
 

rynosurf

Adventurer
Oh yeah, I took it out on the freeway today, is it just me or does the big box make a lot of wind drag?

Edit: without the roof on, I basically had a big parachute in the back. Roof is now complete, and it doesn't drag nearly as much. It is heavy, you can feel that the COG is higher, but overall it doesn't feel much different than before.

Have you thought about putting one Yakima or Thule rack with a fairing on it to cut down on drag? http://www.yakima.com/racks/rack-systems/product/8007047/38-fairing.aspx
 

dustboy

Explorer
That's where your folding ladder goes :)

Or how about two large diameter pvc pipes with threaded cap ends, as seen atop contractor vans.


You may want to add a simple C-channel gutter above the door and on the corner angles or else the water running off the roof and down the open gap is gonna drive you nuts.

Good ideas. I'm definitely going to put some kind of rain gutter over the door gap. And let's see, what could I carry in the pipes? I could use more on-board water capacity, or maybe my camp chairs would fit, or extra beers?
 

chris_the_wrench

Fixer & Builder of Things
Here's an important question: What should I do with all of this space over the rear axle? Some Rotopax cans could slide in there, supported with some angle iron.

IMG_2853.JPG

How about your water tank? Where is your current tank located? I was thinking that would be good use for a space that is not terribly easy to access and it would keep the weight down low.

This thing is great!

-Chris
 

TWHuntFish

New member
Utility space

Hey Evan,
Progress on the unit is looking good. It was cool to check it out last Sat.

What about making a drop in utility storage area box, that you access by lifting out a section of the floor deck.

Weld up a frame, router out the inset for an angle frame in the wood, and use the cut out piece for a lid.

Make it with dimensions that will accept common plastic storage boxes preloaded with water bottles, canned / dried foods....EXTRA BEER !

The single burner stove that I told you about has been delayed in shipping, I get it Friday. I will post a review after we use it this weekend on an overnight up to some BLM land.

Enjoy your trip,
Eric
 

dustboy

Explorer
I will post a review after we use it this weekend on an overnight up to some BLM land.

Enjoy your trip,
Eric

Eric, where did you end up?

My wife and I spent the weekend in Pinnacles National Monument and at Prewitt Ridge. Great camping, although the weather got snotty Saturday morning and we bailed out. At least we got a chance to give the camper a good shakedown.

IMG_0567.JPG


The water system was a last-minute hookup, so it just pumped out through a hose in the side box. It will get plumbed out to the washbasin on the rear pullout.

What worked:
-For the most part, the camper was pretty well sealed, I still need to chase down a couple of leaks.

-Sleeping was comfortable, I could stretch my legs all the way out!

-Interior space is cavernous compared to the old camper shell. Saturday morning while it was raining, we folded the futon mattress into a sofa, and enjoyed our breakfast and coffee inside.

-The wider load floor makes packing a breeze, especially because all of our gear for a short trip can pack in a single layer on the floor. No more stacking crates on top of each other. This helps keep the COG low too.

IMG_0561.JPG


What needs more work:
-As predicted, the aluminum sweats like crazy, so insulation will be applied before the next trip. Also, we had sub-40* nights and got pretty cold.

-The paddle latches are difficult to open from the inside. Also the rear door needs handles inside and out, and the pullout needs a handle.

-The lift struts on the rear door are TOO strong! It's difficult to close, and it pops open too fast, I'm afraid it will catch somebody in the chin. I removed one strut, which was enough to keep the door open, but barely. I will have to mess with the geometry.

-In certain situations, the edge of the rear door is low and could be a head-smacker. I'm going to make it raise high enough to clear my head by a few inches, which means it will slope toward the camper. It will need a raingutter or some means of channeling water away from the hinge gap.

-With a full load (including 200 lbs of water), the camper is too heavy for my factory leaf springs, which have an additional long leaf. I only have 2" above the bump stops. Also it drives like a boat, which may be partly due to the higher center of gravity. There may be some new leaf springs in my future.

-The rear tires did kiss the front edge of the wheelwells at some point, and the terrain wasn't any rougher than some big rain ruts. So, I'll probably have to deal more with that issue.
 

dustboy

Explorer
Detail of the side doors:

IMG_0675.JPG


Got the filler neck shortened so it fits inside the box, OBA compressor installed, and a gallon of extra fuel tied down. Yes the box needs a back, but I ran out of sheetmetal!

Oh yeah, and you can see the skidmark the tire left on the wheelwell. Don't know how flexed it was at the time or when it happened. Both sides show this. I plan to put the factory overload leafs back in, which will give me 3/4" of lift and a more progressive spring rate. That should eliminate the rubbing and help with the heavy loads, if not, I'll be looking at new leaf packs.

IMG_0676.JPG
 
Last edited:

TWHuntFish

New member
Trip and Heater

It looks like you had a good trip, nice pics. I like the side doors !

Last Saturday I went out to the truck to get the ice chest to load.....
Went back in and got a radar shot, rain already where we wanted to go.

So I checked out the new gimballed stove / heater that finally arrived.

Maybe this link should go in the cooking thread also, but I will continue because this is a great addition to small camper units.

I own almost all of the Mr. Heater product line, no bs. 4 or 5, I like all of them.They all have their purpose and handiness.

The problem that I have run into is to much heat making the roof paneling and fishing rods in the Callen way to hot.

Having lived on small boats in the past for 13 years, I have tried all devices of thermal output, home brew to small stainless steel wood stoves.

So I have come full circle back to the best, simple cooking / heating device..
The single burner , gimbal mount , propane stove...with a flower pot.

I could not find the original stove that I used, but upon purchase and use,
I will endorse the Forespar Mini Galley Hotspot.

It comes with a coffee pot and mounting bracket.
You just need to get a 5" clay flower pot, Made in Mexico (they hold up)

Place the pot on the burner upside down, and turn on the lowest flame.
Cabin air comes in the bottom large opening, and comes out the top little hole accelerated which circulates the air in the cabin unit.

RIGHT NOW many people are freaking out...OMG CO poisoning...yep,
if you are stupid (won't open one of your many windows, crack a roof vent, or buy a CO alarm)
you might die....but then you might run from a mountain lion.

http://www.forespar.com/onlineCatalog/2009/Sailboat/sailing_miniGalley2009.shtml

Anyway Ella & I are headed up to some BLM land , rain or shine Friday after work.

Eric
 
D

Deleted member 9101

Guest
It looks like you had a good trip, nice pics. I like the side doors !

It comes with a coffee pot and mounting bracket.
You just need to get a 5" clay flower pot, Made in Mexico (they hold up)

Place the pot on the burner upside down, and turn on the lowest flame.
Cabin air comes in the bottom large opening, and comes out the top little hole accelerated which circulates the air in the cabin unit.

Eric
Thats better than a candle in a coffee can that I have used for years... thank you for the tip.
 

Lumberjack

Adventurer
Cool Build!

Just a thought on the tire rub issue. I think you can offset the centering pin on the axle and leaf springs, moving the axle back. I think waggy's did this. 1/2" straight back would make a big difference and if your changing springs anyhow it would be easy at that point. If it is less than an inch the driveshaft should be ok.

Now why did I sell that welder... darn apartment livin,

Dennis
 

TWHuntFish

New member
Evan,
It comes with a wall / bulkhead mount. so it hangs level.

I mounted the bracket on the wall just inside my door, and the burner gimbal frame slips into it. I won't travel with it swinging around ,it will be removed.

The Mr. Heater little buddy can be wall mounted, above sleeping bag level, but gets way to hot for me.

Have you considered air bags to help your tire rub, and help with load capacity.

Eric
 

Forum statistics

Threads
187,952
Messages
2,900,278
Members
229,233
Latest member
cwhit5

Members online

Top