EarthRoamer XV-JP "Northwest Edition"

PaulJensen

Custom Builder
Jeep Earth Roamer – Part 1

OK, the story continues...

Mike has handed over the keys to me so I can put a shine and polish to the inside...Mike has a great plan that he has fine tuned to prime efficiency... I've presented a few original ideas that Mike has allowed me to pursue...You'll see...

I've been busy finishing some residential carpentry and I just finished with a hollow-wood-stand-up-paddleboard workshop here in Olympia and now that I'm free of those commitments, my energy is focused on finishing the Earth Roamer...

Enough prelude, let's get started...

P1100212%25255B5%25255D.jpg

(above) Noon plus a couple of ticks…Right on time…The morning was sub-freezing and I wanted it warmer than that to start the “work”…


P1100213_thumb%25255B2%25255D.jpg

(above)…Which is, this…


P1100214_thumb%25255B2%25255D.jpg

(above) Mike’s Jeep Earth Roamer...


P1100215_thumb%25255B2%25255D.jpg

(above) As tricked out as they come…


P1100216_thumb%25255B2%25255D.jpg

(above) If it fits, it’s in here…


P1100217_thumb%25255B2%25255D.jpg

(above) Designed for extended excursions to where roads simply don’t exist…


P1100218_thumb%25255B2%25255D.jpg

(above) Long story short…Mike got it used for under half the MSRP…


P1100219_thumb%25255B2%25255D.jpg

(above) My work is to finish out the inside…


P1100220_thumb%25255B2%25255D.jpg

(above)And it begins in here…


P1100221_thumb%25255B2%25255D.jpg

(above) But first, I review the official “Scope Of Work”…


P1100222_thumb%25255B2%25255D.jpg

(above) Today, my goal is to make a very accurate full size pattern of the floor…


P1100223_thumb%25255B2%25255D.jpg

(above) These batteries are in the way so I’ll get them out…


P1100224_thumb%25255B2%25255D.jpg

(above) Next, using hardboard, hot glue and masking tape, I create a very accurate pattern…


P1100225_thumb%25255B2%25255D.jpg

(above) Crude but spot on…


P1100226_thumb%25255B3%25255D.jpg

(above) I didn’t use any measuring tools to make this…Way more accurate that way...


P1100227_thumb%25255B3%25255D.jpg

(above) Pulled out and on the driveway slab…


P1100230_thumb%25255B2%25255D.jpg

(above)…Then onto the work table…I’ve laid onto the pattern the components that will be built into the interior…From left to right: A Porta-Poti, a powered ice chest, and a couple of “house” batteries…


P1100231_thumb%25255B2%25255D.jpg

(above) With such a small space, fractions of an inch are worth fighting for…


P1100232_thumb%25255B2%25255D.jpg

(above) Mike’s plan looks like a winner…


P1100233_thumb%25255B2%25255D.jpg

(above) Even room for a 4# propane tank…


P1100234_thumb%25255B2%25255D.jpg

(above) Yes, it’s all making perfect sense…


P1100235_thumb%25255B2%25255D.jpg

(above) Tight is right…


P1100237_thumb%25255B2%25255D.jpg

(above) From the hot glued hardboard pattern, I made a temporary floor / working pattern of 1/2” OSB…The finish floor will be teak…


P1100238_thumb%25255B2%25255D.jpg

(above) After the weeks of planning, it sure is nice to finally see everything working out as planned…


P1100240_thumb%25255B3%25255D.jpg

(above) Late in the day and I’m feeling great about how it all will come together…

More later…
 

kjp1969

Explorer
So totally looking forward to this.
Propane inside? Hmm. . . I'd put it on the rear rack and connect when needed, but I'll defer judgment for the moment.
 

ersatzknarf

lost, but making time
WOW ! This is great stuff ! ! ! Really looking forward to this, too.
Agree, propane inside should be in a marine locker, just like Mike's Sprinter... So, you guys already know that ;)
 

mhiscox

Expedition Leader
Agree, propane inside should be in a marine locker, just like Mike's Sprinter... So, you guys already know that ;)
Yeah, we've done this enough that we're not about to incinerate ourselves. The tanks--Paul now thinks we can fit two of them and still get them in and out through the former cassette toilet hatch--will be in a completely sealed "locker" space, vented through the floor and accessible only through the outside hatch. So the propane will, essentially, be "outside" of the cabin, while avoiding the issues that arise with fully external tanks.
 

ersatzknarf

lost, but making time
Hi Mike,
That's a great solution to reuse the now defunct cassette hatch.
Dumb question, if I may please...
Is the porta-potti in that location only for transit ?
Just wondering because it is right next to the fridge.
Again, just a dumb question.
 

mhiscox

Expedition Leader
Is the porta-potti in that location only for transit? Just wondering because it is right next to the fridge.
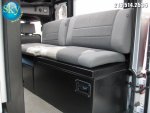
The original layout from ER had the two side by side, but you had to remove the bench cushions and lift a cover to get to either the fridge or the toilet.

ER31.jpg

ER38.jpg


Paul and I are going to set it up so both the fridge and the toilet (each of which probably will have their own compartment) will be on sliding bases under the fixed bench top. So you just pull either one of them into the center aisle to access them and then slide them back out of the way when you're done.
 
Last edited:

kjp1969

Explorer
completely sealed "locker" space, vented through the floor and accessible only through the outside hatch. So the propane will, essentially, be "outside" of the cabin, while avoiding the issues that arise with fully external tanks.

Elegant solution.

Is the porta-potti in that location only for transit ?
Just wondering because it is right next to the fridge.
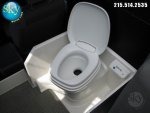
Don't worry, there will be a night light. :sombrero:

Couldya post up an image of the scope of work? I'd like to snoop. . .
 

mhiscox

Expedition Leader
Couldya post up an image of the scope of work? I'd like to snoop. . .
Well, not quite yet, as Paul and I expect that we'll need to change plans as we find out certain ideas won't work, and we'd rather figure that out ourselves rather than have the ever-alert ExPo inmates tell us. That said, though, I suspect that it won't be more than a week or two before things will be locked down enough that the whole plan will be revealed.
 

ersatzknarf

lost, but making time
The original layout from ER had the two side by side, but you had to remove the bench cushions and lift a cover to get to either the fridge or the toilet.

That's right, forgot that one - it has been a while ;)


Paul and I are going to set it up so both the fridge and the toilet (each of which probably will have their own compartment) will be on sliding bases under the fixed bench top. So you just pull either one of them into the center aisle to access them and then slide them back out of the way when you're done.

That's a very nice solution. With the toilet, hope there'll be some way to lock it in position... :Wow1:
 

PaulJensen

Custom Builder
Mike sent me this and I'm posting it here...

"There's only one possibly confusing thing in the picture captions that you might want to change for the Portal post . . . It is true hat I got the original vehicle three years ago for just a little over half of what EarthRoamer probably sold it for, but there's been about $35K in work and parts since then, much of it explained in the thread. So as it sits, before your work, it's a $100K investment, rather than the $65K to secure the base vehicle."

More later...
 

PaulJensen

Custom Builder
Earth Roamer - Part 2

P1100241_thumb%25255B2%25255D.jpg

(above) Nine plus one is today’s starting point…Still below freezing outside, but I have a plan…


P1100242_thumb%25255B2%25255D.jpg

(above) Before I opened the heated garage I worked on a pet project, making a better surfboard…


P1100243_thumb%25255B2%25255D.jpg

(above) Out in the colder world, the Jeep is as I left it last night…


P1100245_thumb%25255B2%25255D.jpg

(above) Components in place but not fully defined…


P1100246_thumb%25255B2%25255D.jpg

(above) To ease the day into full comfort work mode, the coffee is steaming and the space heater (way up front) is dialed to 1500 watts with full fan……


P1100248_thumb%25255B2%25255D.jpg

(above) I think this cord will get a lot of use…


P1100249_thumb%25255B2%25255D.jpg

(above) Alright, today’s plan is to make an OSB full scale bench cabinet…Maybe more…


P1100250_thumb%25255B2%25255D.jpg

(above) I transferred the floor pattern onto a sheet of OSB and laid the components atop of it…Next I glued and stapled the back wall vertical piece to the base piece…


P1100252_thumb%25255B2%25255D.jpg

(above) A couple of framing squares hold the back piece in perfect alignment for marking the panel sizes...Again, the less you use measuring tools, the more accurate the work...


P1100253_thumb%25255B2%25255D.jpg

(above) Next I made a mock-up of the slider base for the toilet…It will have 300# drawer guides that allow it it to pull out and be used without any concern for load capacity…You know what I’m sayin’…???…


P1100254_thumb%25255B2%25255D.jpg

(above) Next I put a vertical panel in place that will be there to mount the drawer guides for the toilet and the ice-chest…


P1100255_thumb%25255B2%25255D.jpg

(above) Ice chest pull-out base made and in place…Vertical panel in place…Battery in place…So easy doing it this way…


P1100256_thumb%25255B2%25255D.jpg

(above) Now it’s moved into the Jeep and a top is scribed to the walls, cut precisely, then tacked in place…I’m deciding whether the battery compartment should be like this….


P1100257_thumb%25255B2%25255D.jpg

(above) …or this…???…


P1100258_thumb%25255B2%25255D.jpg

(above) Choices, choices…


P1100260_thumb%25255B2%25255D.jpg

(above) Next, the driver side cabinet has been cut down… The existing cabinet was /is end grain balsa with fiberglass on both sides..Cutting it was more than just a sharp handsaw situation…Power was needed…


P1100263_thumb%25255B2%25255D.jpg

(above) I also cut out the square steel tubing that did nothing (since the roof lifting method was changed)…

P1100261_thumb%25255B2%25255D.jpg

(above) And this is as it looks when I said “Enough for today”…

More later…
 

Forum statistics

Threads
188,206
Messages
2,903,768
Members
229,665
Latest member
SANelson
Top