Finally starting my m416 trailer build

RAZORBACK

Observer
M416

I've not done a spring over... I could be wrong (it's been known to happen before), but it sounded like from the threads I linked to above about m416 shocks that I'd be ok with these Rancho shocks as a direct replacement. Hope to find out within the next week or two and report back.

Welcome to ExPo, Razorback! Start a thread and show us your build. I'm sure everyone would enjoy following your progress.

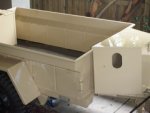
Thanks for the welcome! I will take some more pics today and start a thread when I get the fenders back from the powdercoater and tub back from the sandblaster.
 

telwyn

Adventurer
Started working on the Chaser Nose Box wiring today. Want to get everything cut and laid out and then I'll have it painted to match and actually install everything after that.

You can see where I'll have two black switch plates on the side. One plate will have 3 waterproof toggle switches and led power lights above. The other plate will have two Marinco 12v waterproof outlets and also two dustproof (but not waterproof) usb outlets per this thread. Also on the outside will be the National Luna battery monitor.

On the inside will be the Optima battery using an AT battery tray, the Bluesea 6 terminal fuseblock and the Radioshack hobby box I'm using to enclose the usb circuity (converts the 12v to 5v for usb).

Am working with a friend of mine who runs www.thesolarpowerstore.com to get a solar panel tender for the battery. Already have a shore power tender.

More pics to come but here's a few teasers now of the items mentioned above.
 

Attachments

  • 1.jpg
    1.jpg
    42 KB · Views: 477
  • 2.jpg
    2.jpg
    43.7 KB · Views: 386
  • 3.jpg
    3.jpg
    35.1 KB · Views: 347
  • 4.jpg
    4.jpg
    33.8 KB · Views: 341
  • 5.jpg
    5.jpg
    38 KB · Views: 324
  • 6.jpg
    6.jpg
    42 KB · Views: 355

telwyn

Adventurer
My used Land Rover bumperettes from RoversNorth arrived today. Not an exact match to the MOD ones on the back of the Lightweight, but close enough.

Am going to clean them up (no rust, just flaky paint), get them painted and install them on the back of the trailer. The bumperettes are primarily for protection but also somewhat to better tie the styling of the trailer to the Rover.

When I bring the trailer back in to have the lid (yet to be built) and nose box painted to match, I'm going to have the frame redone (should have thought of that I went I did the original sandblast and paint) in black.
 

Attachments

  • IMG00322.jpg
    IMG00322.jpg
    65.8 KB · Views: 328
  • IMG00321.jpg
    IMG00321.jpg
    611.6 KB · Views: 294

krick3tt

Adventurer
M416 trailer rebuild

There is an M416 site with lots of pictures of other rebuilds. Yours looks good and very professionally done.
Do you have enough room between the new box and the back of your truck when going down a steep depression. The trailer will be very close as you go down and back up. I have noticed it on my rig.
I bought mine with a spring over already in place but I did have to redo the handbrake cable attachments underneath.

Happy trails,
Morris
73 Pinzgauer 710M, M416 MM trailer
 

telwyn

Adventurer
Still plodding along on my nose box wiring job and mulling over whether to buy the lid from eleblanc... but had a blast using the trailer today with my 5 year old to go kayaking in Tampa Bay. Hauling the kayaks will be much easier once I install a lid and add the roof racks I bought from AT, but still very functional this way...
 

Attachments

  • 4.jpg
    4.jpg
    53.7 KB · Views: 279
  • 3.jpg
    3.jpg
    57.6 KB · Views: 275
  • 1.jpg
    1.jpg
    67.4 KB · Views: 337
Last edited:

Faramir66103

New member
Hey Telwin, I'm going to be heading down this same route in the not too distant future. Could you give me a ball park figure on what it cost you to have it sandblasted and painted? Also, how much disassembly did you do for the blasting/painting? How long did it take?

Thanks,
Adam
 

telwyn

Adventurer
I'm sure I way overpaid on the sandblast and paint.

Tried for a while to find someone in St. Pete that I thought would do a good job and ended up picking a guy at a nearby paint and body shop that was doing a complete restoration on a Rolls Royce in his shop. Figured if a Rolls owner would entrust that car to him, I could trust him to do a great job on the trailer.

He had the trailer for about a week and I honestly don't know how much time it took to dissemble, but he sandblasted it, painted the entire tub in Por-15 rust preventative paint and then repainted the entire trailer.

Total cost was about $750 which I'm sure will make everyone gasp, but I can promise you it's as good a paint job as you'll ever see on an old m416. I figure I'll amortize the cost over the rest of my life.
 

telwyn

Adventurer
Used my day off today to drop off the nose box and jerry can holder at the paint shop to have them painted to match the trailer. Here's the before pictures of the nose box and post # 10 in this thread has the before of the jerry can.
 

Attachments

  • 1.jpg
    1.jpg
    52.4 KB · Views: 359

telwyn

Adventurer
tire/wheel help needed

Getting going again on my build. I'm picking up the painted nosebox on Monday and can then begin the wiring and installation of that.

Have some questions though and need some help. I'm a complete rookie when it comes to tires and wheels.

I have an 82 Land Rover Lightweight with what appear to be standard nato rims. I want to change the m416 wheels to match the bolt pattern and rims on the Rover so the wheels will match and I can share one spare. Exactly what adapters and rims do I need to buy to make this happen? Also, I have some side to side wobble on the trailer and believe I need to repack the bearings. Where do I get bearings for this trailer?

As soon as I get some guidance on what to order and where, I'll have the wheel work done and get the Rancho shocks I bought installed.

Thanks in advance for the help.
 
Last edited:

telwyn

Adventurer
In what continues to admittedly be perhaps one of the slowest trailer mods on ExPo, I picked up the painted AT nosebox and jerrycan holders this past week.

My body shop did an awesome job on these, particularly the large dual jerrycan holder I sourced from a military rover in the UK, EXCEPT the paint shop he used to mix the original desert tan paint we used on the m416, absolutely botched the second round of mixing. So here's a few pics of the good, but wrong color paintjob. I have to haul everything back in to the body shop and the guy is going to redo everything for free. Glad he obviously stands behind his work.

I'm bummed I still can't begin wiring the nosebox yet, but am just going to have to wait a bit longer...

Anyone have any thoughts on my tire questions above?
 

Attachments

  • 5.jpg
    5.jpg
    11.8 KB · Views: 406
  • 1.jpg
    1.jpg
    10.6 KB · Views: 308
  • 4.jpg
    4.jpg
    13.2 KB · Views: 302

telwyn

Adventurer
Mounted a pair of used Defender MOD bumpers that I picked up from RoversNorth on the back of the m416 today. When I finally finish the trailer, I'm going to have the frame painted black along with the bumpers and the tongue. Will look a lot better and tie in with the Lightweight's paint job.

Nosebox and jerry can holders are finally back at the body shop being color corrected from the first try (painter's error). Should be back soon and then I will continue on with the world's slowest build.

p.s. Thanks to all for the pointers on the Rover wheel adapters on my other post.

Here's the bumper on the Lightweight:
http://gallery.me.com/eelwyn#100008/P5260023&bgcolor=black

Here's the bumpers mounted on the m416:
http://gallery.me.com/eelwyn#100008/P5260024&bgcolor=black
http://gallery.me.com/eelwyn#100008/P5260025&bgcolor=black
http://gallery.me.com/eelwyn#100008/P5260026&bgcolor=black
http://gallery.me.com/eelwyn#100008/P5260027&bgcolor=black
http://gallery.me.com/eelwyn#100008/P5260028&bgcolor=black
 

telwyn

Adventurer
Body shop just called! :wings:

The AT nose box, my UK military jerry can holder and my two traditional jerry can holders have all been sandblasted and repainted in the correct color to match the trailer. They've even created a paint in the computer now at the paint shop for my body shop guy called "Body Works Beige" so they won't make the same mistake twice. Will come in handy as I get the yet to be built lid painted and eventually paint the Rover to be a perfect match.

Pics this weekend after I pick up the body parts tonight.
 

telwyn

Adventurer
Picked up everything from the body shop. I think the repaint on the AT nosebox and jerry can holders turned out well. :victory:

The large rectangle is the UK MOD jerry can holder off of a Land Rover. As pictured, I think I'm going to bolt it to the bottom of the bed and the tail of the trailer to hold it in place and believe it should be at the back of the trailer to help balance out the weight of the nosebox on the tongue. Particularly since the nosebox is going to house the battery, 12v sockets, etc. I'll finally be able to do the nosebox wiring this weekend now that the paint is finally done.

The nosebox will be a little tricky mounting it to the short tongue, but I think I can do so in a way that still allows the lid to be opened even when I eventually have a lid on the trailer.

Does the jerry can holder placement make sense?

The two US Army style jerry can holders may go on the Rover. Undecided on that.

Pictures below or here.

p.s. The paint does match perfectly in person even though in one of the pictures it doesn't.
 

Attachments

  • 3.jpg
    3.jpg
    17 KB · Views: 192
  • 5.jpg
    5.jpg
    15.4 KB · Views: 197
  • 6.jpg
    6.jpg
    20.5 KB · Views: 289
  • 4.jpg
    4.jpg
    14.7 KB · Views: 161
  • 7.jpg
    7.jpg
    15.3 KB · Views: 190
Last edited:

telwyn

Adventurer
Started working on the wiring for the nosebox today.

1) Installed two flat switch panels from Off Road Controls. Switches and leds also came from Off Road Controls.
2) Installed a 6 fuse Bluesea fuseblock and the Radio Shack box holding the 12v to 5v USB circuit board with dustproof usb sockets. The usb components are from One Half Watt Electronics.
3) Installed the battery tray mount from AT.
4) Installed the National Luna battery monitor from Paul May at Equipt Expedition.
5) Still need to wire the switches to the fuseblock and drill in the two Marinco 12v sockets and the holes in the panel for the usb sockets.

The switches will connect to trailer and power led spot lights, etc that are tbd. Will also wire to the trailer for the Waeco CF-50.

Finally feel like I'm making some progress. Pics here.
 

Forum statistics

Threads
187,610
Messages
2,895,857
Members
228,596
Latest member
donaldsonmp3

Members online

Top