Finally starting my m416 trailer build

telwyn

Adventurer
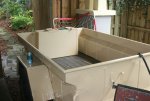
A little more work today on the trailer.

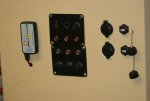
1) Installed 2 Marinco 12v sockets and 2 usb 5v sockets on the nosebox.

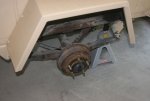
2) Installed one of two Rancho RS5000 shocks on the trailer. Other one has a stubborn stuck cotter pin I'm still working on so I can get the old shock removed.

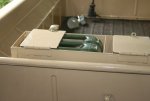
3) Installed the dual jerry can holder. I think it fits nicely. Mounted it in the rear of the trailer to help balance out the nosebox once it goes on front. It's a tad off-center so as not to cover the rear drain hole.

Hopefully some more time to work on this again in 2 weeks.

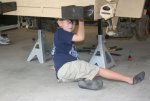
p.s. Don't worry, it was jacked up very, very safely and no risk to having my 5 year old helping with the socket when bolting on the jerry can holders.
 

Attachments

  • 1.jpg
    1.jpg
    32.6 KB · Views: 419
  • 9.jpg
    9.jpg
    37.3 KB · Views: 337
  • 12.jpg
    12.jpg
    26.4 KB · Views: 355
  • 13.jpg
    13.jpg
    45.7 KB · Views: 348
  • 21.jpg
    21.jpg
    22.5 KB · Views: 356
  • 6.jpg
    6.jpg
    39.7 KB · Views: 367

telwyn

Adventurer
Finished the wiring today for the 5v USB chargers and successfully charged my blackberry from it. Not rocket science of course, but pretty proud to have successfullly wired the battery to the bluesea fuseblock and from there to the 12v to 5v usb circuit.

Also ordered some stainless steel square tube from McMaster-Carr that is 12 inches in length and 1 inch thick to mount between the nosebox and the tongue. Will give the nosebox a mounting point on the tongue while also elevating it above the lunette otherwise I wouldn't have enough clearance to keep the nosebox level.
 

telwyn

Adventurer
5v USB sockets

Visit One Half Watt Electronics. They sell a prewired circuit board that converts 12v to 5v and then can handle from 1 to 4 usb ports connected to it which they also sell. They are designed as far as I can tell for automotive use. I'm also going to install a pair on the dash of my Land Rover Lightweight.

This is one of the most customer service friendly companies I've come across. They respond quickly to questions and are happy to help. Might email them and see what they say about 6v.

I bought a small plastic project box from Radio Shack to house the circuit board and drilled holes and ran the wires to the fuseblock and usb plugs through grommets I put on the box. Will seal it with silicone now that I know it works...
 

telwyn

Adventurer
Nosebox install

Almost done with the nosebox install. Received the McMaster-Carr 12 inch long, 1 inch square stainless tubes that I needed to bolt to the tongue to give enough clearance for the nosebox to sit level.

Boy did I miscalculate a few things:

1) These steel bars might be a bit too robust. They are 1/8 inch thick which sounded strong when ordering, but I didn't consider how hard they would be to drill.
2) My electric drill only goes up to 3/8 and I had already started the drilling of the holes on the tongue and the bars with the 1/2 inch drill bit (wanted some robust bolts!). I've got a great 18v 1/2 inch Snap On cordless drill, but it takes a LONG time to drill each hole through the bars and the 1950s era electric my dad gave me as a kid wouldn't hold the larger drill bit. Would have certainly speeded things up if I had simply used 3/8 to begin with.
3) I finished 5 of 6 holes yesterday and then snapped my 1/2 inch drill bit on the 6th hole! :Wow1: That's a big bit to snap. Glad I was wearing safety glasses and drilling across the trailer corner so I had some armor! I'll be checking with my Snap-On Dealer (my step-dad) on a warranty replacement.

Next step after this is to create a cardboard template of the bottom of the AT nosebox and line it up with the tongue and bar supports to determine where the 4 mounting holes on the bottom of the nosebox need to go. I'm using neoprene washers to cushion this a little bit also. Seems to all come together nicely if I can just get my last hole drilled.

So no pics yet since I have one more hole to drill before I can get everything bolted on.

I'm clearly a rookie when it comes to all of this and it's taking me forever, but at the end of the day I'll be proud I've done most to all of the work myself and will also be comfy doing field repairs because I'll know my system inside and out... :coffeedrink:

More soon.
 

telwyn

Adventurer
Made a little more progress:

  • Nosebox is on. Mostly wired, still need to wire the 12v sockets and eventually the switches that will control the AT led worklights on the roof rack and also run another 12v socket through a grommet in the back of the nosebox to the trailer bed where I'll place my Waeco CF-50.
  • Stickers are on. Fuel stickers for the jerry can holder, reflectors for the trailer and a few logos on the side of the nosebox.
  • Cross bars are on. Until I build the lid and mount the AT cross bars to it, I'm using Yakima mounts and bars with Thule saddles. This set up perfectly carried 4 kayaks last weekend. Will use the Thule saddles and/or my baja rack with the AT crossbars after the lid is built.

Next up will be the pioneer tool kit I ordered for the rear of the trailer as done on a few other builds on ExPo.

I also finally figured out how to paste the pictures directly into the thread so hopefully it will be a little easier to follow my build...

IMG_4820.jpg


IMG_4812.jpg


IMG_4805.jpg


IMG_4818.jpg
 

telwyn

Adventurer
Leaving this afternoon for the maiden voyage (as in finally outside of the neighborhood) for the trailer. Headed down to kayak and fly fish the Everglades. All highway but a good trip nonetheless.

Lots more to do on the trailer but good to get it in use.

Pics to follow.
 

dport

Adventurer
Looks great, there's nothing like taking your time on a project. when I take my time on something, it's usually results in 15 different projects piling up all at once, hence my nickname "PROJECT MAN" :coffeedrink:
 

telwyn

Adventurer
Several folks have pm'd me with questions about the kayak rack system. I replied to those but also posted here since others may be wondering as well.

The towers and crossbars are ones I'm reusing from the 99 Land Rover Discovery 2 I used to own. It's the Yakima Low Rider towers. They are designed to clamp around the factory crossbars.

Never expected them to work on the m416, but it's such a perfect fit you'd think they were made for each other. The Low Riders clamp really easily and securely to the rim of the m416's tub.

I then used Thule saddles to hold them to the Yakima crossbar as I greatly prefer the Thule saddles to the Yakima Makos I used to have.

There are also 2 Yakima posts that rotate straight up that let me squeeze two more boats on here if needed for a total of 4.

Longer term I'll modify this system a bit once I get a lid built and will be using 3 AT crossbars that Martyn built for me about a year ago with the Thule saddles.
 
Last edited:

Forum statistics

Threads
186,772
Messages
2,889,995
Members
227,012
Latest member
dalewelsh
Top