Bella PSD
Explorer
Here are a few shots of the storm cover from Flippac. It will defiantly keep you dry. To deploy the cover all you have to do is attach the front of the cover to the flip when its closed. As you open the flip up the storm cover unfolds right on top of the Flippac tent area. Tie it down in the corners and on in the center and that’s all there is to it.


The storm cover does not fit over the back of the camper corner, as you can see in the above and below picture. This is part of the area I enlarged for the rear door and now the cover is about 5” to short. The good news is, even though the cover does not fit the way it was meant to fit from Flippac, the cover does not leak and works perfect as is.

Here you can see one of the openings on the storm cover for ventilation.

And from the inside look out of the storm cover ventilation opening.

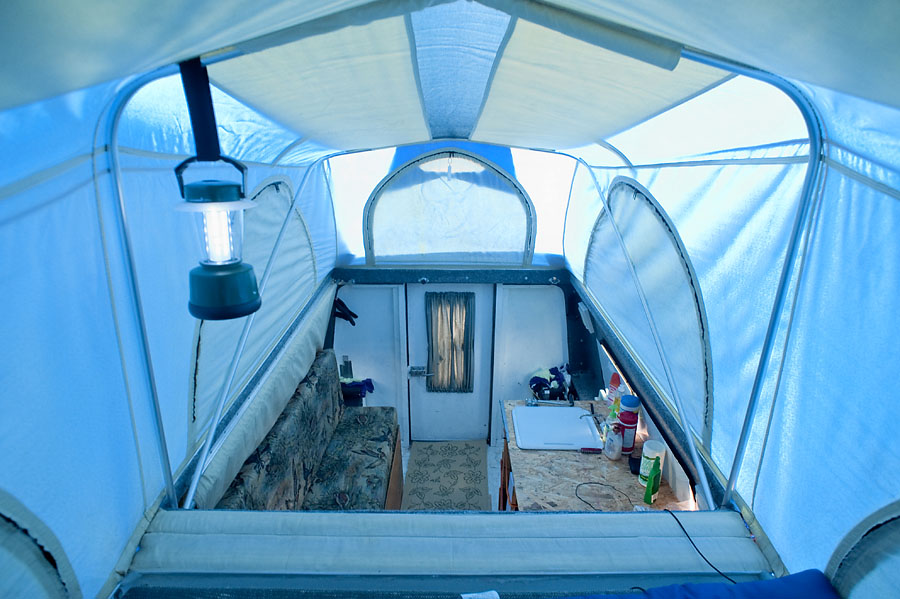
Below is a picture of the inside. Please keep in mind that I finished most of what you see inside in a few hours. It is temporary and will be coming out soon for the permanent interior. I wanted something inside the camper so I could at least use it while I built the outside. This also gave me a chance to charge things around to see what worked and what did not. Like the bed, seat area. That did not work very well. Its too hard to set up the bed and difficult to get to the storage under the bed/seat. I am planning on a 12V Norcold 60L in the spot to the left of the door as you are coming into the camper.

The blue cast in the pictures is from the storm cover. This is the queen size sleeping area above the cab or the part that flips open towards the from of the truck.


Its got to be every bit of 9 feet to the top of the tent!!


The storm cover does not fit over the back of the camper corner, as you can see in the above and below picture. This is part of the area I enlarged for the rear door and now the cover is about 5” to short. The good news is, even though the cover does not fit the way it was meant to fit from Flippac, the cover does not leak and works perfect as is.

Here you can see one of the openings on the storm cover for ventilation.

And from the inside look out of the storm cover ventilation opening.

Below is a picture of the inside. Please keep in mind that I finished most of what you see inside in a few hours. It is temporary and will be coming out soon for the permanent interior. I wanted something inside the camper so I could at least use it while I built the outside. This also gave me a chance to charge things around to see what worked and what did not. Like the bed, seat area. That did not work very well. Its too hard to set up the bed and difficult to get to the storage under the bed/seat. I am planning on a 12V Norcold 60L in the spot to the left of the door as you are coming into the camper.

The blue cast in the pictures is from the storm cover. This is the queen size sleeping area above the cab or the part that flips open towards the from of the truck.


Its got to be every bit of 9 feet to the top of the tent!!


