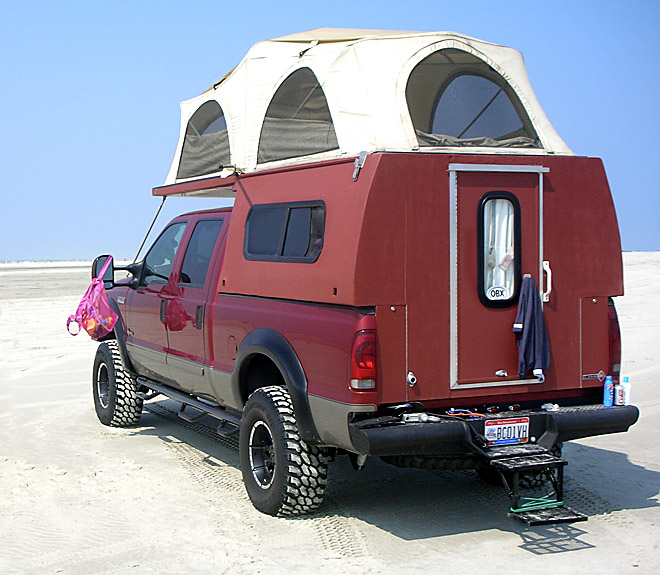
Flip-pac camper build

Bella PSD

Explorer
Consider a digital thermostat. The right one can help with setting and maintaining a more constant temp than the analogs might. (Here's a link.)

Your build is entertaining! Great ideas and execution!

Thanks!! wanderthewest.com!! I spent 3.5 hours there last night reading. Thanks so much. LOTS of ideas rolling through my head because of that site....
Louie
 

Bella PSD

Explorer
In this part of the build I am be completely covering all of the exterior wood that was to build the camper. I am cover all of the wood in fiberglass and then smooth it all out with filler. I am going for rounded corners and have a seamless flow from the existing camper to the new construction. The photos will be from two different fiberglass sections and may not match up sequentially.

In this first two picture I have just rounded the corners with a grinder and 30 grit. Keep in mind that everything from the bottom of the back window down is all new.
Camper_Build_7-08_002.jpg


This was just before the fiberglass went on. I have prepped the camper with a boat type sealer.
Camper_Build_7-08_003.jpg


Here the back of the camper showing the prep sealer. All that hard work getting that door just right went right out the window….But the door had to come off because I wanted to seal and fiberglass under the frame work.
Camper_Build_7-08_005.jpg


No pictures of the fiberglass work. Got busy and was in the zone. Just forgot…Anyway, in this shot you can visible see four different color layers of filler. Trust me there are more. All together there are over 7 gallons of filler and one layer of fiberglass and sealer. Although most of the filler was sanded away, the filler and fiberglass are sanded down to about 1/8 to 1/16 inch thick on average.
Camper_Build_7-08_010.jpg


It's hard to believe this was an ordinary truck cap just a few weeks back…..
Camper_Build_7-08_009.jpg


This is one of the few pictures I have of the exposed bodywork before I primed it. It really is starting to take shape. The new camper body now is seamless, smooth and watertight.
Camper_Build_Torsion_Bar_7-08_016.jpg


This is a shot that shows the rear access doors. They are the ones on either side of the main door. The one on the right is opened up. There is a ton of storage space inside there when the camper is mounted to the truck. You can see the dolly I made too.
Camper%20Flip%20Pac%20off%20028a.jpg


With the rear access doors. I made the compartment so they can be closed off, key locked and water tight.
BellaPSDcamper.jpg


Here is a shot of the camper from the front, fully loaded up and ready to camp. I left the jacks on the camper for this trip. I can also pull the pins for the jacks and store them in the side access compartments.
Ford%20and%20Flip%20Pac%20camper%20.jpg


In this shot you can see a big problem!! The torsion bar snapped! The flip can be raised without it BUT it's not easy. Good to find out at home and not out camping. It's about $275 for a new torsion bar and cover from Flippac. I ordered a new one and need to get it on.
Flip%20Pac%20Torsion%20bar%20004.jpg


I think it's about time for a trip report! I have been building this camper for some time now and I am ready to enjoy it. First trip…. 5 days camping on the beach, Core banks NC.
 
Last edited:

eugene

Explorer
Do you still have the starcraft camper that was hit and are you selling any parts off of it? I need a set of the latches that hold the roof down, I'm missing one and the rest are bent up and painted over.
 

Bella PSD

Explorer
Do you still have the starcraft camper that was hit and are you selling any parts off of it? I need a set of the latches that hold the roof down, I'm missing one and the rest are bent up and painted over.

I don't think I took those off before a bull-dozer pushed it over a cliff at the local dump:Wow1:

I will have to look through my box of parts left over from the camper. I do have the pop up canvas in near new shape and a near new 3L 3 way fridge.

Louie
 

Bella PSD

Explorer
Continuing on with the troubled Torsion bar….

I will label this part of the thread “Flip Pac torsion bar replacement”

I contacted FRP and was first told the bars were back ordered several months. I never ordered one and called back a month or so later. The bars came in and were sold out that fast. I was SOL!!!! I called Diane at Flip Pac and asked if there is any way to still get one without waiting months. They ended up sending me one from a build they had going. Cost was $265 plus I needed the aluminum cover that slips over the bar. That's added $20 plus tax and shipping came to a little over $300.

Now that I had the parts I need to get flipping again, I had to come up with a way to install the bar. Flip Pac recommends using a hoist, crane or lift to suspend the lid perpendicular as the bar is removed and installed. That would mean 20' plus high interior space or parking outside under a BIG tree?? I was stumped as to how to get the torsion bar out and back in without damaging the tent while it is suspended.

Here is how I did it……

Step One.
Undo the round insert cap on the driver's side. Hammer out the old torsion bar from the driver's side to the passenger side. If the bar is cracked in half there is no fear of the torsion built into the spring bar.

NOTE* If the torsion bar is still live sprung, start with removing the live bar at the end of step 9**(very important). Live bar removal will be steps 7,8,9,1,2,3,4,5,6,10


Step Two.
Hammer the driver's side of the new torsion bar through the passenger side mounted splines. Position the new bar as seen in this photo.
Camper_Build_Torsion_Bar_7-08_003.jpg

Camper_Build_Torsion_Bar_7-08_001.jpg


Step Three.
Tap the bar all the way to the driver's side but not into the driver's side splines. Position as seen in this photo. The idea here is to have the bar “free floating” for now.
Camper_Build_Torsion_Bar_7-08_008.jpg


Step Four.
Slide on the filler piece that's goes on the inside of the passenger side splines. Now tap into place.
Camper_Build_Torsion_Bar_7-08_006.jpg


Step Five.
Prepare the bar for the aluminum cover. I used electric tape for a tight fit and to keep the bar from spinning and rattling around in the wind. Now slide the aluminum cover on from the drivers side..
Camper_Build_Torsion_Bar_7-08_009.jpg

Camper_Build_Torsion_Bar_7-08_010.jpg


Step Six.
Position the bar so it is ready to slide into the driver's side splines. Tap the bar into the drivers side splines about 3/8”. Taking care not to have the passenger side splines engage. This is very important. What we are doing here is creating a mounting point for the bar on the driver's side only. That way it will not build up any twist or torsion when the flip is raised.
Camper_Build_Torsion_Bar_7-08_004.jpg

Camper_Build_Torsion_Bar_7-08_005.jpg


Continued in next post....
 
Last edited:

Bella PSD

Explorer
Continuing on to next set of steps.

Step Seven.
Unlatch the flip and raise it up about 2-3 feet up in the back. Support the flip open with a 2x4 as it will be fairly heavy and will come crashing down without some kind of support.
Camper_Build_Torsion_Bar_7-08_015.jpg


Step Eight.
Tie off a rope around the back of the flip leaving about 20 feet of rope to pull from. This will be used to lift the flip Perpendicular.
Camper_Build_Torsion_Bar_7-08_014.jpg


Step Nine.
This is were it all comes together! The idea is to lift the flip perpendicular to the cap but not past perpendicular. To stop the flip from flipping to far I parked the camper next to the house. Had my wife PULL as I pushed with the long 2x4. Once the flip is perpendicular its very balanced and easy to hold in that spot. Now that I have the flip in the right spot you might be wondering what’s happen to the new torsion bar. Nothing at all has happen to it. It’s only anchored to the driver’s side and has no twist at all to it(just spins). The main purpose for the bar up to this point is to hold the camper to the tent top. This is now the correct spot to install the new torsion bar or remove a live torsion bar (**reference to step 1, live torsion bar).
Camper_Build_Torsion_Bar_7-08_016full.jpg


Step Ten.
Tap the torsion bar all the way in on the passenger side as the flip is ½ way open. This now anchors the bar in two places (flip top and cap) and will now develop twist on its way down over the truck cap and on its way down to closed.

**note What is not shown with pictures is the flip actually perpendicular. I had my hands full with the tapping in of the new torsion bar and no way to snap an image;)


That’s it!
Camper_Build_Torsion_Bar_7-08_017.jpg
 
Last edited:

Bella PSD

Explorer
One last note, this is a very good time to clean out the sealant around the mounting points for the torsion bar. They can be a source for leaks and the best time to reseal them is when the bar is removed. I actually removed the torsion bar mounting points from the camper, cleaned out all the out sealant and reinstalled them with new sealant.

Louie
 

SGNellett

Adventurer
Louie,

That thing looks awesome! I wish it would have been around when I was there, I'd love to have seen it, although something tells me it would have been a MUCH longer day if it were there!
 

Forum statistics

Threads
188,023
Messages
2,901,286
Members
229,411
Latest member
IvaBru
Top