Ford Transit build out

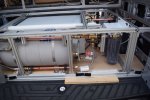
Galley cabinet rough frame, the refrigerator will sit next to the Jerry can and grey water tank
DSC_0481.jpeg
I removed the Dometic Brisk Air 2 air conditioner and got a Kingtec DC powered ac. It pulls about 35 amps. It is comparable to the Brisk Air but much quieter, it doesn't put out as much air flow. I think the fan is about 200 CFM less, but it puts out a good amount of cold air, compared to to brisk which put out more cool air.
DSC_0491.jpeg
Maxxair fan going in where the old air conditioner was (that was convenient)
DSC_0499.jpeg
Water tank fill roughed in with 1 1/2" with a 2" 45 at the top in case I have to fill with 5 gallon jugs. I will make some sort of funnel and I have a 2x3/4 adapter so I can fill with a garden hose as well
DSC_0530.jpeg
The inverter showed up finally and I mounted that on the 80/20.
DSC_0534.jpeg
 
Bed platform above the AT drawers and chuck box
DSC_0539.jpegDSC_0547.jpeg
DSC_0548.jpeg
Hooked up the batteries with the mini BMS (Battery Management System)
DSC_0550.jpegDSC_0553.jpeg
Main and sub AC panel
DSC_0559.jpeg
For the plumbing I used Pex and copper pipe and tested the pump and got the water on!!
DSC_0587.jpegDSC_0588.jpegDSC_0589.jpeg
 
What kind of water tank is that ? Cool build so far. A lot of work.


Sent from my iPad using Tapatalk
 
TT,
Its a Plastic-mart tank 25 gallons. It comes pre-drilled with outlet, vent outlet and fill inlet or they can custom make you one any size with the fittings placed anywhere you want.
I probably should have looked around a little harder for one with baffles in it, I'm not sure if it's going to be an issue yet. Thanks man! Yes it has been a lot of work but its been a lot of fun at the same time.
Thanks for looking
 
Nice quality work. Photos are great.
What is the capacity of the battery bank?
Probably good to make a cover for it.
 
Last edited:
Nice quality work. Photos are great.
What is the capacity of the battery bank?
Probably good to make a cover for it.

Hey Hein-
Does the insulation look familiar? I stopped by your place a few months ago to pick it up, works great by the way, a lot less noise and the heat takes longer to get in and easy to work with/install. I'm not sure what else you could ask for in a product. 1000 Amp hour capacity and I've got some covers in the works thanks for the suggestion.
 
Vandit (Awesome screen name BTW)
Thanks man I really appreciate the props. Defiantly more to come I'm about two weeks behind on the blog so updates for sure. I had a big milestone on Friday and am happy with the progress so far.
Thanks for looking!
 
Time for an update. The big green semi arrived and had this in the back. A folding sofa from RB Components, very comfortable, relatively light and fairly easy to mount.
DSC_0594.jpeg DSC_0598.jpegDSC_0600.jpeg
Here I'm working on the a/c portion of the electrical system, on the other side is the d/c side and in the middle is the amp meter
DSC_0609.jpeg
Plumbing is finally finished
DSC_0612.jpeg
Main a/c panel, sub panel, outlet, amp meter, inverter isolating switch and vent for inverter.
DSC_0619.jpeg
 
Plumbing and electrical getting closer to being finished
DSC_0620.jpeg
Amp meter hooked up and fused (not sure if it needed to be fused or not)
DSC_0635.jpeg
I don't even want to say how long it took me to make and install this upper cabinet. The walls are reasonably flat (slight inclination in toward the center) I would probably pull my hair out if I had to do an Econoline van.
DSC_0638.jpeg
Amp meter on and tracking amps
DSC_0640.jpeg
Took a little drive to Aluminess in Southern California. Pic of the new sexy rear end. Bumper, swing out tire carrier and galley box
DSC_0641.jpeg
Tug em strap and shackles storage?
DSC_0642.jpeg
Rear closed
DSC_0644.jpeg
 

Attachments

  • DSC_0612.jpeg
    DSC_0612.jpeg
    76.3 KB · Views: 91
Roof rack and ladder. I'm going to relocate the ladder aft as far as possible, now it puts you right on the solar panels
DSC_0647.jpeg
Mesh on the rear portion of the rack
DSC_0649.jpeg
Slats under the solar panels
DSC_0650.jpeg
Laying down some underlayment for the heated floor film
DSC_0659.jpegDSC_0660.jpeg
Heated floor film down and secure. In hindsight I should have tested it at this point.
DSC_0663.jpeg
6 mil over the heated floor film
DSC_0665.jpeg DSC_0666.jpeg
 
I used plusnuts to attach the upper cabinets. They worked fairly well and would use them again.
DSC_0674.jpeg
Drill proper size hole, in my case these holes in the passenger side rear worked perfect no drilling needed.
DSC_0675.jpeg
Hold back with wrench and tighter with ratchet until tight
DSC_0678.jpeg
unscrew Plusnut driver and insert 1/4" x 20 bolt for a secure bolting location.
DSC_0682.jpeg
I used 7 or 8 to hang this upper cabinet in the rear it would have been 2 more but I screwed the pooch on 2 of the Plusnuts.
DSC_0683.jpeg
I mounted 4 of these 3 watt "soft" light led's
DSC_0685.jpegDSC_0686.jpeg
And 2 of these bar "soft" light 5 watt lights behind both upper cabinets
DSC_0691.jpeg
 

Forum statistics

Threads
190,918
Messages
2,930,233
Members
234,789
Latest member
Fj89
Top