From Freightliner ambulance to RV - we hope!

rossvtaylor

Adventurer
Not to hijack Ross's thread, but the Honda EU3000i is what I'm planning on using also. Have you discovered any problems with using it, and does it meet your needs as far as the appliances you have?

I would love to see any pictures you have of how you mounted it.


Hijack away! I'm interested, too.
 

rlrenz

Explorer
Your struggles with tires reminds me of my own challenges. Several years ago, I ran into nuts that my 3/4" impact couldn't budge - I needed a railroad shop's 1" IR rattle gun on a 3/4" air hose to budge them. These were Budd lug nuts that seated on a slight taper. I learned that the best way to install them was with a 1/2" gun - that way, when they "locked" on the taper, the 3/4" had enough poop to do the job.

Over the years, other Budd nuts have needed a 10 ft piece of pipe to help the wrench.

My 1999 Freightliner/Medic Master uses Unimount (hub-pilot), so I may find them easier to work with - maybe....
 
Last edited:

rlrenz

Explorer
Regarding colors:

It might be worth leaving the roof white if you decide to use darker colors on the sides. White was recommended by Federal Standard KKK-A-1822E (Paragraph 3.16.2) to minimize the ambulance's cooling load.
 

rwelker

New member
We had issues above 8000 feet starting our A/C unit. The unit is 13500 btu and was a used unit. It starts hard (high amp draw) and that coupled with about 25% capacity loss at 8000 ft didn't work. Honda recommends a rejet above 5000 ft. I tried an oversize capacitor without luck. A polar cub 9200 btu is planned for upgrade very soon which should alleviate the problem. It draws much less at startup. Also we found that the large unit cycled too often due to being far more than needed; it didn't have to run long at all to drop the temp but it wasn't long enough to remove the humidity. At times it felt "damp" in the box. I read another thread on another forum where a gentleman had the same problem on a slide in truck camper. He changed to a smaller unit and problem solved. It got cool in the box, just humid. So we learn as we go. I forgot to mention it also has a NOVACOOL fridge/freezer unit which runs on 12/120 volt.
 

rwelker

New member
attachment.php


This is the only picture I have gotten uploaded; I'll try to do more in the next few days.
 

rossvtaylor

Adventurer
This is the only picture I have gotten uploaded; I'll try to do more in the next few days.[/QUOTE]

That looks nice, but I can't see how the generator is mounted. That's what I'm most interested in here. Thank you for your other input, though! And, yes, we will definitely leave the roof white or maybe even painted silver. We had already decided that.

When we get an awning we will just make sure we park to shade the south-facing side of the box. Given our intended use, awnings on both sides wouldn't be a bad idea. Hmmmm

Back to the roof... we want to have some solar option, but we intentionally decided not to put flexible panels on the roof because we don't want that dark color there.

And, to the wheels. Some of the wheel lug nuts were reasonably tight. But the right rear took everything I had for a couple of those, and there was a time when I thought I wouldn't be able to bust loose a few. But I got it. A longer pipe would have definitely helped. I was heading in that direction, believe me. These are hub pilot rims, by the way.
 

patoz

Expedition Leader
.
We had issues above 8000 feet starting our A/C unit. The unit is 13500 btu and was a used unit. It starts hard (high amp draw) and that coupled with about 25% capacity loss at 8000 ft didn't work. Honda recommends a rejet above 5000 ft. I tried an oversize capacitor without luck. A polar cub 9200 btu is planned for upgrade very soon which should alleviate the problem. It draws much less at startup. Also we found that the large unit cycled too often due to being far more than needed; it didn't have to run long at all to drop the temp but it wasn't long enough to remove the humidity. At times it felt "damp" in the box. I read another thread on another forum where a gentleman had the same problem on a slide in truck camper. He changed to a smaller unit and problem solved. It got cool in the box, just humid. So we learn as we go. I forgot to mention it also has a NOVACOOL fridge/freezer unit which runs on 12/120 volt.

Originally, I was looking in the 9,000 BTU range, but then thought about moving up to the 13,000 BTU range, just to be on the safe side. But based on your info here, I will now go back to my original plan and stay in the 9,000 range. This is something I have not come across before and never even thought of, so you probably just saved me some money and a bunch of headaches. :)

Do you have two A/C units on top of yours, or does the unit behind the 'honey wagon' belong to the RV behind you?


Ross, if you mount solar panels on the roof just be sure to put them on racks of some sort, and leave a couple of inches of space between them and the roof itself for ventilation. Heat is a solar panel's worst enemy! Being able to tilt them to take full advantage of the sun is a real plus also, but then you know all of this already, don't you? :)
 

rossvtaylor

Adventurer
.Ross, if you mount solar panels on the roof just be sure to put them on racks of some sort, and leave a couple of inches of space between them and the roof itself for ventilation. Heat is a solar panel's worst enemy! Being able to tilt them to take full advantage of the sun is a real plus also, but then you know all of this already, don't you? :)

Well, yes I did. :) But that about exhausts my knowledge of solar. I'm a wind guy. And while I've designed systems up to the village scale, I always seek expert opinion on the solar portion. Wind, batteries, charge controllers, sure. Solar? Help!!! Besides, I never mind hearing something again and I learn something new every day. So don't hold back. My full-time job is in wind energy. In fact, this coming Wednesday I leave for three weeks to work in Japan. So we won't get anything done on KETO 1 till I'm back. But as soon as I'm back, we're getting these tires fitted and the suspension work done.

Speaking of charge controllers, I've seen other people mention the MorningStar Tri-Star controllers. Those are about bulletproof. I've installed some in rural India, where maintenance isn't a top priority and reliability is important. They've proven to be very reliable. We'll most likely end up with one in our rig.
 

patoz

Expedition Leader
As I was typing that, I remembered you saying you had done some work in that field, but I thought it was solar.

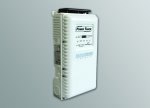
I'm using all Magnum Energy components in my system, and so far I have the MS2012 Inverter/Charger, MMP – Mini Magnum Panel, ME-ARC Remote Control, ME-BMK Battery Monitor Kit, and will add the ME-AGS-N Automatic Generator Start Module when I install the Honda EU3000i generator.

I'm also planning on adding 450-500 Watts of Solar panels to the roof and will add the PT-100 MPPT Charge Controller at that time.

Charge_controller_01_1_0.jpg

All of the Magnum Components are part of an integrated system, and are designed to work with each other. This product line is rated up near the top of the list, however I was wondering if you have any experience or have installed any of it, especially the Solar Charge Controller.

I also see this stuff installed on large Emergency and Command type vehicles and trailers, etc. , as well as in critical function structural installations, so it must be very reliable.
 

rossvtaylor

Adventurer
As I was typing that, I remembered you saying you had done some work in that field... <snip> ...I was wondering if you have any experience or have installed any of it, especially the Solar Charge Controller.

I've used, and seen used, Magnum inverters - they were quality products. But that was Magnum/Power One and I don't know if it's the same company. The ownership had changed, a few years ago, and the branding/logos are different. The stuff you're looking at sure looks nice, but I don't think my experience helps any here.

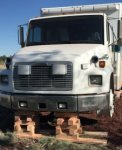
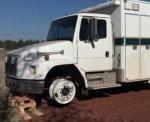
As far as our progress, all I was able to do this weekend was remove the 7 tires and wheels (6 installed and one spare, in left rear cabinet). I had a buyer in Phoenix, found on CraigsList, so I took those down when my daughter and I went swimming in the Valley of the Sun (and heat...). Since I can't wait, of course, I had to fit my 22.5x9 wheels on there and check for fit. I'll do some conflict checking and take track width measurements later. But, in the mean time, the ambulance is up on blocks pending the lifting and cutting.

Screen Shot 2016-06-06 at 7.42.10 AM.jpgScreen Shot 2016-06-06 at 7.42.34 AM.jpg

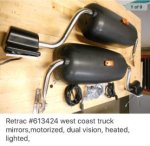
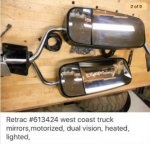
We currently have "typical" West Coast style mirrors, which don't fold back. And they aren't heated, which in our area is an issue at times. Yes, I live in Arizona, but we're 7000-feet up and we do get snow and cold winter weather. I found, and bought, a set of nice remotely-adjustable, heated, foldable mirrors on the Bay. $127 for the pair, plus shipping, seems quite cheap. They were take-offs from a fire truck, so they'll feel right at home on the ambulance.

Screen Shot 2016-06-06 at 7.43.15 AM.jpgScreen Shot 2016-06-06 at 7.43.30 AM.jpg
 
Last edited:

patoz

Expedition Leader
Man, they ruined every light lens on there by painting them didn't they, especially the ones on the light bar?

It would be nice if they would use something like PlastiKote or at least latex paint so the sale would be legal, but at least you could remove it once you got the vehicle home and sell or trade the lenses for something you could use.
 

rossvtaylor

Adventurer
Man, they ruined every light lens on there by painting them didn't they, especially the ones on the light bar?

It would be nice if they would use something like PlastiKote or at least latex paint so the sale would be legal, but at least you could remove it once you got the vehicle home and sell or trade the lenses for something you could use.

Yes indeed! That was the only part of my experience with the dealer that wasn't stellar, though. And I do give them credit for putting "new" clear lenses on the scene lights, when I pointed it out. Knowing how rare those are, for them to give me six out of their stock was, I thought, a pretty decent gesture.

As far as the light bar and the other lenses go, however, those are now unfortunately junk. There's not much market for donating or selling them, because they are halogen and not LED. But it would have been nice to have the option.

All of these build experience threads have been very useful to me, because I've learned quite a bit. It's certainly nice to share our experiences, but I also hope people can learn from my mistakes. Hopefully somebody else reading this will now know to ask their seller to use something removable, as you suggest. I know we will, if we do this again. I was not able to get the spray can enamel off the rear red lenses without damaging them. Fortunately, another nice forum member was kind enough to send us some red lenses so we can use those as brake lights. Thank you, sir!
 

rossvtaylor

Adventurer
Ozrockrat has posted some great information on tires, axle widths, wheels, offset and bolt patterns. He's also recommended some specific wheel model numbers, so you don't have to go digging. Unfortunately, none of those were in our budget. What we found was that steel wheels cost about $300 each, new, and aluminum are closer to $500.

On the Craigslist in Phoenix, we found a set of 6 9-inch wide semi rims with the standard offset. They were $160 for the set... now, that fits our budget! And a local tire shop has used "flat face" 9-inch rims for $50 each. We have two of those, for a total investment of $260. Now, it's time to try the fit.

With standard offset wheels, front and back, the rear wheels look like they'll be close to the edge of the fender well, but not protrude. It looks right and good. The fronts also fit inside the wheels, but I'm a bit worried about conflict in sharp turns - I'd used a cardboard tire profile, taped on the rim, to do some checking... it's clear that having the wheels set out a bit more would be good.

Here's what standard offset semi rims look like...
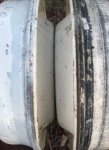
Screen Shot 2016-06-07 at 4.29.12 AM.jpg

They're designed with enough offset so that the DRW can ride next to each other. Most of the "flat face" wheels I've seen are marked "steer only" because if you tried to put them back-to-back in a DRW setup, the tires would clearly rub against each other. Here are the flat face wheels...

Screen Shot 2016-06-07 at 4.29.48 AM.jpg

And here are the track measurements, taken from the outside edge of each wheel/rim:

With standard offset wheels, front track width is 90 inches.
With standard offset wheels, rear track width is 96 inches.
With flat face wheels, front track width is 93.

We could put flat face wheels on front and back, which would result in identical track widths front and rear, but then the rear wheels would be tucked in about an inch and a half. From what I've read, the minor width difference won't be an issue. We'll report more when we actually get the suspension and wheel well mods done, then get everything mounted. But that won't be for another 4 weeks or so.

And, with the 19.5-inch wheel and spare tire removed, that freed up the left rear cabinet - this is underneath the future shower/toilet area. The new spare won't fit in here, so it will live on a mount above the rear bumper. You've got to love the lighting they put in these!
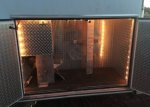
Screen Shot 2016-06-07 at 4.31.25 AM.jpg

From another angle, you can see the vacuum pumps - these will also get removed, along with the protective panel in the front of them.
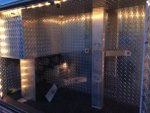
Screen Shot 2016-06-07 at 4.32.00 AM.jpg
 
Last edited:

Forum statistics

Threads
188,008
Messages
2,901,044
Members
229,320
Latest member
SMBRoamer
Top