Hey Vortec Guys! / Sierra pickup / Suburban / Yukon etc - Finally has Index!

rayra

Expedition Leader
more follows


TifToGif%282%29.gif
large.jpg


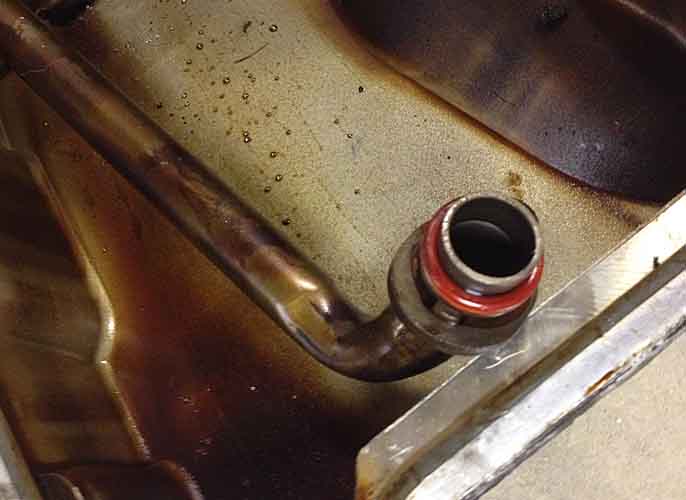
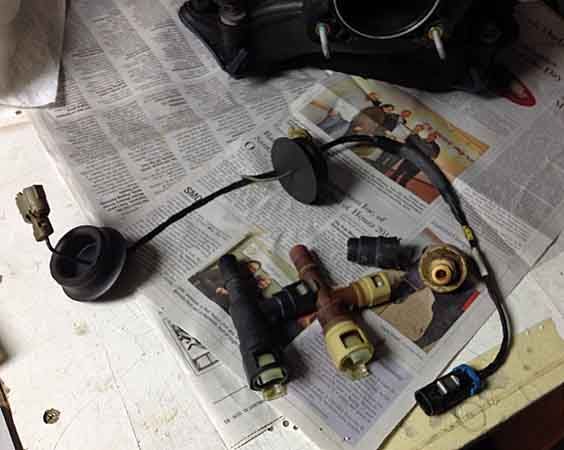
Here's a shot of Knock Sensor #1 (the front one), sitting in its sump. It's in 'okay' condition, a little shabby. I'll probably pull it when I re-open the engine, and try to rehab it some. Remove it and clean it up, naval jelly maybe.

enginethreefer07.jpg


Here's Knock Sensor #2, rusting in its hole. I think that fluid is gas, courtesy of lifting and tipping the intake manifold during its removal, gas dribbled out of the open fuel rails on it. I sopped it out with a towel after the pic, but my nose was full of gas and solvents / degreasers, so didn't really notice what it was. Didn't matter, at that point.

enginethreefer08.jpg


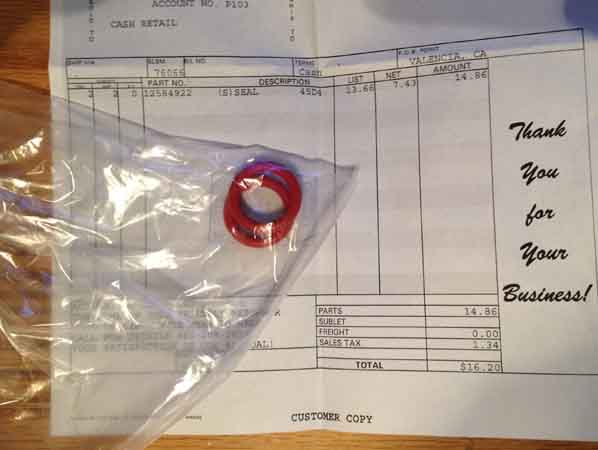
I've got a new knock sensor and a new wiring harness coming in the mail. In the meantime, the Sub is running ok. Actually didn't at first.
When I put it back together monday night (finishing about midnight), the idle was a little elevated. I sort of attributed that to the new intake manifold gasket and the computer learned settings being off. I didn't reset anything. Tuesday I ran some errands and it was idling very high and surging hard when I was off the gas and on the brakes and threw a Check Engine. Code was 'fast idle, more air than expected' or somesuch, didn't write it down. Looked things over for an open vacuum connection, sprayed some carb cleaner around the intake gasket plane, wondering if I'd screwed something up late last night. Didn't find anything
So googled around for fast and wandering idle symptoms in these vehicles / engines and found several references to the Idle Air Control (IAC) on the throttle body. When I'd worked on it monday I'd tried to clean up a bunch of filth. I had the throttle body off the intake manifold and was cleaning it out from both front and back. I'd sprayed some throttle body cleaner in some of its ports. One of those leads to the IAC. That port and a small hole in the throttle plate are the only air the engine gets at idle. The IAC is a solenoid-driven plunger that meters the air passing thru that port. Seems when I sprayed it, the fouling melted and glued the IAC in place, screwing up the mix and thus the idle speed. And preventing the IAC from functioning properly.
$80++ part. Hour plus and inconvenience of a mechanic visit. Or thanks to the internet, an easy 10min fix with $1 worth of spray.

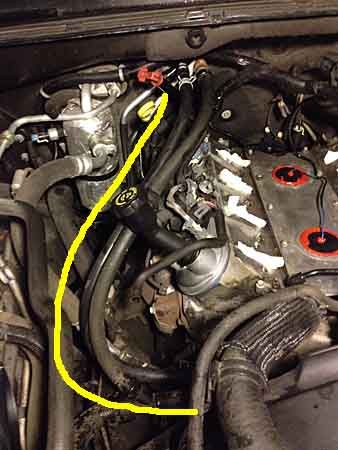
Here's where I was mucking about

enginethreefer12.jpg


The IAC is bolted onto the right side of the throttle body ('00-'02 and maybe earlier), held on with (2) T20 screws. The lower is a little awkward to get to.

Here's what it looked like. Bad auto-focus, got the background. The surface of the thing looked 'hairy' like a magnetic drain plug. The sides of the plunger were caked. As was the 'blow by' area near the o-ring on the solenoid. A little scrubbing and wiping and poking around and some throttle body spray cleaned it right up.

enginethreefer10.jpg
enginethreefer11.jpg


During that evolution I had the battery disconnected, specifically to clear the learned settings out of the computer memory. Put it all together and its running properly. normal smooth idle, proper response etc.

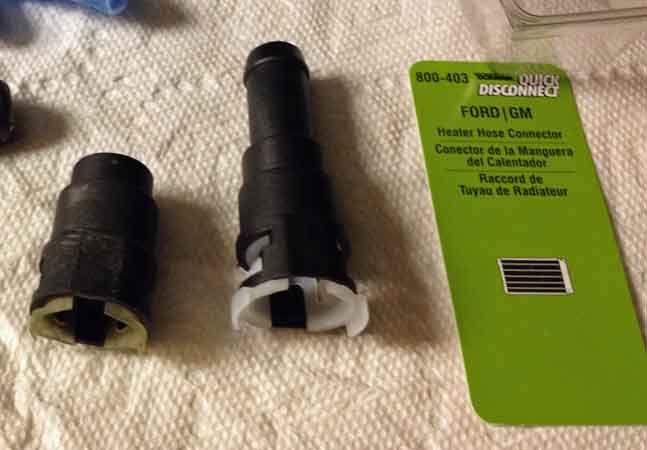
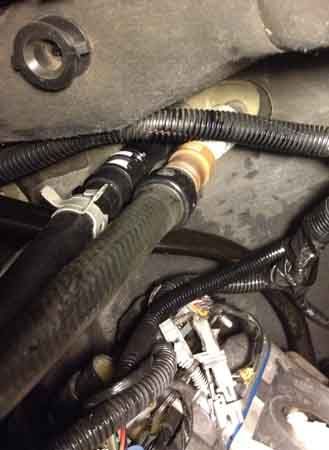
now I'm just waiting to do it all over again when my knock sensor parts come. And then I'll also pull and replace those heater hose connections, too.

The whole 'remove intake manifold' is really a lot easier on these motors than on my old small block chevy. Things are better organized and arranged to make working on a subassembly much easier. Changing the intake manifold gaskets is listed as a 2.5hr evolution. This was my second time doing it (did our Tahoe several weeks ago) and I'd say I'd met that standard, if that was all I was doing. Once you are familiar with the layout, it's quite easy to make the necessary disconnections and take the whole thing off. The fiddly fuel injector electrical connectors are the toughest part.
 
Last edited:

rayra

Expedition Leader
Farting around with the new knock sensor parts I could easily figure out how to get the connector off. I didn't want to force my old one, worried about breaking the old embrittled connector when I still needed it. The thing that looks like a tab is not. Instead you grip and squeeze two pads to distort the connector and clear two clips inside it that are gripping the sensor cap. That would be with pliers, down in the hole.

knockrepairs02.jpg


The new loom seems like a nice product. They've even got a section of split loom protecting the wiring where it will be mashed to the galley plate by the foam dam at the back of the intake manifold. And the large black caps are actually hard rubber, about the consistency of a rubber door stop wedge. They might even fit snug in the wells, act as true caps. On cursory inspection I took my factory caps to be hard plastic. But that might have just been 122k mi and 14yrs. They might have started out as pliable rubber. And the factory cups are loose fitting, not waterproofing, might have just shrunk. Regardless, I'm still sealing these with hi-temp RTV during the install.

knockrepairs01.jpg


Got on the home stretch and broke a heater hose coupler. Got to wait for the missus to get home to go fetch another. Was wrestling one of the heater hose connector Ts I was planning to replace, trying to get the main hose coupling off the end of it first. THought I had the squeeze couple released and was wiggling the connect off the T. No. I was flexing a degraded coupling and broke the male / nipple end off inside the hose. bits flew everywhere. Had to then sacrifice that 3' hose running to the water pump to try and ensure a chunk didn't go down the hose.
Got the new T connectors back on, the other hose too, but am holding off on putting the intake manifold back on as I don't want to disturb my curing silicone on the knock sensor caps - it's too pretty. So probably won't put it all back together until the morning.
Third time, intake manifold removal and all the disconnections took less than half an hour. Then I bogged down removing the rusted knock sensor and cleaning out both sumps.


The rear knock sensor (#2) sump, while cleaning it out

knock30.jpg


The failed sensor that came out of it

knock32.jpg


Some of the schmutz that came out

knock33.jpg


Knock sensor #1 wasn't nearly as bad. I just took it out and cleaned it up a bit and cleaned its sump too

knock31.jpg
knock34.jpg


New sensor, rusted sensor, #1

knock35.jpg


The new wire harness had some fresh rubber caps on it, they were a snug fit. But I put silicone on them anyway. Laid a fat bead where the thin outer lip of the caps would smush into it

knock36.jpg


Then it was on to the heater hose connections. A lot easier to get leverage on with the intake manifold etc out of the way. Still a PITA.

knock37.jpg


Before I pulled the connectors I made a raincoat / gutter out of tinfoil and it worked exactly as I'd hoped

knock38.jpg


Didn't take any pics of the busted crap yet. I'll do a side by side when I get the new coupler.
I'm sorely tempted to just put a new hose directly on the T and use a traditional ladder clamp on it. But the fitting is slick, no hose retention ridges. So I'll just get the proper coupler.
 
Last edited:

rayra

Expedition Leader
The broken and replacement heater hose connector, broke the whole nipple end off in the old hose.

knock39.jpg


The shiny new heater hose. I think it's the return line.

knock40.jpg


New Ts installed, but obscured by everything else. The dirty aged beige connection is integral to the hose Y set that connects to the water pump and to the overflow reservoir. I think I'd have to replace that all. And will eventually, when I do the full coolant system revamp before peak summer. New upper and lower radiator hose, water pump, thermostat, and the rest of the plastic hose fittings / couplings.

knock41.jpg


The tally. Plus the 3' of heater hose.

knock42.jpg


All said and done it's not a difficult evolution, and it's really easy to knock out with the parts on-hand. The truck is running much smoother and a tad lower idle, closer to 500rpm, after the new intake manifold gasket and general cleanup of the various air pathways. I'd disconnected the battery to purposefully clear the learned engine settings. There was an initial bit of idle surging at the first couple startups and since then it's been 'like new'. But note it wasn't noticeably impaired in the first place, no codes until the knock sensor crapped out and I triggered the Idle Air Control stickign with a poor initial attempt to clean things out.
The engine seems stronger now, smoother power curve / acceleration. It's an '02 LM7, iron block, 122k mi. I just changed the plugs for the first time a couple k mi ago. Bought it with 116k mi on it. I found the aluminum engine to be in remarkable shape for its age and mileage. PRobably due in no small part to this vehicle being in SoCal since it was born. And it wasn't leaking a drop from the engine, until I made the mistake of introducing synthetic oil to it - DON'T DO THIS on a high-mileage engine. I quickly switched back to regular oil, but damage done. Changed the valve cover gaskets since. Going to have to change the oil pan and main seals to stop the rest.

Anyway, that's about all I can think to share about this sort of preventative maintenance. The heater connector hose, particularly the white one closer to the intake and the valve cover gaskets leading to oil leaks leading to intake manifold gasket leaks are commonly cited problems with this family of engines. As is the stupid design of the knock sensor placement. If you determine you need to do any part of it, I strongly suggest you plan to do it all in the same evolution. It will save you a lot of time and inconvenience or expense, later. One intake removal instead of three would save you enough mechanic'$ time to pay for ALL the parts to do it yourself. It really isn't difficult at all.

I found RockAuto.com's parts prices to be significantly lower than both the local and chain auto parts stores in my area and shipping was fast and accurate and well packed. I strongly recommend them an dhave no connection with them whatsoever.
 
Last edited:

Burb One

Adventurer
The broken and replacement heater hose connector, broke the whole nipple end off in the old hose.

knock39_zps9pvgihz2.jpg


The shiny new heater hose. I think it's the return line.

knock40_zpsqcke5vwf.jpg


New Ts installed, but obscured by everything else. The dirty aged beige connection is integral to the hose Y set that connects to the water pump and to the overflow reservoir. I think I'd have to replace that all. And will eventually, when I do the full coolant system revamp before peak summer. New upper and lower radiator hose, water pump, thermostat, and the rest of the plastic hose fittings / couplings.

knock41_zpsjwhnb3i6.jpg


The tally. Plus the 3' of heater hose.

knock42_zpshvvm6rsc.jpg


All said and done it's not a difficult evolution, and it's really easy to knock out with the parts on-hand. The truck is running much smoother and a tad lower idle, closer to 500rpm, after the new intake manifold gasket and general cleanup of the various air pathways. I'd disconnected the battery to purposefully clear the learned engine settings. There was an initial bit of idle surging at the first couple startups and since then it's been 'like new'. But note it wasn't noticeably impaired in the first place, no codes until the knock sensor crapped out and I triggered the Idle Air Control stickign with a poor initial attempt to clean things out.
The engine seems stronger now, smoother power curve / acceleration. It's an '02 LM7, iron block, 122k mi. I just changed the plugs for the first time a couple k mi ago. Bought it with 116k mi on it. I found the aluminum engine to be in remarkable shape for its age and mileage. And it wasn't leaking a drop from the engine, until I made the mistake of introducing synthetic oil to it - DON'T DO THIS on a high-mileage engine. I quickly switched back to regular oil, but damage done. Changed the valve cover gaskets since. Going to have to change the oil pan and main seals to stop the rest.

Anyway, that's about all I can think to share about this sort of preventative maintenance. The heater connector hose, particularly the white one closer to the intake and the valve cover gaskets leading to oil leaks leading to intake manifold gasket leaks are commonly cited problems with this family of engines. As is the stupid design of the knock sensor placement. If you determine you need to do any part of it, I suggest you plan to do it all in the same evolution. It will save you a lot of time and inconvenience or expense, later. One intake removal instead of three would save you enough mechanic'$ time to pay for ALL the parts to do it yourself. It really isn't difficult at all.

Real good info, While a simple project, wish i had such a good walkthrough/info when i did it. I am sure, many googler's will find this and be in your debt:)
 

rayra

Expedition Leader
Thanks I appreciate that. Lord knows I've cadged plenty of useful 'How To' info off the internet in the last 20yrs. Really amazing compared to how it was without it.

When I busted that hose nipple I THOUGHT I was wiggling the loosened connector off of the T, thought I'd released the clips. Then it came apart all of a sudden, a bit bouncing off the hood, off my safety glasses. It being late and dark out I didn't even try to find the pieces and was worried a chunk or two went down the hose, so I went ahead and cut it off the water pump and replaced it, as I'm intending to replace all the hoses in another round of PM on the coolant system before the heat of summer. Those are 5/8" fittings and hoses, btw.


778
 

zoomad75

K5 Camper guy
Rayra- Good write up. Couple of notes from the land of the dealer to add. GM wrote a bulletin for the exact condition for the rusty knock sensors some time ago on how to address the problem. Solution is as you did, new sensors, new harness and seal in the rubber plugs with rtv and where the wire comes through the plug with rtv. The online debate goes on as to keeping the foam at each end or not. One argument is, the blocks trap crap in and leaving them out allows crap to flow out the back. If the plugs are sealed, it really don't matter. My techs typically leave them in as the factory did.

The oil consumption issue on the 5.3 LM7 engine isn't nearly as bad as the later active fuel management 5.3's. Still, they had a bulletin that might be of use to the earlier 5.3 and 4.8 engines. One of the items they call out is the passenger side valve cover due to a design change to the baffling for the pcv system. Reason is the design was allowing it to suck not only crankcase air, but liquid oil too. The later design might be a solution for the earlier. The early active fuel management engines have the possibility that they are lacking a baffle on the outlet in the pan where the oil pressure is dumped from the valve lifter oil manifold when 4 cylinders are shut off. Seems as if the outlet for that oil will spray up at the backside of two pistons causing the oil control rings to get coked up with carbon and then stop doing their job and the burning of oil ensues. The fix is to drop the pan and add the baffle.

We don't see as many as we used to needing the knock sensor job. I figure since the first ones are 15+ years old, taking one that old to the dealer is going to have some cost. We still get one every now and then. Last one was about as dirty as I've ever seen. The intake was encased in mud. Intake off and the valley was caked with so much mud/dirt you couldn't see the knock sensor wiring. It was no surprise the back sensor was so rotten my tech almost couldn't get it out. The later gen 4 and active fuel management engines have the knock sensors out of the valley and back at the lower part of the block.

The incredibly stupid plastic nipple quick connect heater hose fittings are one of the dumbest ideas an engineer ever had. Who would have thought plastic would get brittle in the presensce of 200 degree fluids? Pretty easy to remedy if you don't have rear heat. Delete them. You are replacing the hose, the heater core still has a nipple for the pipe. Slide the hose over the pipe, install a worm gear clamp. Problem solved. No ticking time bomb for the cooling system.
 

justcuz

Explorer
Even if you do have rear heat, a copper T with nipples soldered in, will work just as well.

As to the worm clamps, lately they are just a junky as the plastic heater connectors. Must be made in China.
The factory spring clamps are easy to use and a pair of Channel Locks makes easy work of them.

I donate my foam blocks to the recycler, I would rather let any crud run through.
 

rayra

Expedition Leader
Zoomad, I did / do indeed have trouble with the passenger side breather tube, oil right into the throttle body. I pulled the passenger side valve cover again to inspect when I did the knock install, after finding oil in the throttle body, but couldn't find anything causative and just put it down to my tendency to give it too much throttle occasionally and suck it in.


On the plastic heater Tees and their being two different colors despite being the same sizes, my presumption is that it's all about ease of assembly on the line. Engine comes in, it's a couple seconds each to stab them on. Maintenance on them is a bloody nuisance.

I was looking one night for images of the knock sensor fix and came across a guy that had spend large sum on a new upgraded motor, had posted many shots of its installation. I was bemused to see the old connectors on the firewall, even as the new engine grew to fill the space. Guy missed a prime opportunity to replace them.

As it is, at 14yrs, 126k mi, and me only driving it about 5k a year now, I don't expect to ever have to replace them again. But if I do, it will be with metal fittings and ladder / worm clamps
 

rayra

Expedition Leader
Get a load of the foul brake fluid I flushed out of it last week as well. Nothing to do with GM / Vortec, of course. But an issue of maintaining these old(er) vehicles. Something that gets overlooked. Kinda like my rotors.

brakeflush03.jpg
brakeflush05.jpg
 
Last edited:

rayra

Expedition Leader
Figured I might as well put other common issue maintenance items for these vehicles in here.

Recently I set out to fix the instrument cluster in the missus' '05 Tahoe, almost all the lightbulbs were out, and the gear indicator panel had quit working altogether, after being dim for some time.
I looked some stuff up, bought the referenced bulbs (come mounted in a plastic socket that twist-locks into the back of the cluster) and pulled it a few weeks ago to make the repairs.
Lo and behold the bulbs were a completely different type, which were soldered directly to the instrument cluster circuit board. And I resoldered the mounting pins of the gear display panel. Defeated. No improvements, put it back together.

Then I went digging for more info and finally found a couple of YouTube vids that referenced the resoldering of a bank of surface mounted resistors that are on the gear display feeds and some info on the different bulb type, which appears to be in use on the '03-06 GM trucks, at least.

https://www.youtube.com/watch?v=vStMcCHZuRM
https://www.youtube.com/watch?v=tGzlnrZL8k4

The brian vid above also has a good portion talking about replacing the electric stepper motors that drive the gauges.

I found a source for the proper bulbs -
http://www.amazon.com/Partsam-Halogen-Instrument-Cluster-Backlight/dp/B01BY0D93E/ref=sr_1_1?s=industrial&ie=UTF8&qid=1462683943&sr=8-1&keywords=Partsam+10Pcs+4.7mm+Grain+Of+Wheat+Mini+Halogen+Bulbs

Rockauto and others improperly list the earlier series' twist-lock style socket bulbs. The above bulbs have to be de-soldered and re-soldered. Which was a fiddly pain for my aging eyes / astigmatism. So I got some inexpensive magnifiers from Harbor Freight, which worked great but took some getting used to re depth of field / depth perception.

http://www.harborfreight.com/magnifier-head-strap-with-lights-38896.html


It takes a very sharp/pointy and low watt solder pencil to do this right, access is tight, the wires are fine, the plastic sockets are right in contact with the soldering locations and wire, and the surface-mount resistors on the gear display can't take a lot of heat, so don't overdo it.

The operating theater -

dash21.jpg
dash23.jpg


I went ahead and desoldered all the bulbs/mounts and refit them with the new bulbs and trimmed the wires down. The bulbs are a snug press-fit in the plastic sockets and there are find grooves for the wires to fit in and along. You overlap a bit of the wire under the bottom, be careful they don't touch / reach each other.

dash22.jpg


While I was attempting to resolder the small resistors for the gear display, two came free completely while I was laying / rubbing the tip against one end to heat things. The solder joins at the other ends were what had failed (often called a 'cold joint') and killed the display, apparently. So when I heated the other end they just came free. I should have taken some macro photography of the failure points, but I was working with a bit of a time crunch by then.

Here's the panel reconnected, key on to test everything, before reassembly. Gauges haven't been so bright in a long time (threw my hoodie over everything to see things lit.

dash24.jpg


Overall a simple fix, but requires a bit of care and small experience with soldering to not make a hash of it. There are folks on the internet offering this service for $100ish. Cost me $7 and an hour or so. Not counting my first attempt to replace the bulbs after buying the wrong stuff (which works in my '02 Sub anyway, so plenty of spares if and when) and mistakenly resoldering the pins on the gear display instead of the resistors.
It's my understanding the dealerships charge something approaching $350+ for this repair. They don't fix it, they replace the cluster
Taking the dash bezel off is a bare hands job, the cluster is held with (4) 7mm screws (careful not to drop them into the dash).
If you've every soldered electronics on a circuit board, it's an easy task.


eta - here's a shot of the earlier cluster, which has the twist-lock bulbs that are erroneously listed in parts catalogs for the '03-'06 models.

conditionred1_zpsmeba9xmr.jpg


eta2
Tahoe cluster hasn't been this bright and clean in a real long time.

dash25.jpg
 
Last edited:

Jelorian

Adventurer
Figured I might as well put other common issue maintenance items for these vehicles in here.

Recently I set out to fix the instrument cluster in the missus' '05 Tahoe, almost all the lightbulbs were out, and the gear indicator panel had quit working altogether, after being dim for some time.
I looked some stuff up, bought the referenced bulbs (come mounted in a plastic socket that twist-locks into the back of the cluster) and pulled it a few weeks ago to make the repairs.
Lo and behold the bulbs were a completely different type, which were soldered directly to the instrument cluster circuit board. And I resoldered the mounting pins of the gear display panel. Defeated. No improvements, put it back together.

Then I went digging for more info and finally found a couple of YouTube vids that referenced the resoldering of a bank of surface mounted resistors that are on the gear display feeds and some info on the different bulb type, which appears to be in use on the '03-06 GM trucks, at least.

https://www.youtube.com/watch?v=vStMcCHZuRM
https://www.youtube.com/watch?v=tGzlnrZL8k4

The brian vid above also has a good portion talking about replacing the electric stepper motors that drive the gauges.

I found a source for the proper bulbs -
http://www.amazon.com/Partsam-Halogen-Instrument-Cluster-Backlight/dp/B01BY0D93E/ref=sr_1_1?s=industrial&ie=UTF8&qid=1462683943&sr=8-1&keywords=Partsam+10Pcs+4.7mm+Grain+Of+Wheat+Mini+Halogen+Bulbs

Rockauto and others improperly list the earlier series' twist-lock style socket bulbs. The above bulbs have to be de-soldered and re-soldered. Which was a fiddly pain for my aging eyes / astigmatism. So I got some inexpensive magnifiers from Harbor Freight, which worked great but took some getting used to re depth of field / depth perception.

http://www.harborfreight.com/magnifier-head-strap-with-lights-38896.html


It takes a very sharp/pointy and low watt solder pencil to do this right, access is tight, the wires are fine, the plastic sockets are right in contact with the soldering locations and wire, and the surface-mount resistors on the gear display can't take a lot of heat, so don't overdo it.

The operating theater -

dash21_zps9508u6dz.jpg
dash23_zpsboafmksc.jpg


I went ahead and desoldered all the bulbs/mounts and refit them with the new bulbs and trimmed the wires down. The bulbs are a snug press-fit in the plastic sockets and there are find grooves for the wires to fit in and along. You overlap a bit of the wire under the bottom, be careful they don't touch / reach each other.

dash22_zpssmebirim.jpg


While I was attempting to resolder the small resistors for the gear display, two came free completely while I was laying / rubbing the tip against one end to heat things. The solder joins at the other ends were what had failed (often called a 'cold joint') and killed the display, apparently. So when I heated the other end they just came free. I should have taken some macro photography of the failure points, but I was working with a bit of a time crunch by then.

Here's the panel reconnected, key on to test everything, before reassembly. Gauges haven't been so bright in a long time (threw my hoodie over everything to see things lit.

dash24_zpsfrdp5kfl.jpg


Overall a simple fix, but requires a bit of care and small experience with soldering to not make a hash of it. There are folks on the internet offering this service for $100ish. Cost me $7 and an hour or so. Not counting my first attempt to replace the bulbs after buying the wrong stuff (which works in my '02 Sub anyway, so plenty of spares if and when) and mistakenly resoldering the pins on the gear display instead of the resistors.
It's my understanding the dealerships charge something approaching $350+ for this repair. They don't fix it, they replace the cluster
Taking the dash bezel off is a bare hands job, the cluster is held with (4) 7mm screws (careful not to drop them into the dash).
If you've every soldered electronics on a circuit board, it's an easy task.


eta - here's a shot of the earlier cluster, which has the twist-lock bulbs that are erroneously listed in parts catalogs for the '03-'06 models.

conditionred1_zpsmeba9xmr.jpg


eta2
Tahoe cluster hasn't been this bright and clean in a real long time.

dash25_zpswmri9ve9.jpg

Thanks for taking the time to write this up and post the pics. I'm sure it will help anyone of us down the road if and when we encounter this issue.

Cheers!

Jel
 

rayra

Expedition Leader
freakin' $16 for TWO o-rings for the oil pump pickup tubes in our trucks.

oiloring.jpg


I'm changing the oil pan gaskets soon, no better time to change that o-ring. Failure / age-hardening / breakage of that o-ring can contribute to lower oil pressures as well as to sticking lifters, which both of our trucks are exhibiting. Her Tahoe at 165k+ mi can get pretty loud sometimes. My Sub at 129k only at startup for about a minute. I'll oil-flush hers and change both her oil pan and valve cover gaskets, as her Tahoe has recently started marking its territory. May flush mine, already did my valve covers though, and my own oil leakage trouble didn't manifest until I erroneously switched to synthetic oil. Only for ~600mi but the damage was done, started leaking.
 
Last edited:

justcuz

Explorer
What oil are you using?
I've got 270,000 miles on my 2000 and it only has lifter noise if I let it set for 2 or more days and it is only for about 30 seconds.
I do however change my oil every 3 to 4,000 miles and use Valvoline.
Valvoline seems to have a higher detergent content? Or the oil quality is better than most. The inside of all my engines with Valvoline are very clean.
Did you paint the twist in bulbs red or buy them that way? I hear the red is easier on the eyes for night driving, less eye strain?

Thanks for your write ups for these common repairs, very well documented and the photos are great!
 
Last edited:

Ramblejam

Observer
The issue - and I think it's 2003-2007 engines - GM in their inifiinite wisdom replaced a simple $5 PCV valve with a metal baffle integral to the driver side valve cover. And when the internal weep holes in this baffle plate crud up - her engine is crossing 160k mi - the engine starts breathing in oil.
KVKREENGAL.jpg
 

rayra

Expedition Leader
This round is flushing the engine and changing valve and oil pan gaskets and the O-ring on the oil pickup tube. After ~160k her Tahoe finally started 'marking its territory'. And she's picked up an occasional loud lifter clatter. Some searches online seem to link the latter to accumulation of gunk and sometimes a failure of the pickup o-ring, resulting in lowered oil pressures. Which also contributes to the gunk. So I elected to hit it all at once.
Ran some Gunk brand engine flush last night, idling in the driveway, with a bit of elevated RPMs at the end. Sprayed degreaser where it would do some good (and not impact her knock sensors), hosed it all and let it all dry overnight.
Took some time changing the valve cover gaskets and hold-down bolt seals. When I did the driver side work recounted earlier in this thread, I only cleaned up the originals and they looked serviceable so I reinstalled them and they've worked well. The passenger side valve cover showed lots of signs of being the source of most of the leaking oil. And this was it's first time apart in 165k mi.
After that, I set to on the underside and what a chore. Have to pull the skid plate and lower control arm cross frame and then you have to unbolt and lower the front axle to get enough clearance to remove the oil pan. Which was also a PITA, as there are several small bolts attaching plates to close the bellhousing, as well as one nightmare placement on the passenger side under the engine mount, holding a plate / clamp which carries the trans cooler lines and battery cables. Took forever in very tight quarters to get it loose. And only got it free once the oil pan was unbolted and shifted to allow better access (it's bolted to the side of the pan).

I'm getting old and slow. Couldn't get it finished this afternoon. Prepping stuff tonight for full re-assembly in the morning. Changing axle and transfer case fluids as well.

My awning project came in handy for some shade.

TahoeGaskets03.jpg
TahoeGaskets05.jpg
TahoeGaskets04.jpg
TahoeGaskets06.jpg
TahoeGaskets07.jpg


And those little flecks are just what they look like. Little aluminum shavings. Alarming. Didn't really have any in the drain pan after the flush, some chunks of crud though. I have yet to clean the remaining goo in the bottom of the oil pan. Hoping I don't find much more. If I do I'll need to dismount hte windage tray and look for damage. Probably ought to do that anyway, no better opportunity than now.
 
Last edited:

Forum statistics

Threads
188,657
Messages
2,908,608
Members
230,892
Latest member
jesus m anderson
Top