Hey Vortec Guys! / Sierra pickup / Suburban / Yukon etc - Finally has Index!

rayra

Expedition Leader
So I was up early this morning, to do all the parts cleanup I didn't get to last night. Good news is that the apparent aluminum bits in the pan were indeed aluminum bits, but they were part of the pan. Defects in the casting. Like spatter. Threw every solvent I had at them, even tried to mechanically scrape them off, nope, part of the pan.

Went ahead and pulled the windage tray, more good news, what I could see looked fantastic. 165k on this engine and it looks to be in fantastic shape at least from the bottom end. Got up in there and took photos of a few piston skirts and cylinder bores, roller lifters and cam lobes, all showing nominal light wear. I'd expect to see this light of wear on a motor with far fewer miles. Didn't get a good photo of the timing chain, but its teeth looked great, no visible wear. The photo I do have shows the port where the oil pickup tube / o-ring goes in. Basically pristine.

And at the rear, the 'rear main seal' or whatever they call it on Vortec motors, totally fine, no sign of any leakage on the flywheel.

TahoeGaskets09.jpg
TahoeGaskets10.jpg
TahoeGaskets11.jpg
TahoeGaskets12.jpg
TahoeGaskets13.jpg


The rest went back together fairly quickly. Followed the recommending sequence and light torque settings on the pan bolts. Then the three bolts holding the bellhousing closure panels and the wiring brackets. Then the four big fasteners holding the front axle tube. Then the four thru bolts for the frame crossmember and the 4 bolts for the skiplate. Took less than 2hrs for complete re-assembly after the parts were cleaned up.
The Victor-Reinz replacement oil pan gasket / plate was visually identical to the factory original, which itself was pop-riveted to the oil pan. I had a pop rivet kit at hand, so I went ahead and attached the replacement part the same way, made it a lot easier when wriggling the pan back into place over the axle.
Poured in 6qts of 5w-30, reconnected the battery and fired it up. A little clatter as the oil pressure came up, and then the blessed near-silence of a fine motor. I let it idle about 10mins with the oil cap off just to try burning off any remaining flush solvents and running the engine under no stress.
We'll do some easy errand trips in it the rest of the holiday weekend, before it returns to commuter duty on Tuesday.
Whole motor is overall in fantastic shape for its age and mileage. I'm working to keep it that way.
 
Last edited:

AA1PR

Disabled Explorer
man great thread, but ever so sorry to hear or all your troubles
I'm knocking on wood right now
 

rayra

Expedition Leader
Thanks, not so much trouble as expected maintenance on high mileage vehicles. My fiendishly clever plan was to wind up with two GMT800 SUVs, so I had parts and knowledge commonality. And perversely to make maintenance easier. Working on two is like doing a brake job. One side is slow, the other takes 5 mins because you did the other side. Our Tahoe and Suburban have the same drivetrain, the same overall 'generation', so everything I learn or experience applies to both. Flip side is I have to do everything twice.
 

ZMagic97

Explorer
Good job on the lights. I had to do the same in both my trucks and the indicator in my 05 Chevy. My 06 GMC steering wheel controls needed new bulbs as well. I found the process a bit intimidating, but now I tear into these clusters without hesitation.

Did you do the bulbs for indicators as well? I ended up doing so because the cruise control light was out in the Chevy.
 

rayra

Expedition Leader
Turn signal indicators?, no I left them be as they were working. But maybe I should have, they are awfully dim and hard to see when there's sunlight on the panel. New bulbs would be a bit brighter.

I have to pull the cluster again on the Tahoe, I got the Tach needle on wrong, it's reading 0 at idle. Needle / stepper motor seems to be working fine throughout the driving range, just seems like I somehow got the needle off by about 10deg / 700rpm
 

Burb One

Adventurer
Rayra,

Great info!

Is it possible to replace those o rings without dropping the pan? I've noticed my truck has has a lower oil pressure than the previous 150k miles, trying to rule out easy possibilities because it runs and sounds great (other than some piston slap, which seems to be normal/ common on these trucks)
 

rayra

Expedition Leader
There are videos of some very silly attempts to do so, using high-tensile fishing line to leash the bolt so it doesn't drop away. The bolt location is just above the plane of the oil pan, hard to the front cover. It would be a box end wrench 1/8th turn sort of effort.
But I also found the pickup tube was also bracketed to and held down by 2 of the 10 nuts holding the windage tray. And the pickup tube was quite stiff. And given the oil pump location you'd be taking off the front cover of the engine and all that entails, anyway. And more, to get where you could see and adequately work that pickup tube location. Like taking the radiator out. In short I don't think it would save any effort to try it from the front, unless you were already replacing a timing chain or were otherwise pulling apart the front of the motor on other business.

Don't be dissuaded by the bottom end approach, I've made more of it than it was. Good jackstands, jack, air tools, it would be fairly quick to do. And will be, when I do it all again on the Suburban, in a couple weeks. I have air tools, but didn't use them this project. I was working slow and quiet anyway, learning the procedure as I went. 2nd time on the Sub? I'm going for 'book time', tearing right into it. I know everything I need to do, now.


eta - if you go in from the front, planning to change the oil pump anyway, you could more readily change change it, I think. Not sure. Not sure if the pickup tube will even deflect downward enough. Didn't seem like it on my / the '05 'T' engine design.
Oil pump is $65 at rockauto, out of stock. $116 at autozone. If you go after the o-ring from the front, you've already done' 90% of the work to change the pump. And probably ought to, if you are chasing oil pressures. You could do both front and bottom attacks in a full weekend.
 
Last edited:

Martinjmpr

Wiffleball Batter
.
My speedo just started going haywire (reading at least 20mph low in almost all circumstances) so I'm assuming the stepper motors are going out. Since a repair of this kind is way beyond my skill set I'm going to send my cluster out to get done. Going to get green LEDs while I'm at it.
.
FWIW, Some of the places that rebuild the instrument cluster will add a transmission temp gauge for ~$100 or so. Apparently the sender and all the wiring for the trans temp gauge is already there, it's just that on the 5.3 models they don't put in the gauge - the 6.0 and larger engines do get the gauge.
 

ZMagic97

Explorer
Turn signal indicators?, no I left them be as they were working. But maybe I should have, they are awfully dim and hard to see when there's sunlight on the panel. New bulbs would be a bit brighter.

I have to pull the cluster again on the Tahoe, I got the Tach needle on wrong, it's reading 0 at idle. Needle / stepper motor seems to be working fine throughout the driving range, just seems like I somehow got the needle off by about 10deg / 700rpm

I had to do the same due to a fuel gauge.

I meant more of lights for the CEL, Brakes, Cruise Control, etc.
 

rayra

Expedition Leader
IIRC most of those other alert lights are LEDs, so I left them as they were, all were working fine.


And Martin yes, the factory trans temp gauge is a tempting thing. I've been looking at aftermarket digital gauges and thinking about an 'A' pillar pod for a couple gauges. Or finding a place another place to fit it in. Not a lot of empty space for that though. The dash panel below the steering wheel, but that's not really visible. Not sure which direction I'll go. Got a lot of other dash stuff to do first.

And I think it is telling that GM put them in the 2500s and not the 1500s. Given the topics we've had of late on 1500s having towing troubles with heavy loads.
 

rayra

Expedition Leader
So yesterday I was waging battle to install a double-din aftermarket radio in my din-and-a-half Suburban dash. There's various youtube vids / approaches to this, and it doesn't take a lot of money.
I chose to spend even less and took an approach that uses the later-year (2003-2006) dash bezel and central dash chasses, which I caged from a junkyard for <$40 for both.
I had to do a bit of bracket and chassis surgery, you have to fit that huge hulking double din radio (Pioneer AVH-280BT DVD touchscreen in my case) as well as relocate the air control unit downward about 5/8".
So I was cutting and fitting a lot of parts, repeatedly installing and removing parts. During one of those evolutions my heretofore problem-free air system said 'screw you' and broke, leaving my front air blowing only thru the Defrost / top position. Temp and speed all worked, so I figured the control unit was ok and the problem was instead with the actuator that moves the vent door thru the various positions.
I bit of uncomfortable work later, diagnosis confirmed, the vent mode actuator is jacked. Fixing it now.

The Pu-36 Act-tu-ate-or

heatmon01.jpg


The actuator is the cigarette-pack-sized thing. That big pie wedge plate is what swings the door in the vent distribution plenum to divert the air from windshield, to front vents to floor vents. It should have stayed in place when I took the two screws and electrical connector off the actuator and pulled on the actuator. It was stuck on, so I wiggled it all out from under the duct door engagement.

With the actuator removed, I turned the key and vent on and turned that vent duct door by hand to the front-blowing position. Making it driveable in this heat.


Then I removed the five screws holding the actuator clamshell together and found this mess

heatmon02.jpg
heatmon03.jpg


That main gear on the right is askew on the splined metal shaft of the plate, cracked in several places and jumped up off of the drivetrain. And that's why the vent was stuck in the Defrost position.

Unfortunately it's a nylon gear, and there's not really any good glue solution. Nor is gear readily available. I can buy a new actuator mechanism for $60 locally or $40 via rockauto.com. But I'm trying some cyanoacrylate (krazy glue). Prized the cracks open with a raxor blade, got a lot of glue in the cracks, then squeezed everything together for a few minutes as I wiped off the excess with some Q-Tips. Particularly off the inner splines, to keep them clear.

heatmon05.jpg


I'm going to go ahead and reassemble this and put it back in, if it works it works, if it doesn't I'll re-position the vent to the front so I can at least drive the vehicle in comfort.


background on actuators - they're a common item these days, gone are the long slider cables and vac lines. Everybody's using these solenoid packs to direct-drive the pivoting doors in vehicle air systems. Often the actuators are the same, doing different jobs. There's a 'Blend' door that controls the mix of warm and cold air to your desired temp - and TWO of those if your newer vehicle has zone controls. Then there's a 'Mode' door that directs the air to windshield, front vents or floor, or combinations of same.
They are all a pain in the butt to get to, prices vary wildly, and more often than not they can be 'repaired' for free. Sometimes you can even 'fix' them by re-setting your electrical system. When re-powered, your computerized vehicle will walk the actuators from limit to limit to learn the range.
The problems often originate when the actuators are repeatedly driven to the stops, they eventually drive off the end of the gear train - or as pictured above, things pop apart - and in those cases you can usually just extract the actuator, open and re-arrange its guts, and get things working again.


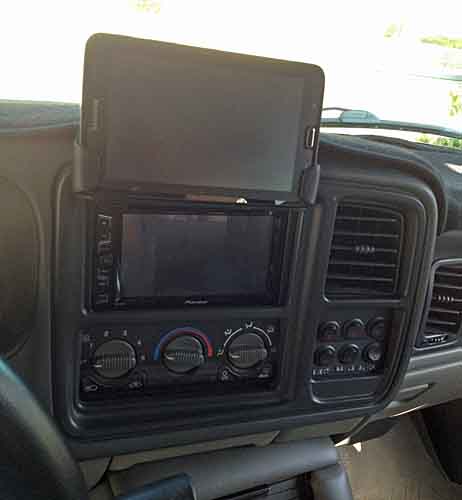
eta - the stereo install was aborted, amongst all the bits and pieces I needed to adapt the aftermarket radio, I'd missed that I needed an adapter to work with the Bose amp / speaker setup. I got everything hooked up and working with the new head unit, except NO SOUND. I've got the right part inbound, in the meantime I put the factory stereo back in. Next week I'll have that working. But I got all the physical fitting done. Here's how it looks installed (with my Samsung 7" tablet mount above it, just clearing the DVD slot)

pioneer05.jpg
pioneer04.jpg
 
Last edited:

rayra

Expedition Leader
As I feared, the krazy glue did not hold in this application. As soon as I pressed the actuator onto the metal shaft, the glued joint parted.

I looked at it a bit more, trying to figure another way to secure or even screw together nylon gear.

Looking at it, the gear is symmetrical, same indents on both sides, so reversible. The gear seats down onto a rim in the back cover of the actuator, which fits in the groove in the gear. The other side is then trapped in place by the top cover, which rides on the raised inner rim of the gear. so the 'top' groove of the gear is unimpeded.

heatmon06.jpg
heatmon07.jpg
heatmon08.jpg


So I hatched a plan to reinforce that groove and try some plastic-specific two-part epoxy on it. I fashioned a ring out of a metal coat hangar, which fit loosely in the groove. I then mixed up the epoxy and carefully partially filled the groove and let things settle a bit, then set the ring in that base and dribbled more epoxy until the groove was full.

heatmon09.jpg
heatmon10.jpg


It's 'set' in an hour, 'full strength' in 24hrs. I don't have that much time but can wait a few more hours before I put things together and try to put it back in play.
 
Last edited:

rayra

Expedition Leader
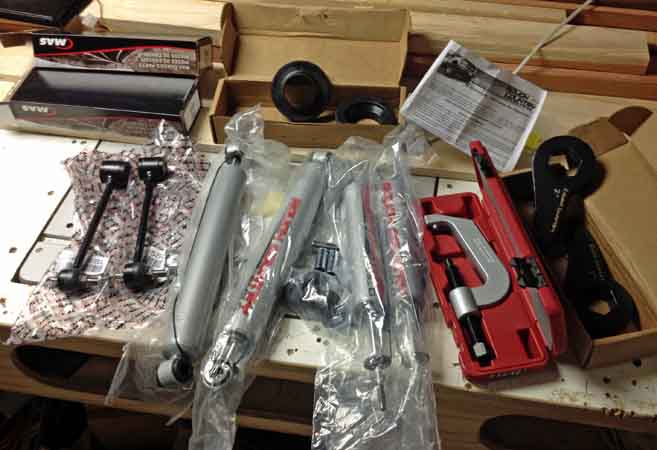
Suspension time. A minimal 2" leveling / lift kit from Rough Country, including their N2.0 shocks. New torsion keys and a rear coil spring spacer (that goes on the top of the coil)

I got the front half done this morning before the heat and fire smoke got to be too much (I'm in Santa Clarita). Already got an inch out of it with only a bit of tension on the torsion key bolts. My previous keys were dialed in with only 4 threads left on the bolts, previously. I'm an inch over that already, with about 14-16 threads left on the bolts. I'll crank them up more after I get the rear spacers in.


The lovely packaging from Rough Country

suspensionlift03.jpg


All the toys laid out with care, last night. The giant C-clamp looking thing is a loaner tool, specifically for 'unloading' GM torsion bar keys so they can be dismantled / reassembled.

suspensionlift05.jpg


The work I have to do tomorrow morning.
1) the rear coil springs, tucked up over the axle / frame;
2) the rear stabilizer bar end links, on on each side. I'm going ot have to pry the top flanges apart after its out as the new parts are a tad wider. I think I can do it with a large crescent wrench, dialed down tight on a flange and I can use the 12" handle for leverage to bend it open a bit
3) the rear shocks. The top bolt is buried up in the rear AC plumbing on one side, and the fuel filler on the other. Had a real hassle with these on the Tahoe last month.
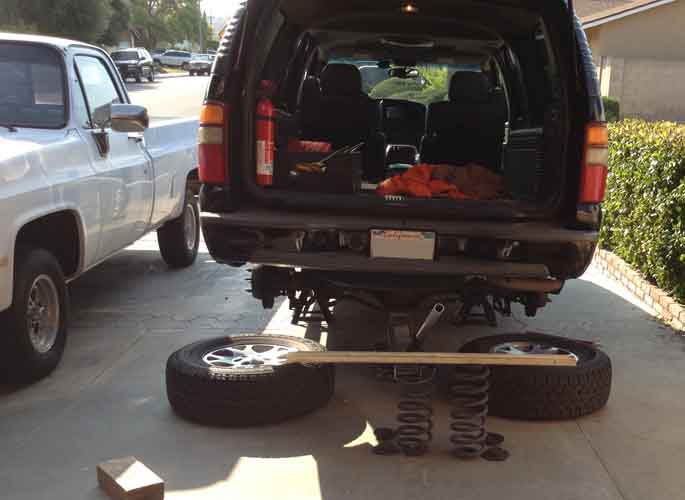
I have to jack the vehicle high in the air, put jackstands on the frame about 2' forward of the rear wheels, decouple all that **** and remove the wheel then lower the axle way down until the coil springs are loose. Then get the spacer in and put it all back together. One side at a time, after the whole *** is in the air.

suspensionlift04.jpg


The front shocks, original, 14yrs, 126k mi, they were a little dead.

suspensionlift07.jpg


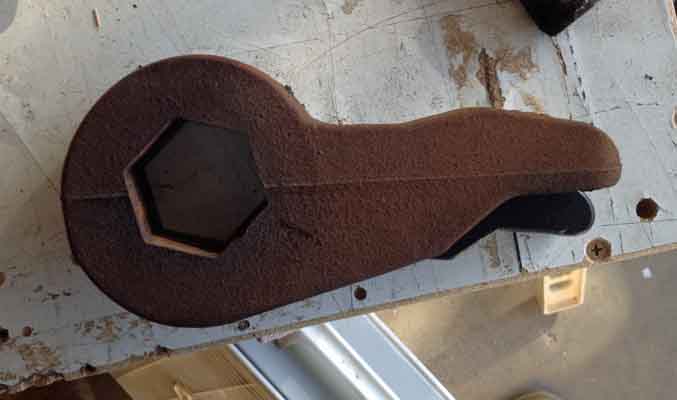
Here's the stock 1/2 ton / Z71 torsion bar key (rusty) atop the replacement 'lift' key. The hex opening is indexed / rotated several degrees, which results in greater lift.

suspensionlift06.jpg


I'm cleaning up the old ones as they have some re-sale value. IIRC they provide a similar lift increase over the stock keys in the similar years' pickups. Aftermarket to lift a Sub, a Sub's to lift a pickup.
So I started off letting them steep in a vinegar / salt solution. About five hours got most of it off, overnight would have been better. But of course I stupidly dumped the solution before I figured that out in the near-dark.
The coat hanger was just to keep them up off the bottom so the solution could circulate. I jiggled the bucket around once an hour.

suspensionlift08.jpg
suspensionlift09.jpg


Anybody need a set of '02 Sub keys for their pickup?

suspensionlift10.jpg
 
Last edited:

boll_rig

Adventurer
Just read though this whole thread finally. Really great info in all these posts rayra. I appreciate the detailed photos as well as I will probably need to tackle a few of these things some day. Already paid for the knock sensor fix unfortunately. Interested to hear how the rest of the suspension/shocks finished up. I got the leveling kit on mine, gained about 1.5 inches on the front and about 1 on the back from the spacer.
 

rayra

Expedition Leader
Thanks! I just finished the back end installs this morning. Got it done with just one smashed fingernail. Didn't get started until 0715, temp was already 78. Went pretty quick on the disassembly. Then things got fiddly as I had to pry open the bracket tabs for the new wider / fresh sway bar end links. And then struggling to get the coil springs back in with both their original end pads and the new spacers in place. I'd missed - and it wasn't in the kit instructions - the right rear brake line hangar bracket when I was trying to lower the axle. I lowered it and didn't quite have room to get the spring stack back into place. Only when I tried teetering the axle down on the passenger side did I notice the taught brake line.
So I jacked it back up, removed the hangar bracket and lowered it all again. Still a tight close non-fit. But then I could teeter the axle enough to get the spring stack back in. I also remembered an old trick, using string to tie the two rubber / poly pieces atop the spring coil, then I could wiggle and jam it around without knocking them out of position.
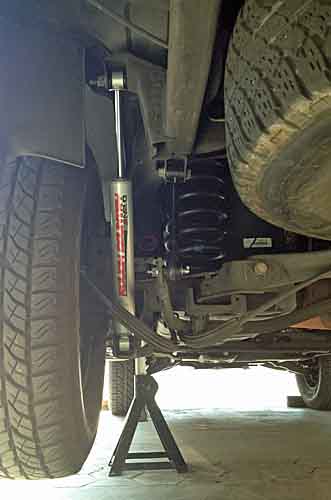
After that re-assembly went quickly, with the new shocks and end links.

suspensionlift11.jpg


I also took time in the middle to clean up the springs and their seats, got the grime and grit off. Not much really for 14yrs in SoCal.
I also checked the spring heights. I was expecting the driver side spring to be shorter / compressed. The whole fuel tank is on the driver side. Call it 300-lbs tank and 32gal of fuel. Plus the weight of the driver all the time. Last night I'd considered an idea to swap them side for side. But when I set them out with a 48" level across them, I found them to be very similar in height and I dropped the idea. I probably should have done it anyway, no better time for it.

suspensionlift12.jpg
suspensionlift13.jpg


That chewed-looking weird thing left of the springs is the rubber bump-stop for the rear axles. Totally decayed. And I haven't been bottoming out as far as I know, so I'm not sure why it's crumbling the way it is, other than age. RockAuto has replacements for $13ea, they're easy to get to with the tires off.


suspensionlift13.jpg


The springs all cleaned and hung by the chimney with care.


suspensionlift14.jpg
suspensionlift15.jpg


I'm a little annoyed the shocks didn't come with boots to shield the exposed rods. I suppose they are available at additional cost. I couldn't be arsed to shop for it, spend more money, or delay the installation.
Hard to see in those pics, but the new stabilizer bar end links (purchased separately, from RockAuto) came with zerk fittings on the ball-joint-like end bolt where they attach to the stabilizer bar itself. These will pretty much last the rest of the life of the vehicle. The factory original driver side was worn the hell out, that 'ball joint' -like bolt was flopping around loose in the end link.


I took some measurements at the top arch of the wheel well openings, centered over the hubs, both before and after. I'm up the 3/4" spacer in the rear (37.5") and about 1-1/4" in the front (37-3/4"). Note that the heights of the wheel well openings are not the same height on the vehicle, I'm going by appearance and maybe the level of the factory nerf bar / step, in making future adjustments.
I can and probably will go up another inch in the front. I'm going to drive it a bit, get it settled in, before I start measuring for level and making the last height adjustments.


Not much of a height increase overall, but the whole kit was $300 delivered, including Rough Country's N2.0 10-valve nitrogen-charged gas shocks. Overall it was cheaper than a set of factory replacement Z-71 shocks, and well less than any other name-brand 'off-road' shock vendor. And as my shocks were pretty much dead, it's pretty much a win-win over all. The vehicle rides well, firm but not stiff, no more roll / wallow and the 50-lbs+ I added with the roof rack deck is back to being unnoticeable. And a 3rd win for not getting maimed while working on coil springs, THIS time.


eta well balls. The boots were available from Rough Country for only $3.10ea. I should have bought them before the install. Going to be a pain in the *** to unbolt the shocks to put them on later. But I don't want to leave the shock rods exposed in the dry rocky terrain I'll be driving in.
http://www.roughcountry.com/shock-boot-87159.html
 
Last edited:

Forum statistics

Threads
188,362
Messages
2,906,024
Members
230,117
Latest member
greatwhite24
Top
­