Hey Vortec Guys! / Sierra pickup / Suburban / Yukon etc - Finally has Index!

fl0w3n

Observer
P.S. when I threw in my new radiator last weekend I also went and reseated the intake. I suspected that when I messed up the torque sequence I created an air leak and it wasn't quite running right. Well, I think I've ruled out placebo and it idles a little smoother now and seems to run a bit better down the road and pulling.

I'm still not thoroughly impressed with towing capabilities, seeing as the boat we tow is around 6500lbs, and this Burb is rated to tow nearly 10k lbs. I can't imagine adding another 4k lbs and trying to tackle any sort of grade... it'd be a 1st or 2nd gear crawl with the motor winging 4500-5500 RPM
 

rayra

Expedition Leader
6.0L, 2500, 4:10 gears, really shouldn't be a problem. It has the tow package / mode, doesn't it? I really don't think holding in 1st or 2nd at such hard revs is survivable, long term.
But the tow rating and GVWR should be sufficient. Just really keep your eye on that trans temp gauge.
 

ajmaudio

Adventurer
Max tow ratings from manufacturers are for selling vehicles... not realistic unless your only towing 10 miles across town.
 

Stryder106

Explorer
Lucas Fuel Treatment - HELP!! I bought a 32oz bottle of this stuff - which is enough for 320 gallons of fuel treatment. I had just filled my tank - 32 gallons when my daughter decided she would help me and put it ALL in my tank. I've gone on the Lucas site and done some research. According to official statements this product does not contain anything that could cause damage even if used in a higher than recommended quantity (they state you are only wasting money if you do that). However, 10X the amount is pretty dang high.
//
Do any of you guys have experience with this stuff? Any recommendations? Just drive it? Or, drain the tank - 32 gallons worth. I just filled my Rotopax so there is an extra 9 gallons - I'm tempted to drive it and immediately keep adding that fuel in to help dilute it down some. I really didn't need this sort of help when I'm in the 11th hour of getting ready for this really big trip - but hey - she meant well so I can't be pissed at her for it. I just need to know if this much lubrication in my fuel will mess with anything. Thanks
 

rayra

Expedition Leader
Heh. I'd siphon 1/2 the tank out, put the rotopax in the tank, fill the rotopax with the mix, top the tank off and feed the rotopax in one at a time at my next fills. Got any other fuel jugs handy?

I don't think it will hurt anything, though.


A gadget like a SuperSiphon is real handy. Just don't do what I did the other day and try to siphon a 6gal+ jug into a 20L. Nice big puddle of gas IN the garage. I'd filled the much older large jug and found it had cracked. Put the big jug on my rolling workbench, 20L on the floor, started the siphon and walked away to do other things, instead of hang out for 4mins.
 

rayra

Expedition Leader
well the oil pressure switch / sensor on the Missus' Tahoe has crapped out. Classic steady 80psi reading. ~192k mi. Really down deep behind the intake manifold, top of the block deck, driver side rear corner. There's vids of folks changing them without removing the intake. Not sure I can get my big hands in there. 27mm sensor socket. Ordering the part now, pics to come.


I also today tried to cut the lid end off the old evap canister on my table saw, got the perimeter cut but there's in internal partition still holding it together and I was busy cutting plywood for other projects so I set it aside. I'll get it apart for photo review this weekend.


Lastly, an interesting topic about inexpensive borescope cameras that work with smartphones.
https://www.ar15.com/forums/general/Borescopes-for-cell-phones-USB-ports-/5-2025411/
 

rayra

Expedition Leader
probably because it would cost 8 cents for longer wiring.

Going after the replacement tomorrow morning, should be easy. I already had the 1-1/16" sensor socket.

This video had some helpful tips on what to disconnect to clear a path, instead of wrestling to reach around those lines. Although I can't believe the guy didn't degrease that crap before pulling and replacing the sensor. Probably shoved a bunch of crud right in the new sensor trying to get it threaded in.

https://www.youtube.com/watch?time_continue=560&v=Cc5w90LGrB0
 

rayra

Expedition Leader
Got it done. Too busy wrestling and bruising my hand trying to get to it, to take any useful pictures. The sender is on the block deck, astern of the intake manifold and just to the driver's side of the centerline. About 9-10" of various extensions and adapters atop to tall sensor socket to get to a level where I could get a breaker bar into play, swinging above the top level of the intake manifold obstructions.
Even after pulling the fuel line, pivoting the EGR live etc, I still have a VERY difficult time gaining access. My hands are Large / XLarge, not very big, but had to contort and jam quite a bit to get in there. And even worse after installing the new sender and trying to plug in and snap down the electrical harness to it. Had to blind-feel the location of the tooth the clip snaps over - different clock position on the new sender vs the old - and at the end I was just barely able to get the electrical connection loosely in place and then just reach it with fingertips to seat it until I got the click of the connector snapping into place. Was about to give up and draft the missus to use her smaller hands and was in fact describing the procedure to her when I managed to accomplish it. Last gasp.

Definitely recommend doing this while the intake manifold is off. It's literally completely in the open then.

I put some teflon tape on the sender threads - it's a large diameter coarse thread, which made it fairly easy to thread back into its hole via socket and extension and by feel.

I also threw a couple layers of wrap on the nut / body of the sender itself, to give it a snug fit in the socket. So as to not drop the sender as I tried to maneuver it into place. And the sender socket is very deep, twice as deep as the sender itself. So wedging it in with tape was a good way to retain it and keep it from driving up into the socket, so some down force could be made while trying to thread it back in.

After 30mins of struggling to get the new sender mounted, it literally only took 2mins to re-couple everything else and fire the vehicle to see a proper ~48psi reading on the gauge. Where before it was pegged at 80psi. That's the typical failure mode of the this sender.


This picture is sort of oriented upside down, given how you have to approach the part. But it was the best picture I had.

oilpressuresender01.jpg


here's the old sensor, about 150% of life size


oilpressuresender02.jpg


I would encourage any do it yourselfers who are changing their intake manifold gaskets to make this a target of opportunity. ~$30 shipped form rockauto, ridiculously easy to replace while the manifold is out.


37.539 (holy carp)
 
Last edited:

rayra

Expedition Leader
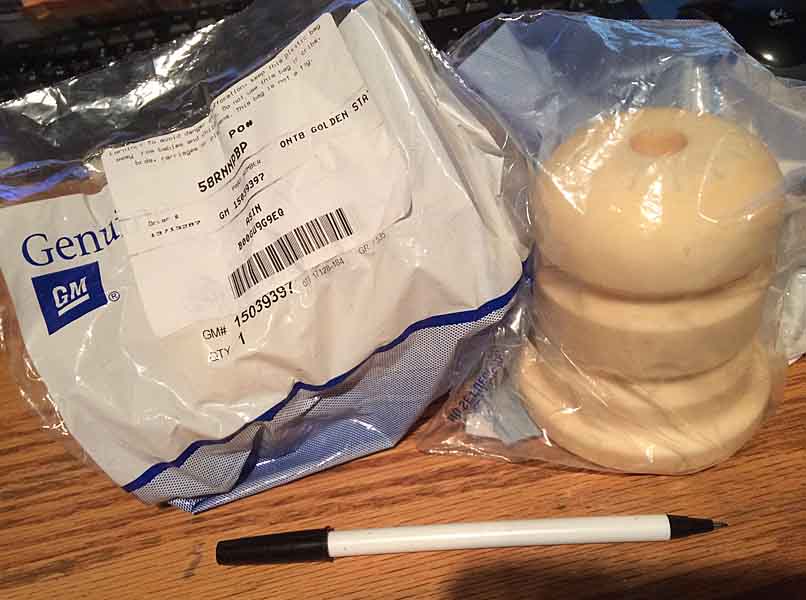
Solution to the crummy crumbly rear suspension bump stops. Can't seem to find the Z71 style red beehive for my '02. Come to think of it, I've never laid eyes on what our '05 Tahoe is equipped with. These are more column-shaped with a rounded end where they contact the rear axle.
They're $20ea just about anywhere. These are from Amazon, but the dealer pricing isn't significantly different. Been talking about them forever but recently have been packing heavy and toxing some loaded utility trailers, so I figured I better get on it.

suspensionbumpersGMT800.jpg
 

rayra

Expedition Leader
swapped them today, about 15mins work to jack the vehicle, pull the rear wheels and pry the decrepit old ones out and wedge the new ones in. They seat in a shallow metal cup that has some tiny retention louvers punch in it. Leading with the off-side tilted up into the cup, pressing it in then rotating the side facing you into the cup and then using a large screwdriver or equivalent tool you can wedge / pry the facing side up where it belongs. Faster to do it that type about it.

As Stryder already found out, this factory replacement part is a little disappointing. It's a 'generic' sort of thing and not an exact replacement. It's a good bit smaller than what was originally installed. Keep in mind too - as described som emonths ago in this topic - that I'd previously lopped off the final portion on my old bumpstops, because they were severely broken down and unevent, resulting in a sort of ************** kickout when rebounding out of heavy compression. My cuttign them even with each other did solve that. But now with these new stops installed, I don't think I'm even going to bottom out on them.


suspensionbumpersGMT800-2.jpg
suspensionbumpersGMT800-3.jpg
suspensionbumpersGMT800-4.jpg
 

03tahoe

Member
Nice thread raya. It been great to follow. On the rear bump stop topic I went with Timbren units last year and they have been working great. They were longer than the bump stops I pulled out. That helps keep the vehicle level when loaded heavily while still riding nice loaded or unloaded.
These are what my bump stops looked like coming out:
mL9620HVJfWHWCD2CvnWA7U-91pdnuz6ktSDzPx5KZqCFOqs8974BLZpc6PlNJH0D79w7qcl2LPqBXJHg7zWI6a8NbikOa0QgfgZfg2rHepCL3-CFQ1x4iezJw0nFW3rXBX01u72YjNktvgQ1kiJ6cfuzlX1YIbLOqWOLYMGffiybY0gfveJavBok9ZqQIo3EumbUDmdphz4rMrEWdybAuM-NCyEEkJ9yddDeAgy-FtAcDIt3U3m7C5CvKdxE9PRTAl_r1wfzH9t9mLUCbZshHXAI44C1xT0WZ5-qfS-_bOj-4oWN14KbO8SvUyolEOE3RIPChZrDtWnLkCwfADrRsYrkzhHCr-vOYYXTou71O6Y2DcatvrfebrQQXj1_jgrORMnsubGKd6yxOQpX_AbVUrmknZI1O5XBC2qyRillTdzoN0kpBz3BKd8DAtSg5fEaph7WH0PGJUoGtvXIRV6ReqLxScGjIF2mvyZAcwauPUXn8rSLzKK05o7YVLFnHDg9L6VXYWj0X499Gr5-MDfhNk7GVnuoc4Qx3ph6gl9zFZI8I6prqvH2IDqmNA4DnJVmdohiU0LClzcagvRKyYrthl33lYyfy4TdX37Xs35Ag=w1016-h762-no

Build thread for my Tahoe is over on NWOL at: http://northwestoverland.com/forums/topic/2003-tahoe/
 

rayra

Expedition Leader
03Tahoe, good topic, looks like you've been solving the same sort of stuff the GMT800 crowd here has been chasing. My next 'fix' is some good fitted seat covers. My driver side seat is really falling apart since the lift, as I drag my butt across it more.


sadchevy, I detailed it here in this topic. That last evolution shooting compressed air back up the line seemed to have done the trick, mostly. The missus reports maybe 1 time in 4 she'll get an early cutoff. Rest of the time she's able to refill without incident. I think the only time it cuts off early on her is when she's run the tank well past the 'low fuel light'. I keep askign her not to run that low, for several reasons. But she's approaching 200k mi on the original fuel pump and thinks that because it's always worked it's always gonna work.
If our two GMT800s took the same fuel pump, I'd already have one sitting on the shelf in the garage.
 

rayra

Expedition Leader
Sometimes I swear mechanical gremlins can smell money. Got a bit ahead of my bills and was considering my next vehicle upgrades and bam, my radiator cracks. Just flogged the vehicle to Vandenberg / Lompoc and back to L.A. this weekend, no noticed trouble. I was there to build some garage shelves so the only heavy vehicle use was loading it down with lumber / materials.
Didn't notice any overheating last night, but frankly I was so dog-tired I was barely keeping awake, much less monitoring my gauges. Didn't get home until almost midnight.
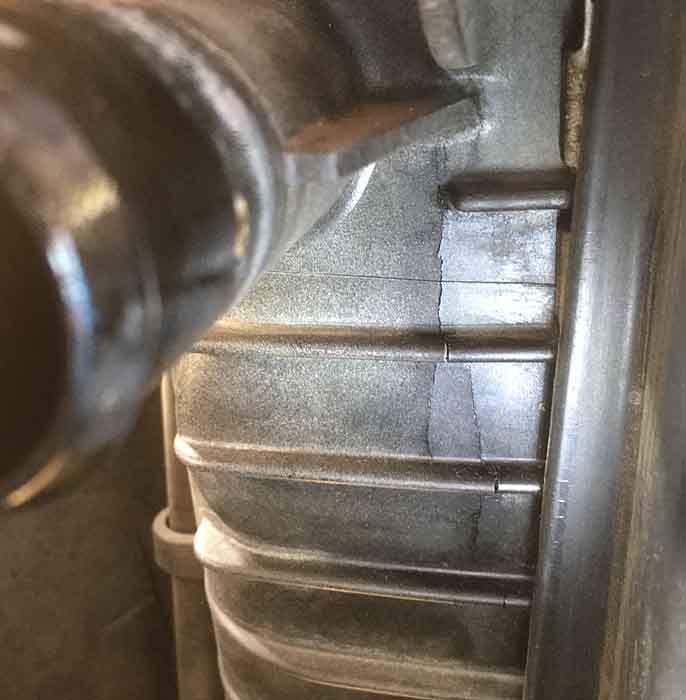
So this morning I'm cleaning and putting away my tools, cleaning the vehicle and doing some maintenance, an oil change, and I notice that my overflow tank is a bit low. 'Oh no' says I, wondering if my CasTech heads had sprung another leak. I added some coolant and got on with other things. In the mid-day I ran some errands and after returning I notice a puddle / stream on the driveway, centered under the engine. It's coolant. Thinking water pump weep - refreshing that whole subsystem has been on my 'To Do' list for two years, I start peeking around, but no, no signs there. But fluid is making it to the plastic and metal skidplates and draining in that center location. I start backtracking the 'wet' and find this -

radiatorcrack001.jpg


That dark mass and band in the upper left is the upper radiator hose. The crack seems to spawn from just below that hose neck on the tank.


Haven't started shopping for a replacement radiator yet. And in fact just got back from buying a new Grp78 battery when I discovered the radiator crack.


... hmm I wonder. Last Friday, for other reasons, I pulled my Grp75 starter battery to put it in my old pickup temporarily. During that separate issue I decided I would buy the new 78 so my starter would match my Aux battery and permanently donate my 75 to my pickup, whose battery had finally crapped out. So I left off the diagonal bracing rod that spans over the starter battery, intending to swap the battery today. Which I have now done. I cannot imagine that one weekend, one road trip of ~250mi sans that brace was enough to trigger that crack. But there is zero external signs of it existing before this weekend. ~135k mi, 15yrs. And suddenly there it is.


I might try to epoxy it tomorrow, for experimental purposes. Going to replace it, regardless. Rockauto has Delco OEM replacement for $162. Will check locally tomorrow.

lompoc052.jpg
lompoc057.jpg
 
Last edited:

rayra

Expedition Leader
So today I took a crack at the crack with this crack kit, which cracked $15. I've already ordered a replacement radiator ($161, rockauto + shipping), but figured it was a great opportunity to test such a kit against future need when far from home.

radiatorcrack002.jpg


The kit said it was formulated for radiator and gas tank plastics (nylon?). Came with an applicator brush, a swatch of sandpaper, a nice thick fiberglass patch about 5"x2" and a partitioned pouch of two-part epoxy.
I skimmed the directions and got busy cleaning the site, after draining down the radiator. I used brake cleaner as wash, some compressed air to blow it out of the crack, the kit sandpaper to roughen the surface to give some 'bite' for the epoxy.

radiatorcrack003.jpg
radiatorcrack004.jpg


And then things went all to hell. I followed the mixing instructions for the epoxy, which is squeeze one end until the middle partition opens and they mix, then mix for a bit, apply half to the site, fit the patch then apply the rest. I only got to the base application before the stuff kicked, my piece of mixing cardboard got too hot to hold and the last reach with the brush turned to gooey bulbble-bum. Never even got to the fiberglass application. Working time was <5mins.
I had taken too much time fiddling with the mixing, then trying to really work it into the cracks.

So I f'ed off and did something else for a while while it really set. And dug into my hobby bench mess to find some two-part plastics epoxy syringe I was sure I still had. And did. Sacrificed a good little art brush because I needed a short stiff brush to work the fiberglass. So I set about re-doing the effort with my own epoxy atop the first application. That seemed to go ok. In hindsight I should have cut the fiberglass into narrow strips to fit between the standing ridges on my radiator tank. Trying to apply the fiberglass in and over all the ribs was a joke. It was tough to get a good angle and application in those confines.

The shiny black at the top is the kit epoxy. The milky goop is my other stuff.

radiatorcrack005.jpg


After giving the 20min epoxy 30mins+, I poured all the coolant I'd captured back in, capped things off and revved it up. After about 10mins at a >2000rpm idle, I was well into operating temps and there was just a couple drops of fluid visible. I'd call it a decent emergency repair and will probably buy another kit to keep in the vehicle with the rest of the emergency junk.


/40,357
 
Last edited:

Forum statistics

Threads
188,362
Messages
2,906,012
Members
230,117
Latest member
greatwhite24
Top