Home made rooftop tent for XJ

MHead

Adventurer
More Jeep pictures

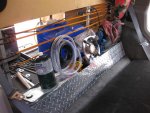
I guess the way to fill out this post is to, from time to time, post pictures of places or features. The picture below is a feature. The picture is taken thru the passenger side rear XJ door (it's a 4 door) looking back into the rear volume with the top of the rear bench seat folded forward. Normally in this view you would just see the empty cavity. In my jeep you are looking at the frontward end (but really the back of) the structure that holds the frig, drawers, and shelves.

The feature to be noticed is the tool and spare parts. The back of my drawers/shelves is vertical, but the back of the bench seat is not. The seat leans backwards. So there is a small triangular cavity. The picture shows that I've made use of this limited space by making aluminum boxes that just fit. These hold a fair number of tools and a bunch of spare parts such as duct tape, siphon hose, and other incidentals.

These came in really handy last summer in Colorado. My front axle smashed a transmission cooler line during articulation on a tough trail. I managed a field repair from these boxes using a rubber fuel hose splint and a couple of hose clamps. It's worked so well it is still there!

attachment.php

Thanks!
 

Attachments

  • IMG_0058.JPG
    IMG_0058.JPG
    73 KB · Views: 8,005
Last edited:

saburai

Explorer
Nice Rig!

Hi MHead,

I sent you a few PM's and I think, an email asking some questions about your very nice set up. I sent them 3/30/09 maybe you missed them...
If you could, please reply.

Many Thanks...
 

MHead

Adventurer
Hi MHead,

I sent you a few PM's and I think, an email asking some questions about your very nice set up. I sent them 3/30/09 maybe you missed them...
If you could, please reply.

Many Thanks...

OOPs! Mike discovers the PM. Yes there is a PM and I've got mail! Actually several messages over the last months. Sorry I've not replied. These all request information and pictures so I'll just put more pictures here in this post. It's frustrating to have all the previous ones disappear.

I'll cover the roof top tent in the next couple installments.

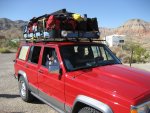
So here's a picture of the Jeep packed. My mission is to transport up to 4 people over difficult dirt roads into remote areas and provide self-sufficient camping for 3 nights, all food shelter water. The jeep pictured below has performed this mission many times. I show the picture to make the point that the roof top tent does not preculde the transportation of a great deal of cargo as well as the tent.

Yes rain is a problem and in subsequent editions I'll picture how I deal with it.


attachment.php


The picture below shows the roof top tent component with the cargo removed. You are looking at the folded tent. Already removed are two tables constructed of an aluminum framework and a thin plywood top. These not only provide civilized camping (tables) but serve the dual purpose of providing a deck above the tent to protect it from dirt, abrasion, and puncture from the cargo. Watch for these in the general camp pictures. I'll do a feature about them in the future sometime

attachment.php


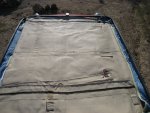
The tent is supported by 1/4" diameter fiberglass rods. These are flexable enough to be bent for various uses. In the picture below I've removed the tables and folded the roof top tent out more-or-less flat. It overhangs the roof rack symmetrically on each side. I'm sliding 1 of four transverse rods into pockets in the tent. The tent is an easy sewing job, being a simple rectangle with transverse and lengthwise pole pockets. After I slide all 4 transverse poles in the roof top tent is a big, flat, rectangle.

4
attachment.php


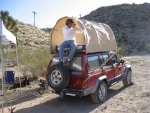
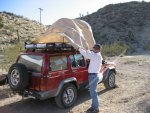
Next step is to erect the tent. This takes two people, one on each side of vehicle. First the two front poles are bent upwards and placed into recepticals on the roof rack. Next the rear two same operation. Picture below shows first two in and second two about to go in.

attachment.php


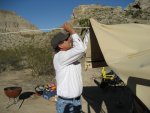
Once the tent is erected a set of 3 lengthwise poles are inserted into sleeves similar to the transverse. These 3 add lengthwise stiffining. Picture shows this operation being done. You'll also see zippers at the tent edge. There is another set of zippers at the tent front. There are two semi-circle flat panels (again a simple sewing job) which zip in to provide a rear door access and ventilation. But these, and the method of securing poles to roof rack are the subject of a future installment.

One thing to note is that this roof top tent depends upon access via steps welded onto the rear tire carrier.

5

Pictures taken at and nearby Beaver Dam Wilderness in SW Utah.


attachment.php
 

Attachments

  • IMG_0118.JPG
    IMG_0118.JPG
    643 KB · Views: 4,310
  • IMG_0122.JPG
    IMG_0122.JPG
    529 KB · Views: 4,084
  • IMG_0124.JPG
    IMG_0124.JPG
    756.6 KB · Views: 4,011
  • IMG_0120.JPG
    IMG_0120.JPG
    654.2 KB · Views: 4,057
  • IMG_0123.JPG
    IMG_0123.JPG
    633.3 KB · Views: 4,871
Last edited:

Xtreme XJ

Adventurer
I've always liked the set up, but you're kill'n me with it at that height... bump it 3" please... a good quality lift...

Now... how does the hood work ? Is it set up to vent hot air ?

Curt
 

slimtwo

Adventurer
That looks like a very cool set up! I would have liked to see all of the first pictures that disappeared. Very inovative. :Wow1:

Happy trails!
 

MHead

Adventurer
I've always liked the set up, but you're kill'n me with it at that height... bump it 3" please... a good quality lift...

Now... how does the hood work ? Is it set up to vent hot air ?

Curt


Thought a lot about lift... The reason you lift a vehicle is for larger tires. Larger tires get you over larger stuff. But lifting has a cost, especially for vehicles with cargo on top, which is higher center of gravity making vehicle more prone to roll over. Lifted vehicles are just less safe to operate off and on pavement. The other side of coin is that lots and lots of truely off-even-dirt-road locations are closed or closing these days. So I've concluded that I don't really need big tires. And I can't recall being shut out of someplace I wanted to camp due to obstacles. So it's worked for me so far.

I'm going to gradually add the pictures back.

Yes, hood is a Quadratec. Looks cool. Can't say I've noticed the engine running cooler.
 

MHead

Adventurer
Next Installment - Roof Top Tent End Panels

Here's the next installment.

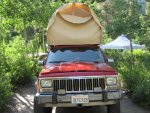
After the tent is erected and the lengthwise poles are slid in the last thing is to install the end panels. These are almost circular and zip to the canopy I showed erected in the previous post. Again a simple sewing job. The picture below shows the front pane. This has two zippers that zip from each side, coming together at the top. This approach allows the zippers to be partially zipped leaving an open vent. Notice I've installed the mating zippers in the tent somewhat in from the end. The idea is that the slight overhang (about 3") provides a little cover from rain and might keep it from entering the zippers, which will leak.

It's hard to see, but I also sewed a light rope into the very edge of the tent with the idea that I'd pull the rope tight and close this flap over the zippers in reall bad weather.

The rear panel is zipped differently. This panel has only one zipper that starts at one side and goes completely around to the other. This method provides a entry door when zipped 1/2 way.

This tent has no rain fly. It tends to get wet on the inside in cold weather from breath-moisture. So ventillation is important. A roof top tent is a different animal than a ground tent. There's no ground! Or rather there's no need to seal the tent at the bottom to prevent bug/snake/water entry. So this tent is designed to hang freely beside the edge of the roof rack. In cold situations warm breath air can rise out the vent and be easily replaced by air entering from below. In situations where the sun illumates the tent the material warms and the internal warmed air can rise out the vent, again being replaced from below by outside air. So, because roof top tents are unique in the tent world, they can be very well ventillated. And if you don't want the vent you close the zippers and the tent tends to capture warm air.

Lastly you can see a white shroud inside the tent. Since the tent can't be completely sealed there must be something done to prevent mosquito entry. The white shroud is just a net designed to be suspended over a ground cot. It's rectangular and it was really cheap. Turns out it is just the perfect size for use inside the tent. I just added velcro pads to the inside of the tent and to the corners and middle of the net. The net suspends from the inside of the tent. I'll show some better pictures later.

Picture taken at Rock Creek in California's Eastern Sierra.


attachment.php
 

Attachments

  • IMG_6602.JPG
    IMG_6602.JPG
    260.3 KB · Views: 2,545
Last edited:

MHead

Adventurer
Next Installment - Roof Top Tent Dimensions

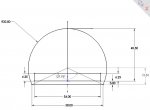
Here are a few drawings of the tent pictured in the previous posts.

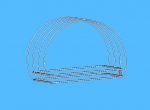
The drawing below shows the general support. You can see the roof rack and also the 1/4" dia fiberglass supports. These are shown in the arched position as though they were already in the tent sleeves. No tent is shown. Also not shown are the 3 lengthwise 1/4" rods that are inserted from the rear.

attachment.php


The following drawing gives some dimensions. Note that the beginning/ending points of the arch are actually below and outside the bottom of the roof rack. The drawing above doesn't show this. Drawing is an early design effort and is out of date. The approach in the drawing below has several beneifts:


1) There is more 'elbow room' since the tent is widest at about elbow level for a sitting occupant.
2) There is ventillation since there is a significant clearance from tent to side of roof rack
3) The mounts for the fiberglass rods are more out of the way and don't interfere with loading of the rack

The trick I found is to adjust the radius of the arch so that the total arc length is 10'. Turns out that the 1/4" fiberglass rod comes in 20' lengths and so when cut in half there is no waste. Also turns out that 10' zippers are available so again there is no waste. Also the material I used is supplied in somewhat wider than 5' rolls and I was able to cut the end panels directly without having to seam them to gain sufficient width.

The dimensions I show below result in a tent that is nice and roomy inside.

I've not shown any lengthwise dimensions. These are based on the rack length and the tent is sufficiently long to extend beyond the end of the rack by 2" beyond the end of the rack at each end, plus a 3" rain flap. I'll show how this is done in a future installment which will cover attaching the fiberglass rods.

By the way the 2" extension beyond the rack gets the front panel of the tent out beyond the roof rack lights, and allows you to sit at the rear when unzipping the door since you can put your feet between the rack and panel. And there's ventillation also.


attachment.php
 

Attachments

  • roofrack1.jpg
    roofrack1.jpg
    51.2 KB · Views: 2,462
  • sketch.jpg
    sketch.jpg
    36.6 KB · Views: 2,438
Last edited:

cnskate

Adventurer
Were you at Zion in April? I think I saw your rather distinctive truck in the campground there. I was tooling by in the NPS shuttle van so I didn't stop to say hi.
 

Forum statistics

Threads
188,362
Messages
2,906,035
Members
230,117
Latest member
greatwhite24
Top