How to build your own Carbon Fiber Camper making your own Composite/Foam panels.

Teardropper

Well-known member
I assume you'll join those with strips of carbon fiber cloth? And the final finish–UV clear coat, I assume?
 

ebrabaek

Adventurer
I assume you'll join those with strips of carbon fiber cloth? And the final finish–UV clear coat, I assume?
Great question really. The gap will be filled with Thixotropic epoxy that has been pigmented black. I have 3 inch tape for the purpose of covering the inside of the flange but I don't plan on using the tape at all. I know that will get many readers attention and perhaps in a skeptical way.
Thixotropic epoxy is the polymers world's dark horse. It is a formula that has been around since the late 60's and is used in high performance boat stringer composite construction and many Aviation companies use it in their structural layups like the Boeing 787 wing and fuselage.
It is an incredible polymer that if you have not worked with it before, it is quite natural to be skeptical but has incredible strength and torsional flexibility.
It is more than capable to arrest the edges and corners and hold them firm and not crack under flex and vibration.

Absolutely yes on a top coat. When it is all done I will spray several layers of a high quality automotive lacquer for UV protection.
 

ebrabaek

Adventurer
From the manufacture's website regarding Thixotropic and its mechanical properties.

Mechanical Properties

Hardness​
85 ± 5 Shore D​
Tee-Peel Strength​
4 Lbs. per inch Width​
Compressive Strength​
15,800 psi @ 77°F (25ºC)​
Tensile Shear Strength​
3,700 psi @ 77°F (25ºC)​
2,200 psi @ -112°F (-80ºC)​
1,450 psi @ 212°F (100ºC)​
Elongation Maximum Yield​
2.3%​
Tensile Strength​
8,800 psi​
Service Temperature​
-67°F to 250°F​
Thin Film Set Time​
120 minutes​
 

ebrabaek

Adventurer
Thanks. You obviously know what you're doing, so I'm leaving my skepticism in the closet. :cool:

Tony
It's quite OK Tony.
I am actually surprised not more have raised that as a concern. It is such a discussed subject..... how to join the pieces.
We're I to build a full size box I would reinforce the edges with a few layers of tape both inside and outside.
After I built the front box on my then off road trailer I beat and flexed the construction but were not seeing any give.
Thixotropic is truly remarkable in the way it works. Lots of great attributes.
Ability to grab and hold on to things are perhaps one of its best. Bonding alloy to composites has always been a tricky prospectus. Coefficient of thermal expansion between the two materials and the possibility of galvanic corrosion being the main issues.
Thix is what I would use. I will try to devote some time to destructive testing this week with left over materials as many are curious about this...... and for good reasons.
I have however not build a box this size and for that purpose and I have the 2 inch tape ready if I see anything I don't like. Have a plan on how to use it as well.
 

ebrabaek

Adventurer
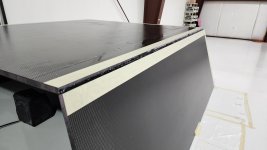
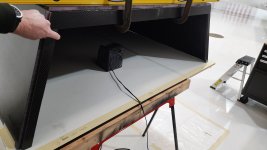
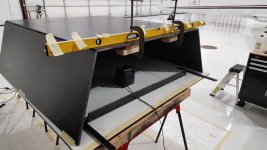
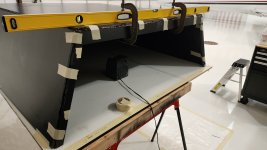
Masked off the edges and corners. I find it best to use the yellow paint tape. It has better adhesive than the blue. If you use the blue the epoxy tend to find itself into and under the masking tape.
20240318_074941.jpg


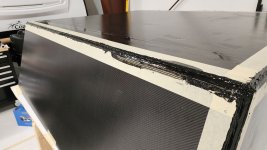
Then you mix the Thixotropic first, then add the pigment and begin build the void. It is very stable but if you use larger quantities to fill big voids, exothermic heat will make it run a bit. I will do this in two stages.
20240318_091835.jpg


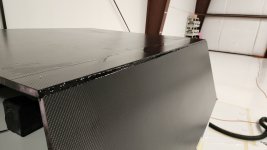
You have about 90 minutes@ 70 deg. It will not turn very fast. So this means that after 90 minutes it begin setting, but can be manipulated even after 3 hrs. Then peal off the tape..
20240318_093424.jpg
 

ebrabaek

Adventurer
Alright for all of you mayhem, madness and destruction aficionados....... Destructive testing video coming up this afternoon. I managed to blow somming up. It was however intentional and fabricated by a few left over scraps. Stay tuned.
 

ebrabaek

Adventurer
Time to work the rear.....ehhh....uhhmmm aft part of the camper shell. First we will cut and bond the top cross brace. That will be the anchor point for the Stainless continuous hinge that will pivot the rear do.... Ok... I gotta quite this.... Uhmmm aft swing flapamadoor plate thing.
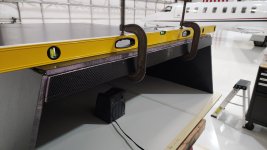
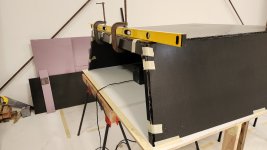
Note the straight aluminum brace across the top. This is to hold the top 100% straight as it will flex a bit hanging all these ornaments. This way it will stay and bond straight. All pieces cut out. Including the verticals.
20240319_082747.jpg


Sides...
20240319_083431.jpg


Have it all laid out with plenty of tape at your disposition.
20240319_083801.jpg


This is how the Thixotropic behaves at 70 deg. F......


Then bonded all pieces in.....
20240319_092321.jpg
20240319_092327.jpg
20240319_130624.jpg
 

ebrabaek

Adventurer
We got to blow stuff apart.... Bwaaaamuuuuhahahahaha.
I bonded two pieces of the layup just like I did on the box. Then covered it with Thoxotropic. Essentially same joint as on the box. The piece is 1.5 wide but as the thixotropic hardened it sorta ran away and only covered half of the 1.5 inches or 3/4 inches in total. It had also only cured 24 hrs but needed 48 to achieve full strength. I must say that I was impressed in several ways. First how well it articulated through out the stress and how much it took to break the joint. Should I spoil it...... Or ya wanna watch..... well... ha ha... It took 8.5 Kilos and I had to swing it a bit dynamically so it was right about there. The arm attatched to the saw horse is 2 inches, and the arm protruding away is 4.5 inches. Ask away.
Very impressive indeed.....

 
Last edited:

rruff

Explorer
Thanks a bunch for that page! (y)I used the 11oz cloth at the bottom a few years ago, bought from another place. When they quit selling it, I couldn't find it anywhere. The price is higher at USC, but it's still a great price for carbon.

I'd also like to thank you for posting this! Great info on a useful subject.

Now, a few questions and comments about your build... now that you are almost finished... 🤪

I agree regarding the edges... we tend to worry about it way too much on this site! Some Australian manufacturers are getting away with joining panels by basically slapping PU adhesive in a butt joint. I did fill the joints, sand them, and layup at least a couple layers of thick cloth on the inner and outer edges... but it was probably major overkill... and a major mess!

About the adhesive, I don't know if there was something special in the type you used, but I just mixed fumed silica in with the epoxy to thicken it, and this worked well.

I'm envious of your nice finish. I did hand layup. With FG I had ~1 to 1 ratio of cloth and epoxy by weight, but 1 to 1.5 with carbon due to its lower density.

In my experiments, carbon does crack more readily than fiberglass (same thickness), in impact testing. Carbon is a little stronger and a little lighter, but the main thing it has vs FG is stiffness. It's about 3x stiffer in matrix... so if you need something to be stiff, carbon is best. FG is actually quite flexible for a structural material.

I did a lot of testing. I think I liked that more than actual building. I did not like the cheap XPS foam, as it is weak... rips apart if you try to pull off the skin, and has poor support for the skins on impact... and epoxy doesn't stick to it well. Sanding and texturing improve it, but I ended up using PVC foam from Carbon Core, which is in a completely different league. It's also more expensive... and price keeps going up, like everything I guess. 1/2" full sheets are $90 now, and the 1.5" inch I used are $250, plus freight. https://www.carbon-core.com/product/pvc-structural-foam-sheets/ XPS will likely be fine in your application, though.
 

ebrabaek

Adventurer
Thanks a bunch for that page! (y)I used the 11oz cloth at the bottom a few years ago, bought from another place. When they quit selling it, I couldn't find it anywhere. The price is higher at USC, but it's still a great price for carbon.

I'd also like to thank you for posting this! Great info on a useful subject.

Now, a few questions and comments about your build... now that you are almost finished... 🤪

I agree regarding the edges... we tend to worry about it way too much on this site! Some Australian manufacturers are getting away with joining panels by basically slapping PU adhesive in a butt joint. I did fill the joints, sand them, and layup at least a couple layers of thick cloth on the inner and outer edges... but it was probably major overkill... and a major mess!

About the adhesive, I don't know if there was something special in the type you used, but I just mixed fumed silica in with the epoxy to thicken it, and this worked well.

I'm envious of your nice finish. I did hand layup. With FG I had ~1 to 1 ratio of cloth and epoxy by weight, but 1 to 1.5 with carbon due to its lower density.

In my experiments, carbon does crack more readily than fiberglass (same thickness), in impact testing. Carbon is a little stronger and a little lighter, but the main thing it has vs FG is stiffness. It's about 3x stiffer in matrix... so if you need something to be stiff, carbon is best. FG is actually quite flexible for a structural material.

I did a lot of testing. I think I liked that more than actual building. I did not like the cheap XPS foam, as it is weak... rips apart if you try to pull off the skin, and has poor support for the skins on impact... and epoxy doesn't stick to it well. Sanding and texturing improve it, but I ended up using PVC foam from Carbon Core, which is in a completely different league. It's also more expensive... and price keeps going up, like everything I guess. 1/2" full sheets are $90 now, and the 1.5" inch I used are $250, plus freight. https://www.carbon-core.com/product/pvc-structural-foam-sheets/ XPS will likely be fine in your application, though.
You are quite welcome. Yeah, there are books written on how to best join corners and more or less they all work. The main thing to focus on is what works for you. If you have experienced Carbon Fiber cracking at levels higher than Fiberglass I would tend to say that every thing being equal you have been using the wrong resin. I have build many things over the last 40 years beginning with glass and the last 35 in Carbon and I have never seen any failures. That included 2 heavy adventure bike bash plates. It is so important to do a bit of testing with your epoxys and once you find a vendor that delivers a great product you really want to stick with it. I have been using Polymer Composites in Ontario for the past 24'ish years and I have never seen a failure. That includes several different types of polymers.
I use MaxBond Thixotropic to bond the pieces together. The link is in the beginning of the thread. I sometimes use silica as well but its heavy and the amount you have to add to stabilize the run displaces quite a lot of epoxy which degrades the bonding effort. I use it mostly when making molds. Mine is hand laid up as well. The video of the first panel is in the beginning of the thread. Keeping 1/3rd resin by 2/3rd cloth is extremely difficult and many times I also end up closer to fitty fitty. Specially if I use a thicker polymer which need a post heat cure.
 

rruff

Explorer
I was whacking the panel with a sledge hammer to judge the "impact resistance"... obviously an extreme case! It made sense to me that carbon would be a bit lower due to its higher stiffness, and not much greater strength. A better comparison might have been to normalize weight, in which case I suspect the carbon would have won.

I didn't pursue the matter beyond that, but if I built a similar camper again I'd use carbon for the whole thing rather than just the base/floor and rear hatch/door. I ended up making a pivoting mechanism to allow for the truck frame's torsional flex, and with that (no need for camper flex), it's better to make the camper stiff. With your 1/2" panels and fully boxed truck frame the carbon would be optimal for sure.
 

Teardropper

Well-known member
We got to blow stuff apart.... Bwaaaamuuuuhahahahaha.
I bonded two pieces of the layup just like I did on the box. Then covered it with Thoxotropic. Essentially same joint as on the box. The piece is 1.5 wide but as the thixotropic hardened it sorta ran away and only covered half of the 1.5 inches or 3/4 inches in total. It had also only cured 24 hrs but needed 48 to achieve full strength. I must say that I was impressed in several ways. First how well it articulated through out the stress and how much it took to break the joint. Should I spoil it...... Or ya wanna watch..... well... ha ha... It took 8.5 Kilos and I had to swing it a bit dynamically so it was right about there. The arm attatched to the saw horse is 2 inches, and the arm protruding away is 4.5 inches. Ask away.
Very impressive indeed.....

Impressive.
 

ebrabaek

Adventurer
I was whacking the panel with a sledge hammer to judge the "impact resistance"... obviously an extreme case! It made sense to me that carbon would be a bit lower due to its higher stiffness, and not much greater strength. A better comparison might have been to normalize weight, in which case I suspect the carbon would have won.

I didn't pursue the matter beyond that, but if I built a similar camper again I'd use carbon for the whole thing rather than just the base/floor and rear hatch/door. I ended up making a pivoting mechanism to allow for the truck frame's torsional flex, and with that (no need for camper flex), it's better to make the camper stiff. With your 1/2" panels and fully boxed truck frame the carbon would be optimal for sure.
Destructive testing is indeed fun. I find it interesting but not just for the purpose of reaching the breaking point, but very much so past its breaking point see what failed and how it failed. When I made my first bash plate many moons ago I used a small throw away piece, went to the wall (Lived in El Paso TX at the time) and shot at it with a 40. I off course knew that it would penetrate so i went through a couple of quart size zip lock bags full of water first. Besides being a hoot I learned a lot from that and it led me to add a few layers of K-39 in the matrix. Mad scientist stuff for sure. Were I to build a full size box I would make a bunch of 8x4 sheets from 1 inch NGX. 3 layers of Carbon on both inside and outside. Bond it with Thixotropic. I would properly cut a few angles rather than bond the same way I did here simply for the reason that it is a lot of Thixotropic to use filling that void but thats just me.
 

Forum statistics

Threads
187,907
Messages
2,899,803
Members
229,071
Latest member
fireofficer001
Top