I did. I am getting about 2mpg better now that the wind is being re-directed over the camper and not into it. It also does a lot better in the wind while driving. Another plus is I have the use of my sunroof back. Before anything over 30mph was unbearable with the wind just hammering down on the top of my head.
Good to hear! My Ovrlnd has a 10” high frontal area x a wider width since its on a Tundra. Been thinking about a wind fairing somehow. Contacted Sherpa to see if they can do something similar for Tundras. Seems like its maybe as simple as mixing and matching Tundra width components with the shorty sides for the Tacomas. We’ll see …
Good to hear! My Ovrlnd has a 10” high frontal area x a wider width since its on a Tundra. Been thinking about a wind fairing somehow. Contacted Sherpa to see if they can do something similar for Tundras. Seems like its maybe as simple as mixing and matching Tundra width components with the shorty sides for the Tacomas. We’ll see …
I'm really pleased with my rack. It's got three load bars so I have plenty of room to store and this thing is super solid. I'd definitely wait for them to make one or get a full length one and cut it down for use with you camper. It's that good.
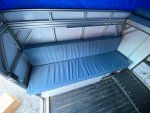
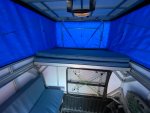
I just realized I have not discussed my mattress woes. The first and best mattress was an Exped Deep Sleep. It was super comfy, but unfortunately it would get pinched between the two bed panels and on the first night of my big trip last year it had a hole in it. So off to Walmart to get a replacement. That one lasted three nights. Then back to another Walmart that didn't have the right mattress so I picked up a mattress topper. That was actually a great idea and it was comfy, but a little thin. So now I am on the second set of custom cut foam trying to find the right firmness.
The current layout is made of 4 pieces that are 3" thick. One that is 58"x39" or half the bed. The other 3 are 58"x13". One of the smaller and the large piece are of HD36 Regular which is a medium firm mattress. The other two are a very firm foam and I use those for my couch cushions and at the foot of the bed where I don't really notice the firmness.
The firmness is a little much and after a few nights I start noticing it. So before I buy another piece of foam i am going to try using an insulated fitted sheet I have to see if that adds a little bit of cushion.
Good to hear! My Ovrlnd has a 10” high frontal area x a wider width since its on a Tundra. Been thinking about a wind fairing somehow. Contacted Sherpa to see if they can do something similar for Tundras. Seems like its maybe as simple as mixing and matching Tundra width components with the shorty sides for the Tacomas. We’ll see …
Not to thread jack here, but . . . For others with Tundras who may be reading this thread, Sherpa got back to me and said they they had had other inquiries about this and were working on a shorty Animus rack for Tundras. Apparently, they have to redesign the back mounting foot as their regular rack doesn't have a mid foot that could be used. No ETA. Maybe others contacting them and expressing interest would speed things up?
FWIW on the mattress, I used 2" of medium density foam and then 2" of the perforated latex foam. Very happy with that combo for sleeping. It's a bit soft for seat cushions, but works fine.
FWIW on the mattress, I used 2" of medium density foam and then 2" of the perforated latex foam. Very happy with that combo for sleeping. It's a bit soft for seat cushions, but works fine.
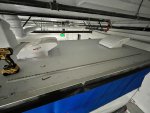
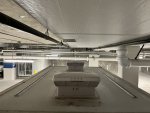
Finally made some real progress on the build. This next phase includes mounting everything on the outside that I will need access to while there is no insulation. Then insulate and put up interior walls.
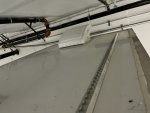
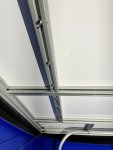
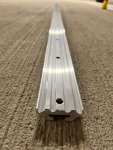
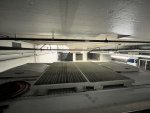
Today I installed the roof rails that I will mount my solar to and if I ever want some load bars as well. Tomorrow I will glue them down and seal them up and cut the excess length off of the screws inside.
In with one and out with the other. Or just twice the airflow. I much prefer the double bubble to one, it is way more comfy in the summertime to move air through it instead of just pull or blow air into the camper. I also don't have windows so two fans helps with that.
I didn't take a lot of pictures yesterday. I removed the roof rails and cleaned up the roof to prep it for adhesive. I used Sikaflex 221 which is the same stuff I used on the door and the fans. The rails have 4 tracks on the bottom side so I ran a hardy bead of sealant down the center two. On the ends the outer two got a half inch of sealant. Then prior to every screw going in the bolt hole got a dab of sealant. I should probably leak test it prior to installing insulation, but I don't have that much time and i'm pretty confident that it will be OK.
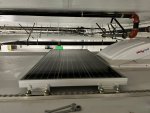
Like many things on a homemade build some things just don't line up the way you want them. In this case literally the frame rails and the roof rails and the solar mounts did not line up like they did when everything was unbuilt on the ground and on paper. I did make it work with a little file massaging on the solar panel mounts.
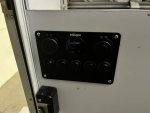
I also got the lights roughed in and the switch panel along with a short piece of conduit to protect the wires in the storage box. I disassembled my existing electrical setup so that I can re-do it all with the addition of the solar panels. I'm using a Renogy 30 DC-DC Charge Controller.
I was going to use FRP for the interior walls, but realized it is way to thin to work so unless someone else has a great suggestion that isn't wood I will use ACM.
This site uses cookies to help personalise content, tailor your experience and to keep you logged in if you register.
By continuing to use this site, you are consenting to our use of cookies.