I'M BATVAN! ...a 2006 E350 V10 DIY Ujoint Conversion

I can sure feel your pain with that one.... Bent axles suck. That's two for me, one for you, and one for Gregor and MG with 100% Satisfaction. At least you found yours in Ontario so there isn't a bunch of shipping involved. But a two hour round trip does cost money in fuel.
 

Vandit

Observer
That definitely sucks, but at least you caught it as early as you did. Hopefully you can get it rectified soon and find another one soon so you can keep moving forward. Looking forward to seeing your progress on swapping this new axle in.
 

Pinnacle Campers

Chateau spotter
So the junk yard took the bent axle back no questions asked, they didn't even want to see the pics. Probably happens all the time, he did mention that it was a light roll over so possible it got hit on the end.
The new axle came with e-brake cables and calipers and rotors. I kept the calipers and rotors off the first axle as I had turned the rotors and painted both.
I have been tearing down and inspecting the axle...
Is it me or does it look like the pinion has hit the diff carrier?
2pq98y1.jpg

My first instinct was to haul the thing back and move on to a different project.
I might just go ahead and do a full rebuild on it replacing all the bearings and seals. I had planned to try and get away with just throwing an axle in but it might not be worth the risk.
 
Last edited:

another_mike

Adventurer
So the junk yard took the bent axle back no questions asked, they didn't even want to see the pics. Probably happens all the time, he did mention that it was a light roll over so possible it got hit on the end.
The new axle came with e-brake cables and calipers and rotors. I kept the calipers and rotors off the first axle as I had turned the rotors and painted both.
I have been tearing down and inspecting the axle...
Is it me or does it look like the pinion has hit the diff carrier?
rarwci.jpg

My first instinct was to haul the thing back and move on to a different project.
I might just go ahead and do a full rebuild on it replacing all the bearings and seals. I had planned to try and get away with just throwing an axle in but it might not be worth the risk.

Cant see the picture, but good deal keeping the calipers.. If you get reman'd calipers from Ford, the core charge is $50 EACH! Mine were seized and I broke a piston getting one off.
 

Pinnacle Campers

Chateau spotter
I fixed the pic.
Yeah, at the other yards I have dealt with its almost like calipers don't exist. I think any calipers they can get a core for right away are gone. Its instant money for them. This yard seems to not care.
If buying an axle requiring a complete rebuild I think the cost should be around $400, I might call the yard and see if they will credit my account with some $.
My only other concern would be finding out later in the rebuild that it is not re-buildable or I may end up finding I need to buy a pinion shaft.
Putting a new diff in the axle that is already in the van sounds so easy right now....
 

shenrie

^^^ hates cars
correct on the calipers. all calipers are instant money for them.

sorry for the hassle with the axles man. guess I got lucky with my transaction at lkq. I paid 280 plus a 100 core. removed the lsd from my semi float and returned for my 100 core. speaking of which, I need to go list that on cl. its stinking up my garage :( good luck with getting it all sorted d00d...hate it when projects turn into a huge pita.
 

Pinnacle Campers

Chateau spotter
Well the salvage yard convinced me that the damage to the diff carrier was from a previous incident. I had to agree that was likely the case as the pinion moved freely and had no apparent shaft play. The diff oil left in the case was also crystal clear indicating a fresh rebuild. To make matters better they credited $400 back to me.
I checked the pinion torque, checked the pattern on the ring gear put new seals in and called it good.
After setting the pinion angle I got a measurement for the new driveshaft length and sent it off to Jims Drivetrain.
Then pulled the axle, welded on the spring perches, and shock/brake mounts and painted up the whole thing. I managed to paint the whole axle in por15 without getting any on my face. ;)
The emergency brake cable issue was easily solved by replacing the drivers side cable with the F-truck cable that came with the second axle.
icsg76.jpg

206cwnr.jpg

2w4zedw.jpg

mc4rqq.jpg

I haven't popped the rear cover off the old diff yet but judging by this sensor and how much quieter the van is now, I would say that problems lurk inside.
 
Last edited:

Pinnacle Campers

Chateau spotter
I took the Red (head steering gear) pill, and I like it.
25p1n5w.jpg

The is no play in this steering gear. Although it did unmask a worn out moog tie rod end with 35k miles. I put it on order.
 

shenrie

^^^ hates cars
nice! been contemplating one of these myself. I thought your steering was pretty crisp already after driving your van compared to mine. worth the moola huh?

sooo, uhhh, never saw any other disturbing pix come across my phone. healing up ok?
 

Pinnacle Campers

Chateau spotter
I did "adjust" my old box and it felt good for a while but then slowly degraded. This box says not to touch the set screw or it will void their warranty.
As for healing up, its been a long slow recovery.

Continued camperizing….
My chateau van (like most) came with the second row removable captains chairs. I have thought since buying the van that it would be cool to make a removable/swapable cabinet based off of another seat base. For a couple years now I have kept my eyes peeled for that extra seat base I can hack up to no avail. The reality is it would have likely been more difficult with a seat base anyways.
Instead I just replicated the seat base attachment points out of some angle and steel rods.
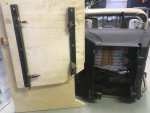
IMG_9983.JPG
With the pins interfacing the mount the cabinet is very solid. Under the lowest drawer there is a toggle clamp with a hook that replicates the OEM style connection. A step further, I installed leveling feet so some tension can be put against the floor.
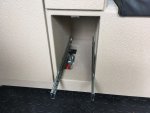
IMG_0014.JPG
This cabinets initial goal was to be a place to put our porta potty for an (at the time) upcoming bi-annual trip to southern Utah. In the past when taking the porta potty it pretty much just slid around under the bed, or was wedged behind the back seat. It was an accident waiting to happen.
I also decided that since we mostly cook outside I didn't really need this cabinet to be near the door. Putting the box on the driver side allowed it to be bigger than on the passenger side and still access the side door. Additionally I found we like the seat by the door.
For the moab trip the box looked like this.
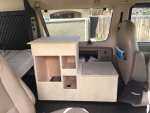
IMG_9987.JPG
There was one large cubby and 3 small ones, the top was removable (and ended up on the bed a few times when playing cards), and enough room in the box for the potty but not enough to get anything else in or out of the box if it was in there, you know like the toilet paper, the box required some modifications to the top for a bigger opening.
In short, we learned a few things by trying the box out in this rough draft form. The larger cubby was used for drinks that were cycled into the fridge, with coats stuffed above. The smaller cubbies were nice for our toiletries bags. I guess this is more like a bathroom cabinet/pantry/nightstand at this point.
After the test run I sourced some hardware, like the nice southco push to turn latches https://amzn.to/2xPKLE4, soft close drawer slides https://amzn.to/2xN2Hz0, a stainless sink off ebay, and a a stainless hinge continuous hinge, these 3' ones https://amzn.to/2JvttRg tend to be the same price as a 16"-24" and they can be cut easily, this was enough for the drop shelf and the box lid.
At first I chose this quick release H/C faucet https://amzn.to/2JdvEte and spigot https://amzn.to/2JtSVXp but felt that its black plastic look didn't really fit well so I bought the black bar sink faucet https://amzn.to/2xO0p2H I'm sure the quick release spigot will get used on a later project, Seems like it could simplify the need for two faucet locations when you can change it from faucet to hose sprayer, https://amzn.to/2kQovR1
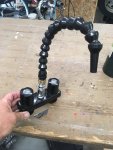
IMG_0097.JPG
I really wanted an undermount sink with a black corian countertop but scraps were difficult to find, and sourcing a piece was proving to be costly. My alternative was butcher block, I looked around a bit for something even craigslist for used stuff. I finally decided, with as customized as I wanted it, making one made the most sense. I took a look at my hardwood stock and found enough maple and walnut to do what I wanted, always nice having the materials I need.
I cut some 1 1/4" strips and laminated them together. As you can imagine, there is a ton of time in something like this but the results are great.
IMG_0096.JPG
I made a drop down leaf over the bench seat side so that my camp stove can be set up there if I need to cook inside. I used one of these stainless steel rotating lid supports from a two pack,https://amzn.to/2Jgc4N9
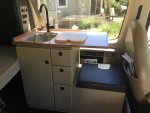
I'm finding that if I expect a cold morning I set up the stove on the counter the night before for hot drinks without getting out of the van the next morning. The countertop has a backsplash on two sides, and an undermount sink and a drop-in cutting board panel. The jury is still out on the cutting board. It doesn't make any noise (yet), I put cabinet bumpers on the bottom edges. Its functionality in this scenario is questionable. I like the look of it in place, but taking it out for a quick hand washing is silly and where do you put it if something is on the counter? Its heavy and clunky and might get left behind.
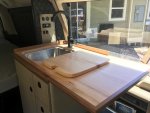
IMG_0088.JPG
For grey water holding I used a 2.5 gallon gas can, its connected to the sink with one of these sink drains, https://amzn.to/2HpWKYr and a sink strainer https://amzn.to/2Ltxlzl which were all found to be compatible. I really only see us using this sink/faucet for teeth brushing or a quick hand wash before bed. We do most of our dish washing in dish pans with the sprayer faucet out the back. Besides the places we go this grey water could always be used to drown out a campfire. I really think the portable, accessible, cleanable, replacable grey/fresh tanks are the way to go at the expense of space inside and a perceived lower capacity.
As you can see I turned the larger cubby into a cabinet, and the smaller cubbies into 3 drawers.
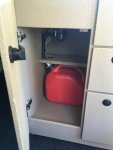
IMG_0092.JPG
The faucet is tapped into the existing hot and cold lines, right behind the left side panel, so there is hot water for a while after driving (exchanger is in the coolant loop), or if you hit the Espar button on the panel to the left and wait a few minutes. I really think I need to "3 way" my pump switch (which is at the back) with another one right here on the panel.
I bought some 3" high density foam and covered the lid with black vinyl. I unfortunately don't have any more of the diamond quilted vinyl left. I think this looks good here. I even used a router to relieve the back of the panel so the seams and ends were inset. I'm considering something for the groove to hide the fabric ends and staples.
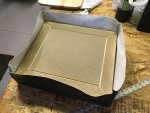
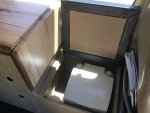
IMG_0005.JPG
IMG_0091.JPG
I also had the upol tintable raptor liner color matched to my tan interior plastics. My local Sherwin William auto paint store did the color matching and did a fantastic job. I'm pretty happy with the raptor although I will say that it doesn't seem as durable as Monstraliner, the finish is also "grittier" in texture, at the same time Monstraliner is a bit more expensive and non tintable. I used a 4 liter kit https://amzn.to/2xKeBtD which is more than I expected but as much as I was prepared for. I also did the bottom, insides, and the drawers inside and out which is a lot of surface area. Just an FYI the coating and tint alone was $130 but the wood is cheap and easy to work with/ very customizable, and easy to fix screw ups.
Pretty happy with the results, its a pretty functional piece of camper furniture.
IMG_0086.JPG
:)
 
Last edited:

Vandit

Observer
One of my favorite vans keeps getting better! Nice work! The cabinet looks great.

I too, used Raptor to spray my fiberglass high top and was very happy with the custom paint match I was able to achieve. Being able to custom tint is definitely one of the advantages of using it.
 

Pinnacle Campers

Chateau spotter
One of my favorite vans keeps getting better! Nice work! The cabinet looks great.

I too, used Raptor to spray my fiberglass high top and was very happy with the custom paint match I was able to achieve. Being able to custom tint is definitely one of the advantages of using it.

Thanks for your comment Vandit!
 

Pinnacle Campers

Chateau spotter
Recently the last of my two key fobs had bit the dust. I made them last as long as I could. Even after the tabs had broken off that the key ring attaches to I just drilled a hole right through the corner and threaded the ring through the body. But now, even with new batteries they would not lock or unlock the doors, and using a key is a pain.
So I took a $10 risk, man I sound like a cheapskate, https://amzn.to/2JephWS
I tried several times to get the new key fobs to program. There is a sequence of events that needs to happen in order to enter programming mode on the van, the sequence is detailed in the instructions included with the fobs and was verified by the Ford shop manual.
First I removed and inspected the connectors to the remote door locks module in the passenger footwell, then I pugged in my SCT tuner and checked for codes, there was a code so I cleared all codes.
I then tried to program and was successful. So it seem all codes need to be cleared before a successful programming can take place.
I might have to revisit the shop manual but I didn't see anything in there about this while researching the problem. I also wonder if the old fob can be reprogrammed after this.
Hope this helps others.
 

another_mike

Adventurer
Recently the last of my two key fobs had bit the dust. I made them last as long as I could. Even after the tabs had broken off that the key ring attaches to I just drilled a hole right through the corner and threaded the ring through the body. But now, even with new batteries they would not lock or unlock the doors, and using a key is a pain.
So I took a $10 risk, man I sound like a cheapskate, https://amzn.to/2JephWS
I tried several times to get the new key fobs to program. There is a sequence of events that needs to happen in order to enter programming mode on the van, the sequence is detailed in the instructions included with the fobs and was verified by the Ford shop manual.
First I removed and inspected the connectors to the remote door locks module in the passenger footwell, then I pugged in my SCT tuner and checked for codes, there was a code so I cleared all codes.
I then tried to program and was successful. So it seem all codes need to be cleared before a successful programming can take place.
I might have to revisit the shop manual but I didn't see anything in there about this while researching the problem. I also wonder if the old fob can be reprogrammed after this.
Hope this helps others.
according to page 57 of the E350 owners manual (downloadable from the Ford site in PDF), you can program up to 4 remotes but all remotes must be programmed at the same time. Doesnt say anything about needing codes to be cleared.
 

Forum statistics

Threads
188,358
Messages
2,905,901
Members
230,117
Latest member
greatwhite24
Top