Introducing Miss Rubi, a 2012 Jeep Rubicon Unlimited

crawler#976

Expedition Leader
Tami has named her Jeep Miss Rubi, and here's what we've done so far.

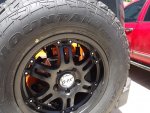
Hot Head liners, Poison Spyder Evap Skid, 5W LED Reverse bulbs, 255/80-17 BFG KM2's w/ center blocks siped - on GFX09 black 17x8.5 rims.

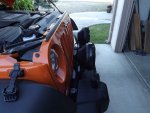
Took it on Broken Arrow trail in Sedona yesterday - traffic was high, so my photo ops were limited. Got a neat side by side of a 1953 Military Jeep w/ Spud Gun! Until Miss Rubi is lifted, the tires make contact with the upper fender if the sway bar is disconnected. The photo is with the sway bar connected.
 

Attachments

  • 1953 2012.jpg
    1953 2012.jpg
    347.8 KB · Views: 182
  • Miss Rubi.jpg
    Miss Rubi.jpg
    397.1 KB · Views: 153

crawler#976

Expedition Leader
With the limited space in the Jeep, We decided to move the Yaesu FT-7900R and Larsen NMO 2/70 antenna from the truck to the Jeep. The detachable faceplate allowed us to find room for the faceplate and microphone between the seats on the sound bar. The radio itself is under the passenger's seat. All the wiring was all run under carpet or in the B-pillar trim, and I used the factory wiring loom from the body to the tailgate for the coax. Power was brought thru the firewall on the driver side firewall, and the loom was secured via various locations with wire ties. It was routed under the console to the floor at the passengers side seat. Jeep provides a rubber grommet thru the tailgate on the right side of the spare tire mount for the coax. Very handy! I bent a 90 deg bracket from 1.50" x 0.125 mild steel, and used Duplicolor bed liner from a rattle can to keep it from rusting. Obviously the antenna location is not ideal, but it is well protected, and clears the garage door by an inch. SWR is 2.5, but the reports I've gotten so far are good. I had no trouble reaching Prescott on simplex from inside the garage, roughly 15 miles. The repeater in Flagstaff was clear, but my transmissions were reported a bit scratchy. Again this was from inside the garage, so it should be better outside. I was please with how clean the install came out, but it sure took a long time. It was a full 8 hours with a short break to clean up and bandage a nice little grinder wound on my right index finger. The old Makita 4" with no guard bit me pretty good while shaping the mount. It removed a strip about 5/16 wide x 1.25 long about an 1/8 deep. After that it really took time to get stuff done...
 

Attachments

  • 5.jpg
    5.jpg
    418.4 KB · Views: 113
  • 4.jpg
    4.jpg
    411.7 KB · Views: 96
  • 3.jpg
    3.jpg
    370.9 KB · Views: 104
  • 2.jpg
    2.jpg
    409.7 KB · Views: 95
  • 1.jpg
    1.jpg
    96.6 KB · Views: 143

crawler#976

Expedition Leader
Relay for '12 JKUR using the High Beam curcuit.

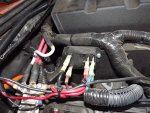
Did some research and came up with a different style relay, a Tyco Electronics or Potter & Brumfield T92S7D22-12 six pin. It's a fully sealed and potted industrial relay. The relay has a very low power draw, and it only activates the switch, not the main power in and out of the relay. The two separate terminals, 0 (power in) and 1 (earth) are for switching power only, so when the four main terminals are switched on, they take primary power in and out. Terminal 2 switches to 4, terminal 6 switches to 8.

No buzz, no chatter, no flicker.

http://www.te.com/catalog/pn/en/1-1393212-4
_______________________________________________________

I'll add some pics of the lights once the install is semi-finalized.

I'm very, very disappointed in the Quadratec exclusive light mounts:

http://www.quadratec.com/products/12110_201.htm

We plan on adding a bumper and winch, so I looked for a less expensive way to mount HID's on Miss Rubi. These certainly prove that you get what you pay for, and yet at $70.00 plus shipping, they weren't "cheap" cheap either. The mounts bolt to the radiator support, and shake like a leaf. I added a cross brace and a vertical support that helped, but they still are not up to any type of washboard road. I will weld a gusset to the angles to try an add some rigidity to the setup, but I don't want to spend too much time or money on a poor product. The lights I tried to mount (Kragen 7" HID's) were too deep even after moving the mounting hole forward, so they have been removed. A set of the new KC Hilite #851's is on the way (same lights as are on Cactus Red, my Power Wagon - http://www.expeditionportal.com/forum/threads/27965-The-Cactus-Red-mod-thread?p=1118799#post1118799) after finding that they will be a perfect fit. Update on that should be next week.

Mark
 

Attachments

  • relay 1.jpg
    relay 1.jpg
    324.8 KB · Views: 49

crawler#976

Expedition Leader
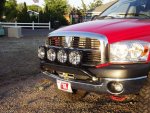
Got the KC Hilite #851 PolyMax driving lights installed. Also have a couple on the Power Wagon. I'm very pleased with the light quality and the good driving pattern.

We had originally installed a set of the Kragen HID's but they were too deep, and touched the grill.
 

Attachments

  • j3.jpg
    j3.jpg
    363.8 KB · Views: 73
  • j2.jpg
    j2.jpg
    405.6 KB · Views: 71
  • j1.jpg
    j1.jpg
    307.1 KB · Views: 75
  • lights.jpg
    lights.jpg
    504.9 KB · Views: 68

crawler#976

Expedition Leader
The owners manual doesn't have the instructions on how to turn off seatbelt chime on the '12 Jeep. All it says its that an authorized dealer can turn it off. After a little online research, I found the procedure is the same as previous years.

Start with the seat belt buckled, turn the key to the on position. Within the first 60 seconds, unbuckle and buckle the belt three times in 10 seconds, turn off the key, and when the door is opened, a single chime will be heard. That's it! Much quicker than going to the dealer.

Mark
 

Forum statistics

Threads
188,062
Messages
2,901,754
Members
229,415
Latest member
Gatofoamball
Top