ITTOG's Truck Camper Build (was 6' x 12' Trailer Conversion)

ITTOG

Well-known member
I guess you could make up for it by having a good roof sealer. Maybe even truck bedliner.
I didn't show it on my drawing but there is usually something to seal on the roof and edge of the angle. They two options I have seen dicor or eternabond. Dicor is a self leveling sealant and the other is a tape.

Sent from my Pixel 5 using Tapatalk
 

ITTOG

Well-known member
My plan to attach my skin was to use VHB 4991 tape. This is what 3M suggested as the best tape to use. I was planning to use 1" tape given my tube is 1.5". But wow, the price for 108' is $200. That will add up fast. To do it the way I was planning, I would need at least three rolls. That would be about $650 just for tape. Ouch!
1634906368127.png

Looking at alternatives, I am considering the VHB tape and Sika 252. With that approach I hope to get buy with one roll of the tape and four cartridges of Sika. That would lower the cost to about $300.
1634906969522.png

I guess $650 isn't too bad when compared to the cost of the total camper but why spend that much if I don't have to. The Sika should work just as well as the VHB tape. Right?
 

ITTOG

Well-known member
Long story short, the fall is very busy for me with kids' birthdays, college football, holidays, etc. I tried to push through but by the time October hit I needed time, lots of it, and a break. So, that, a bad back, and supply chain issues with steel I took some time off. Lastly, I want to make it a hard sided popup but feel fabric will be easier. Fabric will require I find a 3rd party. Therefore, I am at an impasse. In February I have an ATV trip and then hope to get back after it.

Thanks for the inquiry. It helps the motivation.
 

1000arms

Well-known member
Long story short, the fall is very busy for me with kids' birthdays, college football, holidays, etc. I tried to push through but by the time October hit I needed time, lots of it, and a break. So, that, a bad back, and supply chain issues with steel I took some time off. Lastly, I want to make it a hard sided popup but feel fabric will be easier. Fabric will require I find a 3rd party. Therefore, I am at an impasse. In February I have an ATV trip and then hope to get back after it.

Thanks for the inquiry. It helps the motivation.
You are welcome. Your thread is one of the build threads I follow. :)

You mentioned 3rd party for soft sides, but, was that for the material or to make it? Considering what you have done, I suspect you could figure out how to stitch your own.
 

java

Expedition Leader
My plan to attach my skin was to use VHB 4991 tape. This is what 3M suggested as the best tape to use. I was planning to use 1" tape given my tube is 1.5". But wow, the price for 108' is $200. That will add up fast. To do it the way I was planning, I would need at least three rolls. That would be about $650 just for tape. Ouch!
View attachment 688755

Looking at alternatives, I am considering the VHB tape and Sika 252. With that approach I hope to get buy with one roll of the tape and four cartridges of Sika. That would lower the cost to about $300.
View attachment 688756

I guess $650 isn't too bad when compared to the cost of the total camper but why spend that much if I don't have to. The Sika should work just as well as the VHB tape. Right?
Be very careful with the 252, it's very particular about what it bonds to.

Sent from my SM-G973U using Tapatalk
 

ITTOG

Well-known member
You are welcome. Your thread is one of the build threads I follow. :)

You mentioned 3rd party for soft sides, but, was that for the material or to make it? Considering what you have done, I suspect you could figure out how to stitch your own.

I was talking about doing the sewing but both really. I am confident that I could do the sewing but I have zero interest. In addition, I would have to buy a sewing machine. But the biggest factor is I really want to make it a hard side. So I really just need to take the time to design it.

Sent from my Pixel 6 Pro using Tapatalk
 

ITTOG

Well-known member
Be very careful with the 252, it's very particular about what it bonds to.

Sent from my SM-G973U using Tapatalk
Thanks for the heads up. I will definitely research it.

Sent from my Pixel 6 Pro using Tapatalk
 

java

Expedition Leader
Thanks for the heads up. I will definitely research it.

Sent from my Pixel 6 Pro using Tapatalk
Use the prescribed primer, and it doesn't stick to ABS period. And a few others, but that's my experience.

Sent from my SM-G973U using Tapatalk
 

Andrew_S

Observer
I went with Sika 221 & rivets. Very forgiving to install and is holding up great.
221 doesn't have as much shear strength as VHB but unless you need that inherent shear, it's irrelevant.
 

ITTOG

Well-known member
Date: Jan 29, 2021
Time: 1 hours
Total Time to Date: 196 hours
Rework: 4 hours
Total Rework to Date: 79 hours (not part of Time above)
Current Weight: 631 pounds
Roof: 123
Camper: 460 (calculated)
Wedge Weight: 48

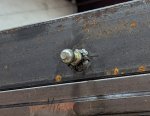
If you have been reading along for the past year you will recall I had issues welding my roof together (https://expeditionportal.com/forum/...6-x-12-trailer-conversion.199414/post-2919559 and https://expeditionportal.com/forum/...6-x-12-trailer-conversion.199414/post-2924017). I believe I tore the roof apart on two different occasions trying to make it better, but with no luck. Trying to weld two 1.5" tubes together to make a 3" tube was causing a lot of twisting and bending of the metal. Therefore, I had gaps between the roof in the camper up to 3/8" wide. That obviously was not going to work. My local steel company did not have a supplier for 3" by 1.5" tube but they did tell me it exists. So I decided to contact the local machine shops and fabricators to see if they had access to a supplier that could provide 3" by 1.5" tube. Fortunately, the machine shop I used previously was able to source it and now I have a roof with hardly any gap, 1/16" max. I also had my gas strut anchors welded into the camper. In this picture from last year you can see the anchor sticking out of the tube. You can also see the end of a cylinder the anchor screws into.
PXL_20210724_203943619.jpg

In these pictures you can see the new 3" tube roof and the cylinder has been welded into the tube. The cylinder is 1.5" long so it is welded on the backside of the tube as well.
PXL_20220202_141355972.jpg
PXL_20220202_141355972 (2).jpg

The next step is to begin working on the lift stabilizers at each end.
 
Last edited:

ITTOG

Well-known member
Date: Feb 5, 2022
Time: 4 hours
Total Time to Date: 200 hours
Rework: 0 hours
Total Rework to Date: 79 hours (not part of Time above)
Current Weight: 631 pounds
Roof: 123
Camper: 460 (calculated)
Wedge Weight: 48


You may have noticed in the last post the camper is located inside a building. I have become friends with a couple guys that work there and one of them is helping me build the lift stabilizers. In this first pic we have measured the height of the roof above the camper and welded fixed supports at the four corners to hold the roof in place. The four gas struts are also in place. All of this to build the lift stabilizers at each end. On the left end you can also see where we started mocking up a lift stabilizer. Unfortunately it is difficult to see with all the stuff behind the camper. I tried to remove that stuff but I don't have good tools to allow me to modify the pic. Hopefully you can figure it out.
PXL_20220208_213732349.jpg

This pic is looking at the cabover section. Again you can see the initial mockup of the lift stabilizer. The top and bottom hinges are hidden by the roof frame and camper frame respectively, but you can see the hinge in the middle. Once the mockup is complete I will run diagonal tubes from each and of the metal horizontal tube in the middle to the hinges on the roof and camper frame.
PXL_20220208_213746672.jpg

This image shows what the lift stabilizers will look like. The green lines are hinges and the black lines are 1 inch square tube. I may have to add some diagonal tubing to strengthen the lift stabilizers. The top and bottom horizontal tubing is 4 feet long and the middle horizontal tubing is 3 feet long.
Picture1.jpg

The next two pictures show how the bottom tube of the lift stabilizer is attached to the camper. Notice the tube is offset from the 1.5" tube on the left. This is because my canvas will be attached to the 1.5" tube vertically on the inside. A problem I discovered with this mockup is the tube of the lift stabilizer has a lot to play in it because it is not sitting on anything. Therefore, I plan to flip the hinge so the tube of the lift stabilizer rests on a 1.5" tube. That will be mockup two and has not been created yet.
PXL_20220208_213840762.jpg
PXL_20220208_213826072.jpg
 
Last edited:

1000arms

Well-known member
... Unfortunately it is difficult to see with all the stuff behind the camper. I tried to remove that stuff but I don't have good tools to allow me to modify the pic. ...
Thanks for the update.

Using tarps/sheets/... to hide the background (and isolate the subject of the photo) is something to keep in mind. It might of been more effort than it was worth in this case, but, at other times, it might be someone's easiest and quickest method, even if someone did have the software to digitally remove the background.
 

Forum statistics

Threads
188,395
Messages
2,904,135
Members
230,274
Latest member
mbauerus1
Top