ITTOG
Well-known member
Time: 3 hours
Total Time to Date: 224 hours
Rework: 0 hours
Total Rework to Date: 79 hours (not part of time above)
Current Weight: 651 pounds
Roof: 123 (need to reweigh and add lift support weight)
Camper: 480 (calculated)
Wedge Weight: 48
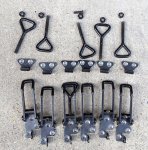
These are the latches I plan to use to latch the roof to the camper. They are way beefier than required but I didn't like they were made to fit only a 4mm bolt. So I drilled them out to accept 6mmx1.0 and beveled the heads so the screws will sit flush and not interfere with the latch. This first pic shows the first one I had converted.

After about an hour I had all of them drilled out and beveled.

Thank goodness for sons. I have been itching for working a little on the camper but knew I wouldn't be able to get the camper of the trailer and turned over. So in comes my son. We have traded roles of providing the muscle around the house. That is probably true even when I haven't had surgery.
I filled in the holes and flaws in the plywood and then sealed it so it doesn't soak in all the epoxy when I fiberglass it.

In order to fiberglass the tub of the camper I needed some walls to lay the glass on. I decided to use, with the help of @AbleGuy, 2" foam board. My tubing is 1.5" thick, thus the inside of the camper will have about 1/2" thick foam over the tubing and 2" elsewhere. This should help reduce condensation with temps in the 20F and higher. Any lower and I will probably see some condensation by the tubing.

In order to install it I used a hot knife to cut out the locations of the tubing. For straight-line cuts it is like a hot knife in butter. But when cutting out the interior grooves it takes a bit more pressure and is a lot slower. But it does work.


Here it is installed and you can see the 1/2" over the tubing.

First piece fully installed. Upon final installation I plan to glue it and fill gaps with expanding foam.


Before I put my camper in storage I put a piece of tubing on the camper with 3M tape, 4991. I affixed the tube around April 10 so it was on the camper almost two months. I used isopropyl alcohol to clean the bare steel and the paint before applying the 3M tape. You will see in the video that the tape came off the paint, without damaging the paint or the tape. I was able to pull it off the bare steel as well but it was more difficult. The first pull in the video is just me pulling with one hand and it passed that test. But when I pushed off the camper with the other hand it came off pretty easily. Thus, this tape probably needs a primer or something to make it work better. I also have 3M 5952 so I need to test it. Hopefully it will work without a primer.
Total Time to Date: 224 hours
Rework: 0 hours
Total Rework to Date: 79 hours (not part of time above)
Current Weight: 651 pounds
Roof: 123 (need to reweigh and add lift support weight)
Camper: 480 (calculated)
Wedge Weight: 48
These are the latches I plan to use to latch the roof to the camper. They are way beefier than required but I didn't like they were made to fit only a 4mm bolt. So I drilled them out to accept 6mmx1.0 and beveled the heads so the screws will sit flush and not interfere with the latch. This first pic shows the first one I had converted.

After about an hour I had all of them drilled out and beveled.

Thank goodness for sons. I have been itching for working a little on the camper but knew I wouldn't be able to get the camper of the trailer and turned over. So in comes my son. We have traded roles of providing the muscle around the house. That is probably true even when I haven't had surgery.
I filled in the holes and flaws in the plywood and then sealed it so it doesn't soak in all the epoxy when I fiberglass it.

In order to fiberglass the tub of the camper I needed some walls to lay the glass on. I decided to use, with the help of @AbleGuy, 2" foam board. My tubing is 1.5" thick, thus the inside of the camper will have about 1/2" thick foam over the tubing and 2" elsewhere. This should help reduce condensation with temps in the 20F and higher. Any lower and I will probably see some condensation by the tubing.

In order to install it I used a hot knife to cut out the locations of the tubing. For straight-line cuts it is like a hot knife in butter. But when cutting out the interior grooves it takes a bit more pressure and is a lot slower. But it does work.


Here it is installed and you can see the 1/2" over the tubing.

First piece fully installed. Upon final installation I plan to glue it and fill gaps with expanding foam.


Before I put my camper in storage I put a piece of tubing on the camper with 3M tape, 4991. I affixed the tube around April 10 so it was on the camper almost two months. I used isopropyl alcohol to clean the bare steel and the paint before applying the 3M tape. You will see in the video that the tape came off the paint, without damaging the paint or the tape. I was able to pull it off the bare steel as well but it was more difficult. The first pull in the video is just me pulling with one hand and it passed that test. But when I pushed off the camper with the other hand it came off pretty easily. Thus, this tape probably needs a primer or something to make it work better. I also have 3M 5952 so I need to test it. Hopefully it will work without a primer.


