Jeepster Commando Build - A Different Sort of Jeep Thing - Stoffregen Motorsports

I figured it would be a refresh thing, but nope. Sometimes I see all of them, sometimes not all are shown. I did change my resize parameters the other day. I wonder...

Thanks.
 
If I hit refresh on the page, different pics are absent every time I refresh. I wonder if the file size is too big, but you'd think the forum would warn me that they were too big.

Thanks.
 
I’m not having any issues seeing all your beautiful work. I love how thought out and simplistic you have made everything. It will be a beautiful build once she is all done


Sent from my iPhone using Tapatalk
 

IdaSHO

IDACAMPER
If I hit refresh on the page, different pics are absent every time I refresh. I wonder if the file size is too big, but you'd think the forum would warn me that they were too big.

Thanks.


It looks like they are hosted on Photobucket.
Photobucket has a pretty ugly history with hosting and use in forums (specifically)
Not sure as of late, if they have changed things... it may just be a temporary hosting issue.

Personally, I prefer Flickr.
Not nearly as social media friendly for rapid hosting/posting, but I've never once had an issue once uploaded.
I don't post a ton of photos at a time though.

Superb build BTW. I enjoy the fab work, and love watching the transformation. (y)
 
Thanks everyone. For many people, gadgets and features make a vehicle more interesting. For me, it's always been simpler is better. Direct your eyes to the important things, instead of to blinking lights all over the dash.

Re- the pics, I've been with Photobucket for so long now that I could hardly justify switching over to another service. I believe that's what they call being hamstrung. I think the problem is on their end, and I'll just sit tight and let them figure it out.

Thanks again.
 
I've been working hard to get the Jeepster body ready to bring to the painter's, so I apologize for the lack of updates.

In the past few weeks, I have finished the dash, firewall and transmission tunnel. We went ahead and built our own custom twin stick shifter for the D300 and attached a nice chrome Lokar shifter handle to the TR4050 trans. The passenger side seat mounting brackets also needed mods to be able to fit over the new transmission tunnel. Everything in that area is tight, but it all fits. Whew...!!!

Other work to the body has been minimal, but I have reshaped the hood to fit tight against the grille, welded up some extra trim and emblem holes (don't worry, we didn't delete all the emblems...) and spent a couple hours tweaking on the body corners where the fenders meet the tub (for tighter fit). I didn't go all Kindig Kustom on gap fitting, but enough to take the "1970s Toledo" factor to a minimum.

One other thing that needs to be done before I can send it off is the air intake tube and air box. Those need to be built ahead of time so I don't have to drill holes in a freshly painted body. You see that a lot of that on "those TV shows" and it always kills me.

Pics coming soon. Thanks!
 
Great. I love when you guys ask for updates. It makes me feel like the time spent compiling pics is not wasted.

Here's a bit of an update. All of the sheetmetal work has been completed, and the body is now back at American Stripping for a final white metal blast and powder coating. The powder is a zinc rich material which will act as the primer, but is also better because it's baked on. Getting it ready for blasting and coating took a long time. Obviously the metal work had to be completed beforehand, but a thorough mock up and more seemingly unrelated fabrication needed to be done to make sure I didn't have to drill or cut holes once the body came back from the paint shop. All of the holes were cut/drilled in the firewall for wiring and plumbing. The transmission and t-case got new, custom shifters which clear the dash and passenger seat (you'll see what I mean in a minute). The air box and intake tube were built along with the power distribution and fuse box brackets and all associated holes were drilled and tabs welded.

Then came final body fit. I mocked up the front clip to get ready for adding the Jeepster eyebrows to the CJ7 grille shell, and while I was there, I found some surprises. The hood had been smashed and repaired at some point, probably decades ago because the paint looked original, which meant that the fit to the grille was horrible. So that had to be repaired. The fenders needed some work too. Filling holes and welding cracks mostly. The once the front end was finished and ready to go, focus was turned to the remaining body panels- the doors, windshield frame and tailgate. The doors were in great shape, aside from a bad repair done years ago to "fix" a torn out window guide hole, but when I got to the tailgate, I was shocked to find that the entire bottom of the tailgate was rotted, and again, the repair looked good at a glance. I figured the tailgate would have been the easiest prep for paint, but after 10 hours or metal replacement, I was proven wrong.

Pics are being compiled on Photobucket as we speak, so give me a few minutes and you'll start seeing some pics.
 
Building the transmission tunnel and floor. I was able to go ahead with part or it without mockup, based on measurements alone. Overall, I don't love the angularity of the firewall, but it really was a tight fit to everything around it. And besides, once the motor is in, you don't hardly see any of it.


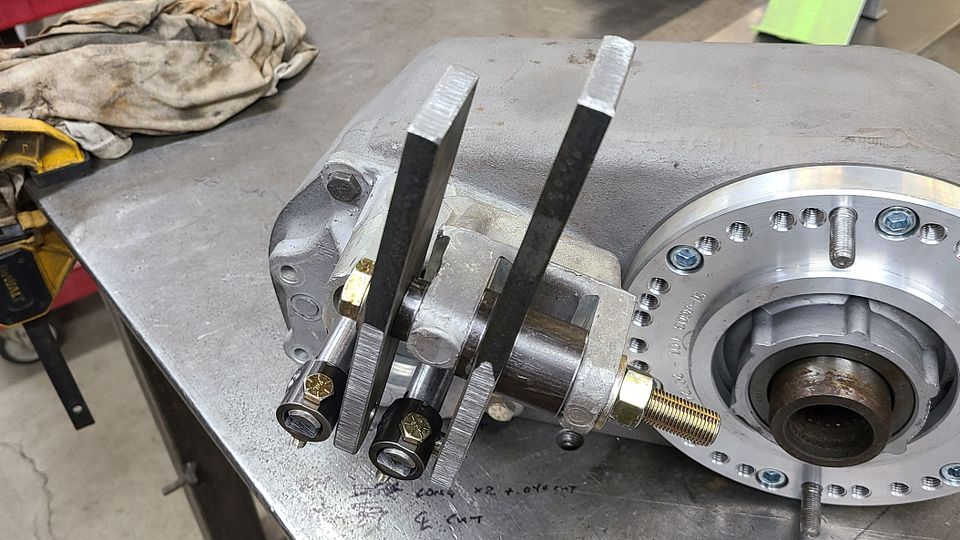
Once the rear section of the floor was in, I could then mockup the transfer case and figure out what to do for the t-case shifter.


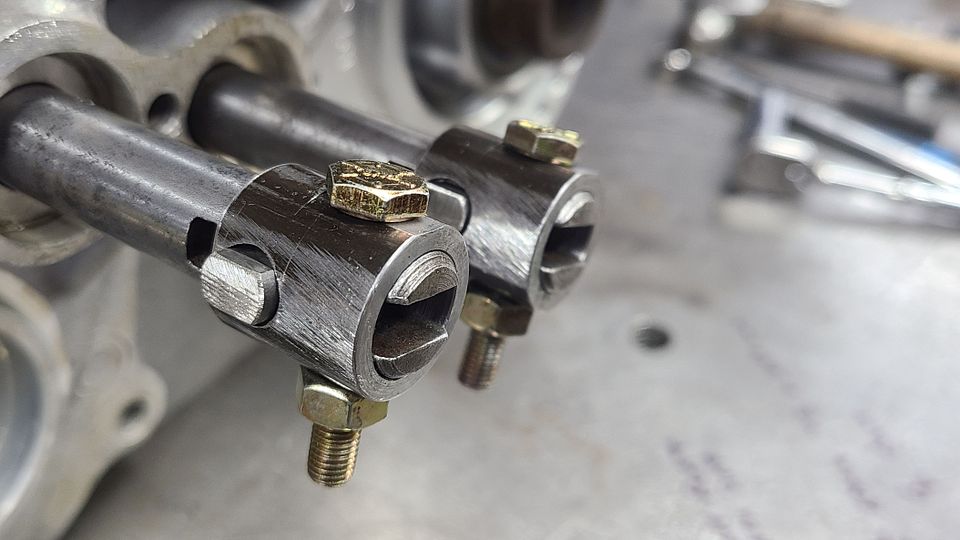
You can see in the previous pics that I ultimately decided to make my own twin stick shifter. The stock stick wouldn't be easily fit around the passenger seat, and the twin sticks currently sold would have to be modified anyway, so here we are. Custom bullet proof D300 twin stick. At this point, the sticks are straight, but you'll see in a few minutes, how they had to be bent to clear the seat.

While I was at it, the transmission shifter needed to be built/modified. The stock TR4050 shifter base is a composite material, and the shifter stick is removeable from it, but you need to drill out the four rivets that hold it in place. Once those are out, then you can remove the stick. The stock stick was heated and bent to the required shape, then machined and drilled/tapped for use with a chrome lever from Lokar.


Next up, fitting the passenger seat.

The shape of the new floor is different from the original. In fact, massively so. The tiny little transmission in the original Jeepster made the original floor pretty flat. Not so with the huge Tremec TR4050. Some measurements were taken and the passenger seat brackets were modified, then the seat was installed to see how it fit around the t-case and its shifter.


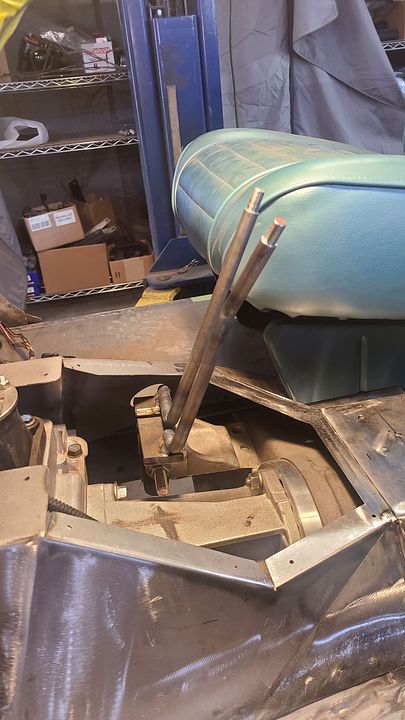
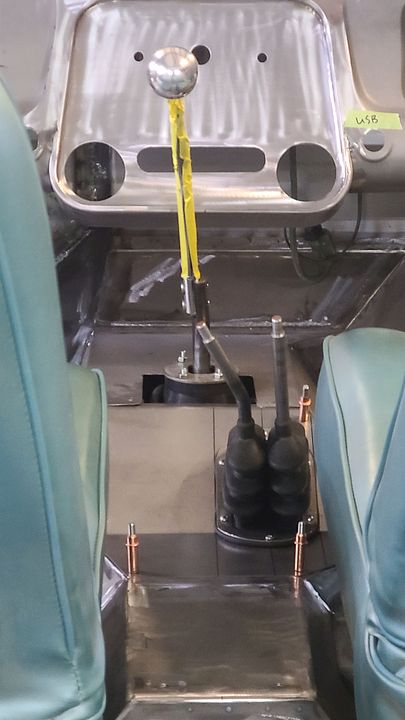
Let's take an aside here. On a normal day, my life is consumed with worry over the ever changing emissions control rules that go into one of my smog legal Toyota Land Cruiser LS swaps. It's always a moving target. So building any emissions exempt vehicle should be a breath of fresh air, right? Back to the Jeepster. At this point in the build, I just needed things to fit, because up to this point, nothing did fit. Everything had to be massively modified to work inside the confines of a small Jeep. So when it came to the t-case shifter, I had it in my brain that this was THE LAST troublesome piece of the Tetris puzzle. Once the passenger seat fit around a working transfer case shift, I could breathe again. Here's what I came up with. You'll see how tight it really is. Remember that the passenger seat has to tilt forward to allow rear seat passengers to get in.


My original plan for the t-case shifter was to have it come up into a flat floor. That didn't happen as the shifter was so far forward that it wanted to compete with the tailhousing of the transmission. So a bent panel was formed with the intention of having the twin stick boot be on an angle. Then that didn't happen. The final result is a bent panel with the shifter hole justified to the front, but also poking up out of the rearward flat portion of the tunnel area.


Anyone who has ever installed a classic Jeep shifter boot will know that the trim rings are flimsy and don't fit well. Anyone who has ever installed a twin stick shifter boot will know that there is no such ring at all. So I made one. Using 14ga steel, so it wouldn't flex too much when fastened down.


When I finally got around to building the sticks for the t-case shifter, I used some solid 1/2" round steel. The ends were machined first so I could tap them to 3/8-24 to fit the ball knobs we're using (there's a story there too). You will see in the pics just how far to the left I had to bend the lower sifter levers. This was to clear the passenger seat and to give me something to weld the sticks to.


Turning attention now to the engine bay. Intake tube and air box, fuse panel bracket and power distribution panel and bracket.

LS crate engines use a 4" intake tube. Some say it is too big for the engine and a smaller one will build more torque, but I've built enough with the larger tubing to know that it's really just splitting hairs. Besides, bigger is better. Everyone knows that. The ideal shape wouldn't lay out properly, so compromises were made and this is what I came up with. You'll also see the fuse panel, right up front for easy access. The power distribution panel also incorporates a breaker for the alternator power cable. That panel is out of plain sight, but nice and close to the battery and still accessible if the breaker ever trips.


Here are some pics of the hood and the damage to the front of the hood. The damage caused there to be a large gap between the top of the grille and the front lip of the hood. I ended up cutting out a section of the nose of the hood and reshaping it. The resulting fit is probably better than when it left Toledo in 1970.

Also, the underside hood structure had to be modified to fit the radiator. And a new hood prop was made too, to fit in the gap between the radiator and grille.


Forum statistics

Threads
188,346
Messages
2,905,922
Members
229,959
Latest member
bdpkauai
Top