JK/JL Jeep Camper Concept

SkiWill

Well-known member
I have been getting a ton of emails and Instagram DMs from people asking if I will be making more of these vehicles and selling them. Man, selling completed vehicles has a lot of logistical and liability issues to work out. I think you are right that plans and maybe selling some components (like the hard to make molded fiberglass parts) could be a good option. I'll think more about it. That could be a reasonable way to get more of them on the road.
And given your background, the ability to put together an appropriate manual for the work would be worth an awful lot too. There are a lot of aftermarket parts that have users manuals and installation guides that could have been written by a middle schooler than doesn't know the difference between a wrench and a screwdriver let alone the cutting tools that this job would require. Speaking of which, including rough cut templates for the vehicle would be a nice touch too.
 

Mules

Well-known member
Roof rack:

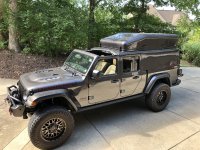
Yup, I usually make my own roof racks. I think I’ve made 5 custom racks over the last 25 years. I went with the Rhino Rack this time for a few reasons. First, because I was making two campers at the same time, I was a little pressed for time, so I figured that modifying an existing rack was probably worth it. There are a lot of reasonable racks out there now-a-days, so I was originally a bit undecided on what rack to get and cut down. Dan previously used a Rhino Rack Pioneer rack on his Australia Gladiator, and it sounded like it held up really well, so that seemed like a good option, and Dan was interested in using a Pioneer rack again (they are a sponsor of his). I really didn’t want to design two different rack mounts for the two vehicles, so we both just went with cutting down the same size Pioneer rack. Our racks and mounts are identical at this point. I had most of the mount part fabrication finished/kitted before Dan got here, but when he arrived, Dan cut down the rack parts on my chop saw and he assembled the racks while I finished fabricating custom aluminum standoffs and custom molded fiberglass seal caps for the mounts. The mounts bolt the racks directly to the roll bar through the jeep freedom panels while the fiberglass seal caps urethane (Korapop 225) bond to the upper freedom panel surface making a weather seal between the mount and the roof. There are actually 4 unused bolt holes in the forward JLU roll bar, so I was able to make mounts that bolted directly to those locations with 3/8” bolts without modifying the roll bar in any way. So far, the mounts seem to be holding up well.

View attachment 787420View attachment 787421

View attachment 787422View attachment 787423
View attachment 787424View attachment 787425
View attachment 787426
View attachment 787427
View attachment 787428
View attachment 787429
Great roof rack installation! I went to great extremes to keep my freedom panels removable in my build.

It probably sounds strange but I would still like a roof rack. Any ideas / thoughts on how to mount a roof rack and have the freedom panels removable underneath?


IMG_6930.JPG
 

86scotty

Cynic
That would be a pretty tall order Mules. Simply no place to attach them. Where there's a will there's a way but you might not like all the wind noise/etc. that a roof rack over an open top works out at speeds over 45 or so.
 

LostInTheWorld

Builder/Traveler
Great roof rack installation! I went to great extremes to keep my freedom panels removable in my build.

It probably sounds strange but I would still like a roof rack. Any ideas / thoughts on how to mount a roof rack and have the freedom panels removable underneath?


View attachment 795586
In an ideal world, I would have liked to have my freedom panels removable still, but I had to drop it as a requirement based on how the camper box integrates anyway, so in the end, I decided to go with a direct load path into the roll bar as the freedom panels were already pinned in place.

In your case, being able to remove the freedom panels with a rack installed might take some thought.

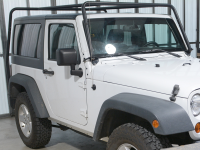
We have a JK as a daily driver, and years ago we put an exoskeleton type rack on it, so we could haul plywood and stuff. It’s been on there for about 10 years now. I don’t love the way that it looks, but it works really well. I’m sure it kills our mileage and there is wind noise, but we are used to it now. It is a direct load path into the body and we can still remove the freedom panels from under it ( I think it is actually taller than it needs to be). Modifying a rack like the one we have on the JK would work for the forward part of your rack, but I’m not sure what you would then do to support the back edge of the rack.
1694626520035.png
 

Mules

Well-known member
In an ideal world, I would have liked to have my freedom panels removable still, but I had to drop it as a requirement based on how the camper box integrates anyway, so in the end, I decided to go with a direct load path into the roll bar as the freedom panels were already pinned in place.

In your case, being able to remove the freedom panels with a rack installed might take some thought.

We have a JK as a daily driver, and years ago we put an exoskeleton type rack on it, so we could haul plywood and stuff. It’s been on there for about 10 years now. I don’t love the way that it looks, but it works really well. I’m sure it kills our mileage and there is wind noise, but we are used to it now. It is a direct load path into the body and we can still remove the freedom panels from under it ( I think it is actually taller than it needs to be). Modifying a rack like the one we have on the JK would work for the forward part of your rack, but I’m not sure what you would then do to support the back edge of the rack.
View attachment 796323
Thanks, I like the exoskeleton idea!

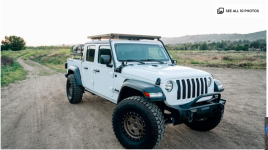
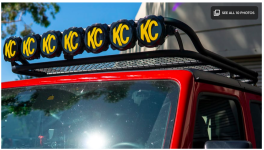
It looks like I'm not the only one that wants to keep my freedom panels operational with a roof rack. Here are a couple examples I found on the internet. I love the cantilevered design below for simplicity but I wouldn't trust it bouncing around on trails with a load on it.

Screen Shot 2023-09-14 at 6.44.21 AM.pngScreen Shot 2023-09-14 at 6.44.03 AM.png
 

LostInTheWorld

Builder/Traveler
Thanks for the reminder @Mules. I’ve been moving along on the project, but I’m quite behind on updating this thread.

I spent a lot of time at the end of the summer picking out appliances, doing internal layout refinement, and trying to figure out the lightest way to build all of the furnishings. I made a lot of composite test samples and decided on an assortment of different composite materials for the inside. I also built a new roof (more on that below).

Appliances and systems:

I got a Dometic front load 46L fridge, a small 600W microwave, a Renogy invertor, 300Ah of Battle Born batteries, a Trelino Evo L separating toilet, a small stainless sink, and a bunch of other stuff…. I also decided to use multiple Scepter water jerry cans packed in a cluster like we did in our trusty old Unimog camper; we liked the ability to remove them one at a time to fill them. Now that I have most of my appliances in-hand, I have started to design and build around them.

Vehicle weight:

A big part of the above activity was more spreadsheet work to track the overall loaded vehicle weight. I iterated a lot of appliance, structure, materials, layout, and systems options to try to get the best utility for the least weight. Right now, I think it will still be under gross weight when fully packed and loaded for travel (including my wife and I). I think that is pretty good, but it has taken excluding some optional “nice to have” items.


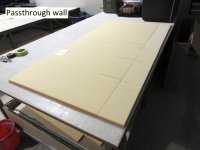
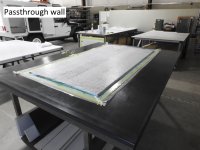
Passthrough wall:

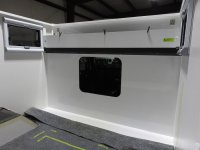
From my spreadsheet work I noted that small area density changes in the larger panels/parts quickly had a positive impact on overall weight, so for that reason, I ended up making more parts out of carbon fiber than I originally expected (the cost difference was reasonable). For a long time, I was undecided if I wanted the forward end of the habit to be a wall with a passthrough, leave the cab and habitat open to each other, or just use some type of curtain to block off the cab. Because we want to be able to use this camper in colder locations (Canda/Alaska or maybe someday Iceland), I decided to go with a fully insulated wall to keep the habitat warm. Having a wall also made a nice boundary along one side of the bed. I positioned the wall to allow a comfortable front seat position (with margin) while not using up too much of the habitat volume. The wall also might help block annoying rattling sounds from the habitat while driving. I made the wall from vacuum bagged carbon fiber with a Divinycell PVC foam core (R-value of about 4.5). The passthrough opening will have a thick insulated quilt cover Velcro-ed over it when cold (my wife and I are thinking of using Insul-Bright for the passthrough cover insulation).

I incorporated a shelf at the top of the passthrough wall that I designed to securely hold five zipper bags for our clothing. The shelf was also a nice way to insulate and enclose the roll bar. I made the shelf out of carbon fiber sheets that I molded on my flat layup table. I also installed two USB changing outlets in the face of the shelf for charging things and running small USB reading lights (there are a lot of cool USB lights available now).

Interior structure:

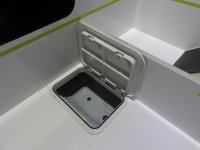
I’ve started to bond in the internal camper structure, and I put a marine deck hatch in the floor to access underfloor storage. I plan to put heavy things like tools, recovery gear, and canned food under the floor to keep the center of gravity low. Note: The dinette/bed is in the front of the habitat and the kitchen is in the driver side rear corner opposite the entry door.

Roof:

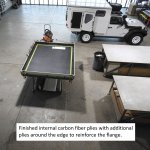
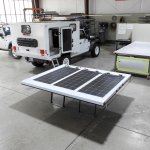
After much debate, I made a new carbon-fiber/foam composite sandwich roof. The original honeycomb cored fiberglass roof with aluminum outer frame that I made in the spring was fine, and it worked well, but I wanted to see if I could reduce the roof weight and simultaneously increase thermal insulation. The roof is a large percentage of the camper surface area, so increasing the roof thermal R-value is a good way to increase the overall camper cold weather comfort.

The new roof turned out 28.2% lighter than the original roof and the R-value is now around R4.5. It was a lot of fabrication time, but I think it will be worth it when traveling and camping in colder locations/seasons.

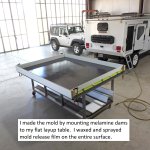
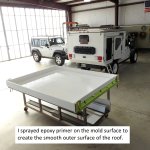
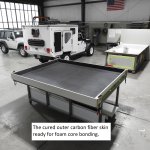
I made the new roof using two types of epoxy resin, three types of carbon fiber, and Divinycell foam core. The following are some labeled roof fabrication photos that I posted on Instagram a bit ago (the Renogy solar panels are just sitting on the roof right now).

New roof build photos:
20231212 (1).JPG

20231212 (2).JPG

20231212 (3).JPG

20231212 (4).JPG

20231212 (5).JPG

20231212 (6).JPG

20231212 (7).JPG

20231212 (8).JPG

20231212 (9).JPG
 
Last edited:

Mules

Well-known member
Love the storage bags above the passthrough! These are easy to carry in/out and label. I use similar ones for Kitchen supplies, one for dry goods, one for my outdoor fire supplies (hatchet, lighter fluid, some charcoal, and one for my toiletries.

I also like the idea of using 5 gallon Sceptor water containers, instead of built in tank. They're easy to carry to the water source (river) and easy to clean out periodically.

Great idea on integrating a microwave. I think a kitchen layout change is in my future.

Oh, and the flexible solar panels are the icing on the cake!

You are definitely a Master Craftsman. Thanks for posting the photos.
 
Last edited:

canyonmann

New member
This is a travel rig concept that I've been working on in the background for the last few years. We are considering building it to fill the place of our trusty old Unimog that we built in 2017-2019. This would be a vehicle for my wife and I to travel in for moderate length overland trips (destinations TBD).

We’ve had and used a lot of travel/camping setups over the years (LMTV, Unimog, Pinzgauer, Jeeps, RTTs, trailers, VW, car camping, backpacking…), and lately I’ve been feeling like “less is more”, but we do want to be comfortable, so we made a list of must have features, and this little rig pretty much does it for us. It’s a nice little camper.

The habitat has a large passthrough to the cab. There is a 4' by 6'2" bed side-to-side in the front of the habitat (behind the passthrough) that is convertible to a dinette/office. We’ve been happy with that bed size before in some of our other rigs. There is a small kitchen (with stove, fridge, and sink) across the back wall and a composting toilet in a small bathroom opposite the habitat door. It would have a diesel heater and water filtration. This is a pop top with standing height, and you can sleep with the top down if the weather is bad or when camping in the city when a little more camping discretion is needed. It fits nicely in a sea container to be shipped overseas if desired.

Shown here it is incorporated into a 4-door Jeep Unlimited JKU with the back of the body removed. Professionally, I’m a vehicle design engineer, certified welder, composite fabricator, and machinist, so building this rig would be within my normal experience range. There are certainly benefits to other chassis, but for the price, a Jeep JK or JL as a base vehicle is pretty appealing. We’ve owned several JKs, and we have liked them pretty well (there is one sitting in our driveway right now). They are reasonably priced, there are lots of parts and accessories available, and it would be nice to have cruise control, airbags, and air-conditioning.

I have designed the habitat to be a light-weight composite sandwich shell with several molded fiberglass parts. I have very carefully set up a weight and center of gravity spreadsheet, and this setup (including all of our normal travel gear and cargo) would work with the gross weight of a JK or JL Jeep with margin (it would also work fine on a Land Rover Discovery, a G-Wagon, or a Land Cruiser). I have seriously considered a diesel G-Wagon option as an alternative to the Jeep, and it’s mechanically appealing, but the price is significantly different. I’ve also considered the JT Renegade, but we want a 2-door vehicle, the JT is actually longer than I want, and I don’t want to deal with the displacement between the cab and habitat from twist of the longer JT frame.

It's just a concept, but I'd like to get input from you. What do you think?

I’m not sure what the timing of this project will be, but I’ll document the build in detail on our Wabi-Sabi Overland blog and Instagram.

Michael

P.s. I realize it is functionally similar to the AEV Outpost II, and I’ve chatted with Dave at AEV about my concept.
View attachment 695848

View attachment 695850
Ill never get to me I would just build purchase whatever an small overlanding camper. No need to heavily modify a vehicle. I have a rock crawler and there are plenty of beautiful places you can take a camper. Camp at the trail head and then unhook and explore. I use my overland camper as a hotel room when I travel and I can commute to work in the tow vehicle. I understand that what you want is not what I want. The campers small overlanding campers are very capable. Its kind of like a rooftop tent. You go to camp setup and if you need to run down to the river youve got to pack up again. Everywhere you go in that jeep it is now a dedicated vehicle pulling carrying all that extra weight and fuel costs. Expedition or Mission oe kingdom Camping have some very capable pull along overlanding campers.
 

mog

Kodiak Buckaroo
Ill never get to me I would just build purchase whatever an small overlanding camper. No need to heavily modify a vehicle. I have a rock crawler and there are plenty of beautiful places you can take a camper. Camp at the trail head and then unhook and explore. I use my overland camper as a hotel room when I travel and I can commute to work in the tow vehicle. I understand that what you want is not what I want. The campers small overlanding campers are very capable. Its kind of like a rooftop tent. You go to camp setup and if you need to run down to the river youve got to pack up again. Everywhere you go in that jeep it is now a dedicated vehicle pulling carrying all that extra weight and fuel costs. Expedition or Mission oe kingdom Camping have some very capable pull along overlanding campers.
Perhaps I am mistaken, so even though the OP stated he is building a specific vehicle for a specific type of travel for himself based on his decades of experience custom building and traveling in those vehicles, your reply is you would do something different? If that is the case, it will be very time-consuming posting that 'I'd do something different' on the hundreds of build threads here on the Expo Portal. Given this is your very first post, perhaps you are unaware that you can start your own thread, with exactly what you would build/use etc by using the
pt.pngin the upper right corner of forum sections on the Expo Portal. it will give you a dropdown menu to which section you would like to start it in.
 

Forum statistics

Threads
188,359
Messages
2,903,712
Members
230,227
Latest member
banshee01
Top