bigwapitijohnny
Adventurer
My ‘journey’ began in March following the acquisition of my 4runner in January. I was fortunate enough to find various forums, like this one, with information regarding options for bumpers. After mulling it over, I called Jed Hemming at ARMOROLOGY and talked to him for quite sometime regarding the fabrication process. I was drawn to his work due to his clean lines and his weld beads that resembled a ‘roll of nickels’. I had seen some of his work on several 4runners and Tacos (Ric, ‘Spindleshanks’, and ‘Crux’), and inquired about fabricating a front bumper.
I realized immediately that he was quite knowledgeable and initially seemed that his prices seemed a ‘tad’ high. However, after pricing other bumpers / options (custom fabrication work in K.C. (BruceTS style), ARB tacoma bumper with modified frame caps, TJM, Shrockworks, Rockware, etc.), Jed’s prices were similar with the others. Also, his bumper would not be sheets of steel that are break formed for strength, rather it would be a box / beam style that used all possible mounting points of the frame, thus resulting in a bumper that was stronger. Also, it would be totally custom, an original, and I would have as much input into the build that I wanted.
I am a maniac about research, and came up with a design that I wanted. It is a hybrid of the ‘Sonoran steel’ style hoops combined with the stinger of ‘Ric’ and ‘Spindleshanks’ rig and here is the ‘photochop’ of my design. THANKS RIC FOR THE TEMPLATE!
I am truly a blessed man who is married to the most awesome woman in the world. After discussing my project with my wife, she remarked “WHY DON’T YOU GO AHEAD AND GET THE REAR BUMPER DONE AS WELL?” Schaaweet! I wanted the rear bumper to house some backup lights, as well as, wield a tab for my Firestik antenna. I was particularly fond of the rear bumper of Albuquerque Jim’s. I love the functional rear lights that were incorporated into his bumper and thought this would be very useful for me out in the field. THANKS JIM FOR THE IDEA!

Anyway, I emailed all of these pictures to Jed, and he said that this would be no problem to do all of this. Side note: Jed does not ship his bumpers :shake:, all of his work is done while the vehicle is in his shop. His rationale is due to the fact that not all Toyota bumpers are mounted exactly the same from the factory :headscratch:, and he has to ‘tweak’ the mounting points every time for a solid custom fit (This discrepancy was true to form, and it took quite sometime for him to get it right on my rig – if I can recall, it took several hours to get this just right). If he would ship, he would have more work than he can think of, however, the quality control would be out the window…I can respect a true craftsman and his convictions about quality.
After weighing my options, I decided to go for it and scheduled a time in July. I was somewhat unsure of how this was going to work, being that I was about 600 miles away. However, he assured me that with pic attachments (email), phone calls and time, this would not be an issue at all. So I dropped my rig off and flew back to KC and watched this thing unfold. By the way, the day that I dropped off the truck, Jed had blocked off the entire day for us to discuss every detail of the project. I don’t think that too many fabricators would take that time to do this. If there are, MORE POWER TO YA! He had a customer (Doug – a.k.a. hhog4dc) drive his 4runner over, so I could visualize the rear bumper and decide on what options I wanted to go with.
On to the pics of the finished product...


As you can see, it is dead on of my 'photochop' design. My expectations were exceeded on every aspect of this project. Here are the specifics of what I did...
Winch with synthetic line: Went with the Warn® 9.5ti (# 67550) and 3/8” winchline – 100 ft (VTL38100+WST-WL) with the safety thimble. I also found a hockey puck, bored it out, and put it on to avoid scratching the fairlead plate (not bad for .99)...


Lights: Yeah, my initial photoshop pic was quite ambitious with the lights. I KNOW. I chose the Lightforce[sup]TM[/sup] Styker 170s (RMDL 170) for my auxiliary lighting due to their toughness, reputation for quality, and the ability to change the light pattern / color by switching lens covers. One ‘drawback’ is that these lights are quite sizeable, this proved to be the most challenging issue that we faced.

For the backup auxiliary lights, I went with the Optilux built-in work lamps (#HL88708). They are a 37.5 watt halogen bulb with a free-form reflector. The great thing about these is that they fit ‘flush’ inside the bumper. Clean and simple.

Firestik antenna: Got the 4’ Firestik® II ‘FS’ series antenna (FS4-B), Fire-Flex® COAXIAL CABLE ASSEMBLY w/Low-Profile Fire-Ring and Stud (K4-8R18), Heavy duty spring (SS-3H), and Match-MakerTM CB/AM/FM CB Antenna Splitter (AR-1A). I have not had the opportunity to hook this up yet. I am still deciding on what CB to buy…
I found a Military Specification Buna-N Rubber Grommet (9307K36) from McMaster-Carr that the coax would fit into as well as be weather resistant for quite some time (Temperature range is -45° to +250° F). Again I ask, isn't it all about the details?...

I did not like the ‘action’ of the antenna on the spring, it tended to whip around especially in high winds and on the highway. I also did not want to utilize a tennis ball to protect the antenna from slapping the truck; rather, I found that the barrel de-resonator (Small - # 12051), from Sims Vibration Laboratory, fits the Firestik® II perfectly. It is made of NAVCOM material and it does the trick, and looks alot cleaner I think...

In conclusion, I am so grateful that I went with Armorology. This was the BEST option for me, and if I had to do it again, I would WITHOUT any hesitation. Please note, I was not given any 'DEAL' in exchange for this write-up. I just felt compelled to let everyone know what kind of service, and attention to detail you will get at Armorology. The value of my hard earned dollar was far greater than anywhere else that I could find. Jed is a talented fabricator with a discerning eye for what looks best. The amount of time involved, as well as the correspondence, was well worth it. This process is not for everyone. However, if you are a discriminating person who wants only the best for your rig, this is one of your best options. Not only did I find an excellent fabricator, I feel as though I have made a friend as well.
Regards,
BWJ
I realized immediately that he was quite knowledgeable and initially seemed that his prices seemed a ‘tad’ high. However, after pricing other bumpers / options (custom fabrication work in K.C. (BruceTS style), ARB tacoma bumper with modified frame caps, TJM, Shrockworks, Rockware, etc.), Jed’s prices were similar with the others. Also, his bumper would not be sheets of steel that are break formed for strength, rather it would be a box / beam style that used all possible mounting points of the frame, thus resulting in a bumper that was stronger. Also, it would be totally custom, an original, and I would have as much input into the build that I wanted.
I am a maniac about research, and came up with a design that I wanted. It is a hybrid of the ‘Sonoran steel’ style hoops combined with the stinger of ‘Ric’ and ‘Spindleshanks’ rig and here is the ‘photochop’ of my design. THANKS RIC FOR THE TEMPLATE!
I am truly a blessed man who is married to the most awesome woman in the world. After discussing my project with my wife, she remarked “WHY DON’T YOU GO AHEAD AND GET THE REAR BUMPER DONE AS WELL?” Schaaweet! I wanted the rear bumper to house some backup lights, as well as, wield a tab for my Firestik antenna. I was particularly fond of the rear bumper of Albuquerque Jim’s. I love the functional rear lights that were incorporated into his bumper and thought this would be very useful for me out in the field. THANKS JIM FOR THE IDEA!
Anyway, I emailed all of these pictures to Jed, and he said that this would be no problem to do all of this. Side note: Jed does not ship his bumpers :shake:, all of his work is done while the vehicle is in his shop. His rationale is due to the fact that not all Toyota bumpers are mounted exactly the same from the factory :headscratch:, and he has to ‘tweak’ the mounting points every time for a solid custom fit (This discrepancy was true to form, and it took quite sometime for him to get it right on my rig – if I can recall, it took several hours to get this just right). If he would ship, he would have more work than he can think of, however, the quality control would be out the window…I can respect a true craftsman and his convictions about quality.
After weighing my options, I decided to go for it and scheduled a time in July. I was somewhat unsure of how this was going to work, being that I was about 600 miles away. However, he assured me that with pic attachments (email), phone calls and time, this would not be an issue at all. So I dropped my rig off and flew back to KC and watched this thing unfold. By the way, the day that I dropped off the truck, Jed had blocked off the entire day for us to discuss every detail of the project. I don’t think that too many fabricators would take that time to do this. If there are, MORE POWER TO YA! He had a customer (Doug – a.k.a. hhog4dc) drive his 4runner over, so I could visualize the rear bumper and decide on what options I wanted to go with.
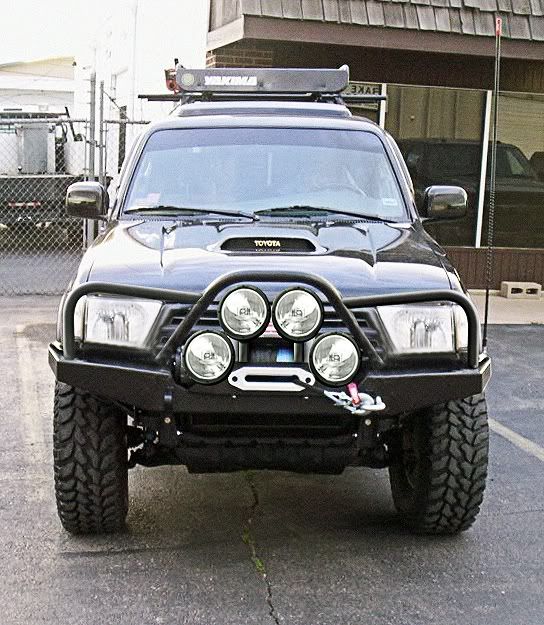
On to the pics of the finished product...
As you can see, it is dead on of my 'photochop' design. My expectations were exceeded on every aspect of this project. Here are the specifics of what I did...
Winch with synthetic line: Went with the Warn® 9.5ti (# 67550) and 3/8” winchline – 100 ft (VTL38100+WST-WL) with the safety thimble. I also found a hockey puck, bored it out, and put it on to avoid scratching the fairlead plate (not bad for .99)...
Lights: Yeah, my initial photoshop pic was quite ambitious with the lights. I KNOW. I chose the Lightforce[sup]TM[/sup] Styker 170s (RMDL 170) for my auxiliary lighting due to their toughness, reputation for quality, and the ability to change the light pattern / color by switching lens covers. One ‘drawback’ is that these lights are quite sizeable, this proved to be the most challenging issue that we faced.
For the backup auxiliary lights, I went with the Optilux built-in work lamps (#HL88708). They are a 37.5 watt halogen bulb with a free-form reflector. The great thing about these is that they fit ‘flush’ inside the bumper. Clean and simple.
Firestik antenna: Got the 4’ Firestik® II ‘FS’ series antenna (FS4-B), Fire-Flex® COAXIAL CABLE ASSEMBLY w/Low-Profile Fire-Ring and Stud (K4-8R18), Heavy duty spring (SS-3H), and Match-MakerTM CB/AM/FM CB Antenna Splitter (AR-1A). I have not had the opportunity to hook this up yet. I am still deciding on what CB to buy…
I found a Military Specification Buna-N Rubber Grommet (9307K36) from McMaster-Carr that the coax would fit into as well as be weather resistant for quite some time (Temperature range is -45° to +250° F). Again I ask, isn't it all about the details?...
I did not like the ‘action’ of the antenna on the spring, it tended to whip around especially in high winds and on the highway. I also did not want to utilize a tennis ball to protect the antenna from slapping the truck; rather, I found that the barrel de-resonator (Small - # 12051), from Sims Vibration Laboratory, fits the Firestik® II perfectly. It is made of NAVCOM material and it does the trick, and looks alot cleaner I think...
In conclusion, I am so grateful that I went with Armorology. This was the BEST option for me, and if I had to do it again, I would WITHOUT any hesitation. Please note, I was not given any 'DEAL' in exchange for this write-up. I just felt compelled to let everyone know what kind of service, and attention to detail you will get at Armorology. The value of my hard earned dollar was far greater than anywhere else that I could find. Jed is a talented fabricator with a discerning eye for what looks best. The amount of time involved, as well as the correspondence, was well worth it. This process is not for everyone. However, if you are a discriminating person who wants only the best for your rig, this is one of your best options. Not only did I find an excellent fabricator, I feel as though I have made a friend as well.
Regards,
BWJ
")


