I wanted to mount a shower tent on the driver’s side of the shell and move the Kammok awning off the roof to a lower position where I could reach it standing on the ground.
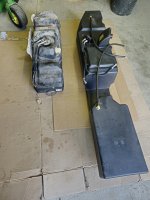
At Christmas I ordered myself a Kakadu shower / instant hot water heater and their shower tent.
To date I have only tested the water heater in the house but in the on-line reviews it sounds like the propane system will work at 10,000-foot altitude.
I haven’t figured out how to test the high-altitude function in Ohio as our highest elevation is only 1,549 feet, I guess a trip to Rocky Mountains is called for…
Watching YouTube and reading on-line forums it seemed like adding a track system to the side of the camper would be a good solution for the mounting.
There are several systems that utilize tracks on pickup bed racks where a hanger bar spans the gap from the top of the bed rail to the upper rail of the rack.
Also, Grenadier has L-track attached to the side of their vehicles for similar accessory mounting.

Andrew of 4X Overland fame has been adding Fount Runner Universal Tracks to the side of his Toyota Land Cruisers, I think the intended use for these tracks is on the roof as a base for a roof rack.
This seems like a good system to copy, the hanger bars to mount the accessories need to be custom made but they are easy enough to fabricate.
The L-track (the extruded aluminum track with the half circles) would be the less expensive system but attaching to the L-track is not straight forward.
Also, I have to wonder if the L-track makes noise at freeway speeds.
I ended up ordering the Front Runner Universal Track in both 1400 mm and 1800 mm lengths.
Theoretically the Front Runner track is easy to attach to, you slide a bolt into the track, add your accessory and attach it with a nut, the track will hold the bolt from rotating as the nut is tightened.
I ended up ordering 4 set of bolts before getting it almost right, two sets off the Front Runner web site and two sets off McMaster Carr.
In the end a metric M12 bolt head is the right width across the flats but the head is too thick, I ground the heads down and painted the back side.
At first I was considering mounting the tracks to the vertical frame members of the shell but then it occurred to me I could simply mount the track along the edge trim of the shell into the horizontal top and bottom frames of the shell.
And the Front Runner track color matched the trim on my shell, it almost looks like I planned it.
I marked, center punched and pilot drilled the hole locations, then opened them up to the final size, deburred the outside with a countersink and the inside with a burr in the dermal.

Because of the thickness – frame pipe wall, VHB tape, outer skin, another VHB tape and the trim – I used plus nut rivet nuts to mount the trim.
The plus nuts are more amenable to variation in thickness and when set the legs of the “plus” will hit the wall of the square tube they are in as extra protection to prevent rotation of the rivet nut.

For the hanger bars I ordered some ¾” X 1 ½” rectangular steel tube, planning to make ends from 1/8” plate so I could keep the hanger bars tucked in close to the side of the shell.
However, I received a notice that the order would be delayed 3 weeks for whatever reason, so I dug around in the eternally delayed project stockpile of steel tubing and found some 1” X 2” 0.120 wall tubing (originally purchased to fix the sliding man door on the stock trailer).
This stuff is way overkill for the weight that will hang on them - the weight of the hanger bars is close to the weight of the shower tent, but it was available without delay.
Thinking this set of hanger bars would be temporary until I circled back to re-make the hanger bars from the ordered material, I simplified the design to just a 30 degree angle cut, weld some caps on and drill holes from opposite sides.
(The ordered material arrived and was immediately placed in the eternally delayed project stockpile)

I dug the remnant of the pipe out of the scrap pile for this picture, the cut pipes where soaked in vinegar for 2 days to remove the mill scale and rust.
It works a treat with just a little rub with a Scotch Bright pad.

I added 1” plastic plugs for the large holes and the shower tent was moved up from the initial placement, so I added some push pins to plug those holes (it looks like it was designed to be adjustable – as opposed to being designed and then adjusted).
However, the hole saw cut a little large so I used grip glue (for holding handle grips on motorcycle handlebars) to make sure they don’t pop out (for this project my 1” hole saw cut threw a combined 2.5” of steel, so I’m not surprised it’s cutting large).

 I have a fear that at interstate speeds the tubing will whistle, that is why the ends are capped and welded and the holes plugged, but it also helps to give it a clean look.
With the awning at a reasonable height, I think it will get used a lot more.


For the shower tent my wife found a duckboard at Cost Co (with the old free standing shower tent she would hunt around to find flat rocks to stand on).


 View attachment 847085